Traditionally, event receivers in SharePoint have been used for a wide range of purposes in business solutions, from sending out email or spawning announcement notifications, to data validation, to canceling a current user action and redirecting him to another action. Event receivers are often used simply for logging or tracking documents in a library for reporting purposes. The new remote event receivers take nothing away from the multiplicity of ways developers can employ them. But more importantly they comply with the objectives of the new app model to move the execution of developer code outside of SharePoint and provide a consistent programming and run-time experience on-premises and across SharePoint Online. Because the remote event receivers run off-box from SharePoint, you do not need to install .dlls for event receivers on the SharePoint server. Also, unlike the SharePoint Online sandbox environment, your event receiver is no longer required to complete within 30 seconds and you can now call out to as many external services as needed to support the work required for an event to logically be completed.
However, keep in mind that event receivers were not intended to be depended upon as a mechanism to build a transactional system. These are not wrapped in a transaction framework of, say, a begin and an end commit. So use them wisely and be careful to try not to coerce them into high-value, mission-critical, transactional scenarios they were not meant to be used for.
In the following Try It Out you build a simple RER for Office 365 SharePoint Online to see how event receivers are constructed using Visual Studio and get a sense for how these remote events work.
For this activity you will use your Office 365 tenancy to deploy two lists and exercise a remote event receiver. The remote event receiver web service is autodeployed to Windows Azure, and OAuth is used for the RER to call back into SharePoint Online to log an entry in another list.
1. Run Visual Studio 2012 as Administrator. Select New Project.
2. In the New Project dialog, expand the Templates ⇒ Visual C# ⇒ Office/SharePoint ⇒ Apps nodes. Select App for SharePoint 2013 and provide the name: C12RERO365. Click OK.
3. In the Specify the name for your app for SharePoint settings dialog, set the SharePoint site URL you will deploy the app to and choose SharePoint-hosted as the location to host your app for SharePoint. Click Finish.
4. Right-click on the C12RERO365 project node in Solution Explorer and select Add ⇒ New item.
5. Select List, provide the name, ListToFireEvents, and click Add.
6. In the Choose List Settings dialog, select Create a non-customizable list based on an existing list type of, select Custom List from the drop-down list, and click Finish.
7. Right-click on the C12RERO365 project node in Solution Explorer and select Add ⇒ New item.
8. Select List, provide the name, RemoteEventLog, and click Add.
9. In the Choose List Settings dialog, select Create a non-customizable list based on an existing list type of, select Custom List from the drop-down list, and click Finish.
10. Right-click on the project node in Solution Explorer and select Add ⇒ New item.
11. Select Remote Event Receiver, leave the default name of RemoteEventReceiver1, and click Add.
12. In the Choose Event Receiver Settings dialog, select List Item Events for the type of event receiver you want and Custom List for the event source. Click An item is being added and then click Finish.
13. Visual Studio automatically adds C12RERO365Web, a Web project to host your remote event receiver. In the C12RERO365Web project locate the RemoteEventReceiver1.svc node that was added. This SOAP-based web service is the endpoint for receiving the SharePoint events remotely. Right-click on the RemoteEventReceiver1.svc node and select View Code if the file is not already open in Visual Studio.
14. Delete the following lines from the code:
using (ClientContext clientContext =
  TokenHelper.CreateRemoteEventReceiverClientContext(properties))
  {
    if (clientContext != null)
       {
          clientContext.Load(clientContext.Web);
          clientContext.ExecuteQuery();
       }
  }
15. In the exact location you deleted the above code, insert the following:
            // Do not log events written to the remote event log list
            string RemoteEventListTitle = "RemoteEventLog";

            // Check to see if it is an event on the RemoteEventLog that fired
            // and return if so.
            // You do not want to log these events and an infinite loop would occur
            // as well.
            if (string.Equals(properties.ItemEventProperties.ListTitle,
 RemoteEventListTitle, StringComparison.OrdinalIgnoreCase))
                return result;

          // Evaluate the type of event and perform an edit and respond accordingly.
          switch (properties.EventType)
          {
                case SPRemoteEventType.ItemAdding:
                    if (string.Equals(properties.ItemEventProperties.AfterProperties
["Title"].ToString(), "TestCancel", StringComparison.OrdinalIgnoreCase))
                    {
                        result.ErrorMessage = "Title cannot be 'TestCancel'.";
                        result.Status = SPRemoteEventServiceStatus.CancelWithError;
                    }
                    else
                    {
                        // Retrieve and write the remote events logging list
                        // for the adding event.
                        using (ClientContext clientContext =
TokenHelper.CreateRemoteEventReceiverClientContext(properties))
                        {
                            clientContext.Load(clientContext.Web);
                            clientContext.ExecuteQuery();
                            List myEventLogList =
clientContext.Web.Lists.GetByTitle(RemoteEventListTitle);

                            try
                            {
                                // Add the event entry to the EventLog list.
                                string myItemTitle = "Remote event logged: "
+ DateTime.Now.ToString(" yyyy/MM/dd-HH:mm:ss") + ", Event type: "
+ properties.EventType.ToString() + ", Title: "
+ properties.ItemEventProperties.AfterProperties["Title"].ToString();
                                ListCollection myLists = clientContext.Web.Lists;
                                List myRemoteEventList =
myLists.GetByTitle(RemoteEventListTitle);
                             clientContext.Load<ListCollection>(myLists);
                             clientContext.Load<List>(myRemoteEventList);
                             ListItemCreationInformation listItemCreationInfo = new
ListItemCreationInformation();
                                var listItem =
myRemoteEventList.AddItem(listItemCreationInfo);
                                listItem["Title"] = myItemTitle;
                                listItem.Update();
                                clientContext.ExecuteQuery();
                            }

                            catch (Microsoft.SharePoint.Client.ServerException)
                            {
                                // If a SharePoint server error occurs, return.
                                return result;
                            }
                        }
                    }
                    break;
            }
16. Right-click on the AppManifest.xml file in the C12RERO365 project in Solution Explorer and select View Code.
17. To make testing the remote event receiver more convenient, you can set the app to start on the list page by changing the StartPage element in the manifest to the following:
<StartPage>~appWebUrl/Lists/ListToFireEvents</StartPage>
18. In the Solution Explorer, right-click on C12RERO365 and select Deploy. (Not F5. The Autohosted Web service must be fully deployed to Windows Azure.) When the browser launches the trust request page, click Trust It.
19. On the ListToFireEvents page, add a new item to the list and click Save.
20. After adding the item, go to the address bar in your browser and click in the bar so the cursor is at the end of the URL. Delete everything back to …/Lists/. Following the slash (/), type RemoteEventLog and press Enter so the browser navigates to the remote event log list. You’ll see the list item that wrote back to SharePoint using CSOM from within the remote event receiver web service.
21. Using the browser’s back button, navigate back to the ListToFireEvents. Add another new item, but title it TestCancel, and click Save. Since there is logic in the remote event to not allow an item with this specific title, an error message is being returned to the user. Go ahead and cancel out of the add, or change the title and choose to save. In either case, you can again navigate to the RemoteEventLog list and see that the item with a title of TestCancel was not added.
Synchronous “-ing” actions, adding, deleting, updating, in SharePoint must use the ProcessEvent method. The “-ed” events, those that have already added, updated, deleted, can also use the ProcessEvent if you want synchronous processing for your code or they can use the ProcessOneWayEvent method. Keep in mind, “-ed” events with synchronous processing, by definition, cannot be canceled because the action has already happened in SharePoint. Asynchronous “-ed” events that use the ProcessOneWayEvent method can be a fire-and-forget asynchronous action. You can also choose to call back into SharePoint after your code actions complete. What’s important to note is that the ProcessOneWayEvent method does not hang the UI waiting for your code to complete so you can have long-running processes that are initiated by a SharePoint event if you need to.
Before you ran the code you made a configuration change to the manifest file to set the start page. By default, the starting page is set to Default.aspx but in your case you wanted the starting page to be the ListToFireEvents page.
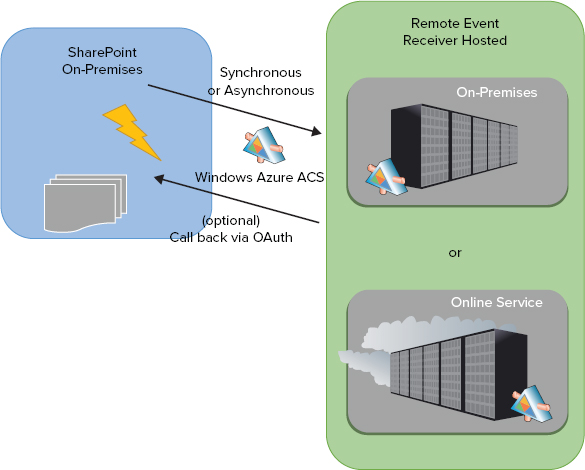
Remote event receivers follow the typical three patterns for authentication that are used for Autohosted and SharePoint-hosted Apps for SharePoint: on-premises only, in the cloud only, and hybrid where part is on-premises and part is in the cloud. Remote event receivers only need to be concerned about authentication if they need to call back into SharePoint to perform some action on SharePoint. If your remote event receiver is of the fire-and-forget model, or if you are simply performing a validation and optionally cancelling an event, you do not need to be concerned with authentication in your code, but the manifest does need to have the correct designation. Figure 1 shows the on-premises-only and cloud-only configurations as well as the appropriate authentication used by the remote event receiver if your code needs to call back into SharePoint.
FIGURE 1
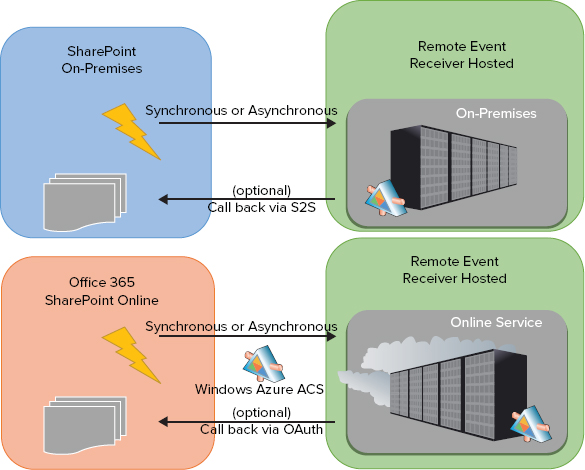
Some enterprises that have their SharePoint site on-premises will choose to be configured for a hybrid environment where their remote event receivers may reside either on internal servers or in the cloud. In this case the enterprise might want a single authentication method and programming model for its remote event receivers that will work equally well regardless of where the remote event receiver is hosted. To accommodate this, the enterprise must follow the Microsoft-provided guidance to configure SharePoint to use Windows Azure Access Control Services (ACS) as the authorization service and expose the appropriate endpoints for SharePoint and any internally hosted remote event receivers to the public Internet. ACS must be able to access these endpoints to provide the needed authentication via OAuth. Figure 2 shows this hybrid pattern.
FIGURE 2
Although you have the opportunity to call back into SharePoint to do additional work within the app web, host web, or elsewhere depending on your app’s permissions, sometimes you might simply want to make some alterations on the list item and its properties that are currently being processed in the ProcessEvent method. You can do this by evaluating any value passed in on the properties object and then use the SPRemoteEventResult object and its ChangedItemProperties object to pass your alterations back to SharePoint.
For instance, you can use the properties.ItemEventProperties.AfterProperties object in your validation logic to assess whether the incoming values are as you expected them to be. Once you make any changes to your result object this will be passed back to SharePoint. SharePoint will update the list columns accordingly.
The following Try It Out walks you through using the SPRemoteEventResult object. Additionally, you will see in this example that because your app does not explicitly need to call back into SharePoint to read/write data, there is no need to use the TokenHelper class in your code.
TRY IT OUT: Creating a Remote Event Receiver for a Document Library and Content Type (C12DocLibRERO365.zip)
For this exercise you use your Office 365 tenancy to deploy a document library that contains custom content type, custom columns, and a remote event receiver. The remote event receiver web service is autodeployed to Windows Azure.
1. Run Visual Studio 2012 as Administrator. Select New Project.
2. In the New Project dialog, expand the Templates ⇒ Visual C# ⇒ Office/SharePoint ⇒ Apps nodes. Select App for SharePoint 2013 and provide the name: C12DocLibRERO365. Click OK.
3. In the Specify the name for your app for SharePoint settings dialog, set the SharePoint site URL to the app you will deploy to and choose SharePoint-hosted as the location to host your app for SharePoint. Click Finish.
4. Right-click on the C12DocLibRERO365 project node in Solution Explorer and select Add ⇒ New item.
5. Select Site Column, provide the name, DocNumber, and click Add.
6. Right-click on the C12DocLibRERO365 project node in Solution Explorer and select Add ⇒ New item.
7. Select Content Type, provide the name, MyC12Document, and click Add.
8. In the Choose Content Type Settings dialog, select Document from the drop-down list as the content type to inherit from and click Finish.
9. In the content type designer, under the Columns tab, choose Click here to add a column. Using the drop-down list, select and add three columns: Author, Status, and your custom column Doc Number, and save the content type.
10. Right-click on the C12DocLibRERO365 project node in Solution Explorer and select Add ⇒ New item.
11. Select List, provide the name, MyDocumentLibrary, and click Add.
12. In the Choose List Setting dialog, click the Create a customizable list based on radio button and select Document Library from the drop-down list. Click Finish.
13. In the list designer under the Columns tab, scroll down if needed and click the Content Types button.
14. In the Content Type Settings dialog, select Click here to add a content type and select MyC12Document from the drop-down list.
15. Select the row of the MyC12Document item; click Set as Default and Save.
16. To now remove the extraneous Document content type that was previously the default document so it will not show within SharePoint, click Content Types again, select the entire row for Document, right-click the selected row, and choose Delete. Click OK.
17. Click on the list designer Views tab. In the Available columns pane, select the Title column and click the right-facing arrow button to move it to the right-hand side.
18. Click on the list designer List tab and copy the List URL. Navigate to the AppManifest.xml file, right-click and select View Code.
19. Replace the StartPage element contents so the element looks something like this: <StartPage>~ appWebUrl/Lists/MyDocumentLibrary?{StandardTokens} </StartPage>. Save and close the manifest file. This change directs SharePoint to start at your document library when your app launches.
20. Before going any further, press F5 to validate that the content type and document library are working correctly.
21. When the MyDocumentLibrary page opens, click on the Files tab to open the ribbon. On the ribbon click the New Document drop-down to see your MyC12Document. Click it.
22. Word 2013 will open and all the metadata columns associated with your content type will display in the Document Information Panel (DIP) at the top of the document. It’s these columns that can be validated or augmented in your remote event receiver code. Go ahead and add some values in the fields and save the document. Word will prompt you to select a location to save the file. Under the Current Folder, click MyDocumentLibrary. Alternatively, you can browse to the document library via the appropriate URL for your site. Close the Word document and refresh the page to see the metadata stored in the columns. Close the browser to stop debugging.
23. Right-click on the C12DocLibRERO365 project node in Solution Explorer and select Retract. If the retract fails, login to the Office 365 site and remove the app manually from the Site Contents page. Hover over the app tile, click the ellipsis (…) and select Remove.
24. Right-click on the C12DocLibRERO365 project node in Solution Explorer and select Add ⇒ New item.
25. Select Remote Event Receiver, leave the default name of RemoteEventReceiver1, and click Add.
26. In the Choose Event Receiver Settings dialog, select List Item Events for the type of event receiver you want. Notice that Visual Studio selects your MyDocumentLibrary by default, so leave this and select An Item is being added. Click Finish.
27. If the code for the remote event receiver does not automatically open, right-click on the RemoteEventReceiver1.svc node and select View Code.
28. Delete the following lines from the code:
using (ClientContext clientContext =
  TokenHelper.CreateRemoteEventReceiverClientContext(properties))
  {
    if (clientContext != null)
       {
          clientContext.Load(clientContext.Web);
          clientContext.ExecuteQuery();
       }
  }
29. In the exact location from which you deleted the above code, insert the following:
            // Generate a random number to simulate an external system providing
            // a reference number for a document.
            Random r = new Random();
            int myDocNum = r.Next(100) + 1000;

            // Evaluate the type of event and perform an edit and adjust
            // the result object accordingly.
            switch (properties.EventType)
            {
                case SPRemoteEventType.ItemAdding:
                    // Set a default title if no Title was input.
                    If
(properties.ItemEventProperties.AfterProperties.ContainsKey("vti_title")
                        && string.IsNullOrEmpty
(properties.ItemEventProperties.AfterProperties["vti_title"].ToString()))
                    {
                        result.ChangedItemProperties.Add("vti_title",
properties.ItemEventProperties.AfterProperties["_Author"].ToString()
                          + "-" + myDocNum);
                    }

                    // Set a default status to Draft if no status value was input.
                    if
(properties.ItemEventProperties.AfterProperties.ContainsKey("_Status")
                        && string.IsNullOrEmpty
(properties.ItemEventProperties.AfterProperties["_Status"].ToString()))
                    {
                        result.ChangedItemProperties.Add("_Status", "Draft");
                    }

                 // Always provide a document number.
                 result.ChangedItemProperties.Add("DocNumber", myDocNum.ToString());

                    break;
            }
30. In the Solution Explorer, right-click on C12DocLibRERO365 and select Deploy. (Not F5. The Autohosted Web service must be fully deployed to Windows Azure.) Go through the process of adding a new document by clicking on your content type under the FILES tab on the document library landing page. The DIP will be displayed as before; make no changes to the DIP fields, save and close your document.
31. Refresh the browser to see that your file has been added but notice that all the list columns now have information in them due to the processing that happened in the remote event receiver.