3. Workflow Association Options
When you create a new reusable workflow, it cannot
be used until it has been associated with a list or Content Type. When
you open the workflow in Designer, you will have both association
options in the ribbon in the Manage section. When you click Associate
to List, you will see all the available lists to associate with.
Similarly, when you click Associate to Content Type, you will see
available Content Types. The benefit of associating a workflow to a
Content Type is that it will work for all items using that Content Type
in any list where the Content Type is in use.
4. Workflow Actions
SharePoint Designer ships with a set of actions
specifically for SharePoint interaction. This list can be extended by
installing third-party actions or even developing your own. Table 1 lists all the actions provided with Designer.
Table 1. Actions to Choose from When Developing a Workflow in Designer
| Action | Description | Available in Visio? |
|---|
| Core |
| Add a Comment | At the time of this writing, this action does not do anything in the release candidate version of SharePoint 2010. | Y |
| Add Time To Date | Adds a time period to a date variable. | Y |
| Do Calculation | Does a basic calculation such as addition and outputs to a variable. | Y |
| Log to History List | Writes an entry to the workflow history. | Y |
| Pause for Duration | Pauses the workflow for a defined period. | Y |
| Pause until Date | Pauses the workflow until a defined date. | Y |
| Send an E-mail | Defines e-mail recipients, subject, and body. | Y |
| Set Time Portion of Date/Time Field | Sets time value and outputs to a variable. | Y |
| Set Workflow Status | Sets status of current workflow. | Y |
| Set Workflow Variable | Uses a workflow variable to store values. | Y |
| Stop Workflow | Terminates the workflow. | Y |
| Document Set Actions |
| Capture a Version of the Document Set | Can specify document set with major or minor versions. | N |
| Send Document Set to Repository | Copies or moves a set to a defined content organizer. | Y |
| Set Content Approval Status for the Document Set | Sets the status with comments. | Y |
| Start Document Set Approval Process | Kicks off an approval process for the set for list of users. | Y |
| List Actions |
| Check In Item | Checks in the item and provides comments. | Y |
| Check Out Item | Checks out the item. | Y |
| Copy List Item | Copies an item from one list to another. | Y |
| Create List Item | Creates an item and outputs it to a variable. | Y |
| Declare Record | Declares current item as a record. | |
| Delete Item | Deletes defined item in list | Y |
| Discard Check Out Item | If item is checked out it will be discarded. | Y |
| Set Content Approval Status | Sets status to Approved, Rejected, or Pending. | Y |
| Set Field in Current Item | Updates field value. | Y |
| Undeclare Record | If an item is a record, it will be reverted. | |
| Update List Item | Commits any changes made to item. | Y |
| Wait for Field Change in Current Item | Pauses workflow until a field value condition is met. | Y |
| Relational Actions |
| Lookup Manager of a User | Gets manager from Active Directory. | Y |
| Task Actions |
| Assign a Form to a Group | Defines a form with simple fields and assigned to list of users. | Y |
| Assign a to-do Item | Creates a task for a user and adds to workflow task list. | Y |
| Collect Data from a User | Builds a custom form and outputs values to variable. | Y |
| Start Approval Process | Kicks off an Approval workflow. | Y |
| Start Custom Task Process | Kicks off a Task workflow. | Y |
| Start Feedback Process | Kicks off a Feedback workflow. | Y |
| Utility Actions |
| Start Feedback Process | Kicks off a Feedback workflow. | Y |
| Extract Substring from End of String | Manipulates a string value. | N |
| Extract Substring from Index of String | Manipulates a string value. | N |
| Extract Substring from Start of String | Manipulates a string value. | N |
| Extract Substring of String from Index with Length | Manipulates a string value. | N |
| Find Interval Between Dates | Manipulates a string value. | N |
5. Creating a Simple Workflow
We covered the basics of Workflows in SharePoint
Designer 2010; let’s create a simple workflow to see how it actually
works. For our example, we are going to create a site workflow
that allows a site member to request elevated privileges—so a visitor
can request to be upgraded to a member, and a member can request to be
upgraded to an owner. All the site workflow will do is e-mail the
administrator with the request, so it does not need to be associated
with a list item.
For our workflow, we need to
Define the initiation variable for the requested role.
Create a step to e-mail the administrator.
Create a task for the administrator.
Write to the workflow history.
Let’s
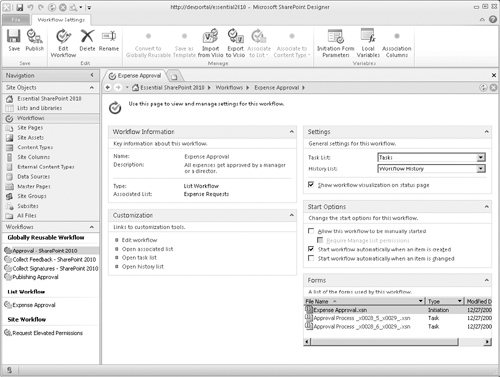
get started. From the workflow tab in SharePoint Designer, click the
Site Workflow icon in the ribbon to create a new workflow. Figure 4 shows the dialog where we enter the workflow name and description.
The main pane starts with a Step 1 for the workflow (see Figure 5).
The Insert group on the ribbon has options to allow you to add workflow
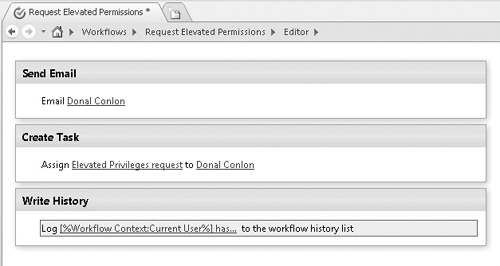
elements such as conditions or actions. Our workflow will have three
simple steps, which are described here:
1. | Send e-mail. Edit the e-mail to include the user name and site name and send to the administrator.
|
2. | Create task. Create a task for the administrator.
|
3. | Write to history. Track the request in the workflow history.
|
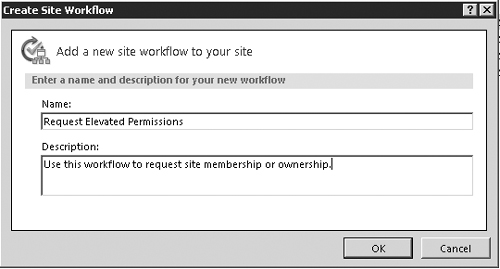
Before defining the workflow steps, we create an
initiation form parameter that will be used for the role requested
(member or owner) (see Figure 6). From the Variables group on the ribbon, click the Initiation Form Parameters icon and add a new Field called Requested Permission. This will be a Choice field where we define our choices: Member and Owner.
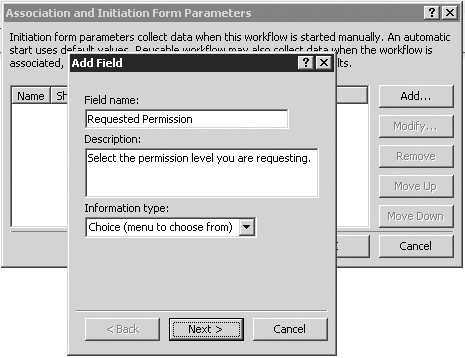
Clicking Next allows you to provide the two values for our options: Member and Owner.
Step 1: Send E-mail
From
the Action menu on the ribbon, select Send an E-mail. Click the link in
the action to bring up the e-mail dialog as shown in Figure 7.
We want to include the name of the user requesting the change, the
permission level they are requesting, and the site they are requesting
access to.
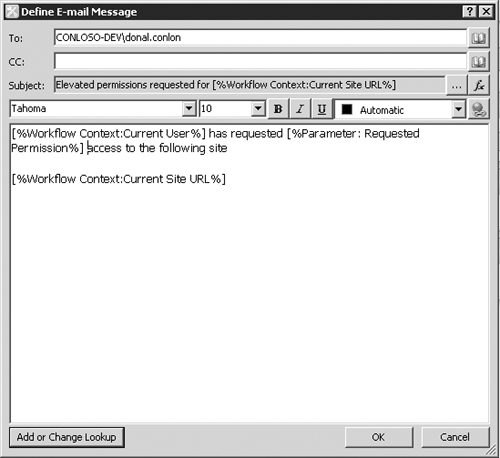
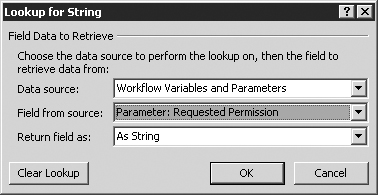
To include values from the workflow such as
permissions level, site URL, and so on, click the Add or Change Lookup
button at the bottom of the dialog. This allows you to choose values
from the workflow variables, the associated task or history list, even
values from other lists in the current site. Figure 8 shows selecting the Requested Permission variable so we can add it to the body of the e-mail.
Step 2: Create Task
Add
another step to the workflow from the Insert section on the ribbon.
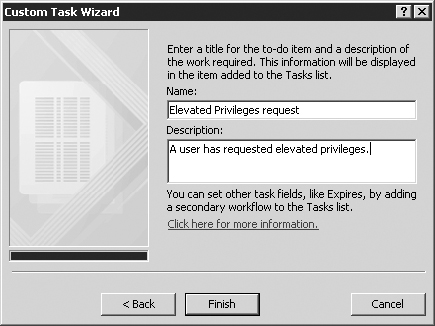
This step is going to create the action to create a task for the
administrator. Select Assign a To-Do Item from the actions menu.
Clicking the link in the task action launches a wizard that asks for a
task title and description (see Figure 9).
Step 3: Write History
The final step is going to capture the request in
the workflow history log. Again from the ribbon, add another task and
insert the action Log to History List. This way we can see what
requests happened when. Figure 10
shows the text we are going to write to the history log. Again, we can
include values from the workflow using the Add or Change Lookup button.
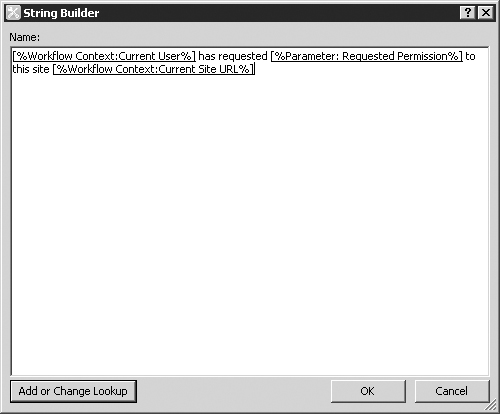
Figure 11 shows the end result of all the workflow steps.
Note
The steps are initially listed as Step 1, Step 2,
and so on. You can rename the steps by clicking the step title and
adding your own value.
With
the workflow steps complete, we are ready to publish the workflow.
Clicking the Publish icon on the ribbon will first check for errors and
then publish the workflow to our site.