3. Using Visio Services to Visualize Workflow State
In addition to the actions that we defined in our
original Visio model, we’ve also included a few new actions to attach
the captured data to our product item. We can export our updated
workflow to Visio so that we can update our diagram with appropriate
descriptions for these new actions. Once our model is updated, we can
use it to provide status visualization for our workflow.
In SharePoint Designer, select Workflows from the Site Objects pane. Select the Product Publishing workflow from the list.
From the Workflows ribbon, click the Export To Visio button. Save the interchange file as PublishingProcedure.vwi.
Open
Visio 2010, and then either open the saved PublishingProcedure.vsd
document that we created earlier or create a new document from the
Microsoft SharePoint Workflow template.
From the Process ribbon, click the Import button. Browse to the PublishingProcedure.vwi file that we exported in step 2.
The
revised workflow will be imported and will update our existing model
where appropriate. Add descriptions for the two Set Field In Current
Item actions. The first should be Store Technical Data and the second should be Store Product Image.
With
these changes made, we can tidy up the layout if appropriate and export
our workflow as we did in the preceding section. The completed model
should look as illustrated:

Switch
back to SharePoint Designer to import the changes. Select the Product
Publishing workflow and then click the Import From Visio button in the
Workflows ribbon to import the changes. You’ll notice that, this time,
SharePoint Designer recognizes that the interchange file relates to an
existing workflow, and rather than prompt you for details to create a
new workflow, it automatically upgrades the existing workflow with the
changes.
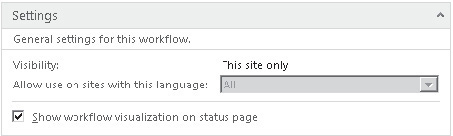
To
use our Visio diagram to provide status visualization for our workflow,
we need to check the Show Workflow Visualization On Status Page
checkbox in the Settings section, as illustrated. Click the Save icon
in the upper-left corner to save the changes to the Product Publishing
workflow.
Before
we can use the workflow, we need to publish it. After you publish the
workflow, SharePoint Designer will automatically generate any required
InfoPath forms. If the workflow being published is already attached to
a list or content type, all new instances of the workflow will use the
new published version, while currently running instances will continue
to use the previous version. To publish our Product Publishing
workflow, click the Publish button in the Workflow ribbon.
Associating Reusable Workflows
With our new workflow published, we can now
associate it with our Product content type. You’ll remember that when
we created our workflow, we specified that it should target the Product
content type. Even though we specified this targeting, the workflow
isn’t bound to any content type until we specifically bind it. When
creating a workflow, the main reason for setting a content type target
is to ensure that the fields of that content type are available as
values within the workflow logic. For example, we specified Product so
that we could make use of the Product Image and Technical Data fields.
To
associate our workflow with the Product content type, click the
Associate To Content Type button in the ribbon. You’ll notice that the
only option available in the drop-down list is Product. Since our
workflow targets the Product content type, only content types that are
derived from Product or the Product content type itself are valid
selections. Select Product to begin the association process.
The
association process is performed using the SharePoint user interface.
Since we want our workflow to start automatically when a new item is
created, check the appropriate start option and then click Next to
continue.
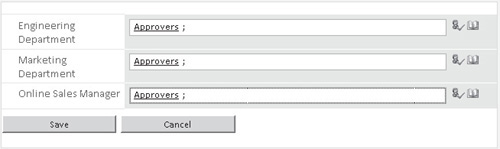
SharePoint
Designer automatically generates a custom association form based on the
parameters that we specified in our workflow. Since we’re using a blank
site, we don’t have specific user accounts for each of the three
departments. We can use the
built-in Approvers group for the purposes of this demo. Complete the
form as illustrated, and then click Save to complete the association.
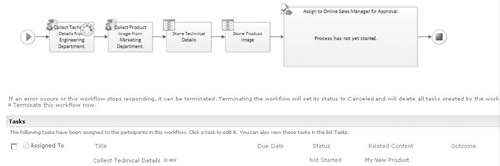
To see our new workflow in action, browse to the
Products list and add a new item. Once the item is saved, the Product
Publishing workflow automatically starts. By clicking the In Progress
link in the Product Publishing column, we can see more detail on the
workflow progress, including our Visio visualization, as illustrated.
We can click the tasks that are created and enter the appropriate
information to complete our workflow. Notice that the progress is
indicated on our Visio visualization.
Note
You’ll notice that the New Item form
contains text boxes for each of the fields in our content type. Of
course, this is perfectly reasonable in most situations, but in our
case, we don’t want the Product Image and Technical Details fields to
be populated, because these are completed by the appropriate
department.