As you’ve learned, the UpdatePanel performs its work asynchronously in the background. As a result, the user can keep working with the page. This is generally the behavior you want, but there’s one catch. While the asynchronous request is under way, the user won’t necessarily realize that anything’s happening. If the asynchronous request takes some time, this could be a bit of a problem. At worst, the user will assume the page is broken or click the same button multiple times, creating needless extra work for your web application and slowing down the process further.
ASP.NET includes another control that can help—the UpdateProgress control. The UpdateProgress control works in conjunction with the UpdatePanel. Essentially, the UpdateProgress control allows you to show a message while a time-consuming update is under way.
NOTE
The UpdateProgress control is slightly misnamed. It doesn’t actually indicate progress; instead, it provides a wait message that reassures the user that the page is still working and the last request is still being processed.
1. Showing a Simulated Progress Bar
When you add the UpdateProgress control to a page, you get the ability to specify some content that will appear as soon as an asynchronous request is started and disappear as soon as the request is finished. This content can include a fixed message, but many people prefer to use an animated GIF, because it more clearly suggests that the page is still at work. Often, this animated GIF simulates a progress bar.
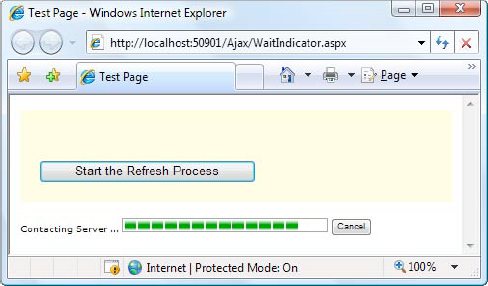
The top figure shows the page as it first appears, with a straightforward UpdatePanel control containing a button. When the button is clicked, the asynchronous callback process begins. At this point, the contents of the UpdateProgress control appear underneath (as shown in the middle figure). In this example, the UpdateProgress includes a text message and an animated GIF that appears as a progress bar, with green blocks that perpetually fill it from left to right, and then start over. When the callback is complete, the UpdateProgress disappears and the UpdatePanel is updated, as shown in the bottom figure.
The markup for this page defines an UpdatePanel followed by an UpdateProgress:
<asp:UpdatePanel ID="UpdatePanel1" runat="server">
  <ContentTemplate>
    <div style="background-color:#FFFFE0;padding: 20px">
      <asp:Label ID="lblTime" runat="server" Font-Bold="True"></asp:Label>
      <br /><br />
      <asp:Button ID="cmdRefreshTime" runat="server"
       Text="Start the Refresh Process" />
    </div>
  </ContentTemplate>
</asp:UpdatePanel>
<br />

<asp:UpdateProgress ID="updateProgress1" runat="server">
  <ProgressTemplate>
    <div style="font-size: xx-small">
      Contacting Server ... <img src="wait.gif" alt="Waiting..." />
    </div>
  </ProgressTemplate>
</asp:UpdateProgress>
This isn’t the only possible arrangement. Depending on the layout you want, you can place your UpdateProgress control somewhere inside your UpdatePanel control.
The code for this page has a slight modification from the earlier examples. Because the UpdateProgress control only shows its content while the asynchronous callback is under way, it only makes sense to use it with an operation that takes time. Otherwise, the UpdateProgress will only show its ProgressTemplate for a few fractions of a second. To simulate a slow process, you can add a line to delay your code 10 seconds, as shown here:
Protected Sub cmdRefreshTime_Click(ByVal sender As Object, _
  ByVal e As EventArgs) Handles cmdRefreshTime.Click
    System.Threading.Thread.Sleep(TimeSpan.FromSeconds(10))
    lblTime.Text = DateTime.Now.ToLongTimeString()
End Sub
There’s no need to explicitly link the UpdateProgress control to your UpdatePanel control. The UpdateProgress automatically shows its ProgressTemplate whenever any UpdatePanel begins a callback. However, if you have a complex page with more than one UpdatePanel, you can choose to limit your UpdateProgress to pay attention to just one of them. To do so, simply set the UpdateProgress.AssociatedUpdatePanelID property with the ID of the appropriate UpdatePanel. You can even add multiple UpdateProgress controls to the same page, and link each one to a different UpdatePanel.
2. Cancellation
The UpdateProgress control supports one other detail: a cancel button. When the user clicks a cancel button, the asynchronous callback will be cancelled immediately, the UpdateProgress content will disappear, and the page will revert to its original state.
Adding a cancel button is a two-step process. First you need to add a fairly intimidating block of JavaScript code, which you can copy verbatim. You should place this code at the end of your page, after all your content but just before the </body> end tag. Here’s the code you need, in its rightful place:
<%@ Page Language="VB" AutoEventWireup="false" CodeFile="WaitIndicator.aspx.vb"
 Inherits="WaitIndicator" %>
<html xmlns="http://www.w3.org/1999/xhtml">
<head runat="server">
    ...
</head>
<body>
  <form ID="form1" runat="server">
    ...
  </form>

  <script type="text/javascript">
    var prm = Sys.WebForms.PageRequestManager.getInstance();
    prm.add_initializeRequest(InitializeRequest);

    function InitializeRequest(sender, args)
    {
        if (prm.get_isInAsyncPostBack())
        {
            args.set_cancel(true);
        }
    }

    function AbortPostBack()
    {
        if (prm.get_isInAsyncPostBack()) {
         prm.abortPostBack();
        }
    }
    </script>
</body>
</html>
Once you’ve added this code, you can use JavaScript code to call its AbortPostBack() function at any time and cancel the callback. The easiest way to do to this is to connect a JavaScript event to the AbortPostBack() function using a JavaScript event attribute. You can add a JavaScript event attribute to virtually any HTML element. For example, you can deal with client-side clicks using the onclick attribute. Here’s a basic HTML button (not a server control) that uses this technique to connect itself to the AbortPostBack() function:
<input ID="cmdCancel" onclick="AbortPostBack()" type="button" value="Cancel" />
If you click this Cancel button, the client-side AbortPostBack() function will be triggered and the callback will be cancelled immediately. Typically, you’ll place this button (or an element like this) in the ProgressTemplate of the UpdateProgress control, as shown in Figure 1.
Figure 1. An UpdateProgress control with a cancel button

Don’t confuse this approach with server-side event handling—the client-side onclick attribute allows you to intercept an event in the browser and process it using JavaScript code. The server doesn’t get involved at all. In fact, when you cancel an operation, the server continues to process the request, but the browser simply closes the connection and stops listening for the response.