Selecting
an item refers to the ability to click a row and have it change color
(or become highlighted) to indicate that the user is currently working
with this record. At the same time, you might want to display additional
information about the record in another control. With the GridView,
selection happens almost automatically once you set up a few basics.
Before you can use item selection, you must define a
different style for selected items. The SelectedRowStyle determines how
the selected row or cell will appear. If you don't set this style, it
will default to the same value as RowStyle, which means the user won't
be able to tell which row is currently selected. Usually, selected rows
will have a different BackColor property.
To find out what item is currently selected (or to
change the selection), you can use the GridView.SelectedIndex property.
It will be −1 if no item is currently selected. Also, you can react to
the SelectedIndexChanged event to handle any additional related tasks.
For example, you might want to update another control with additional
information about the selected record.
1. Adding a Select Button
The GridView provides built-in support for selection.
You simply need to add a CommandField column with the ShowSelectButton
property set to True. ASP.NET can render the CommandField as a
hyperlink, a button, or a fixed image. You choose the type using the
ButtonType property. You can then specify the text through the
SelectText property or specify the link to the image through the
SelectImageUrl property.
Here's an example that displays a select button:
<asp:CommandField ShowSelectButton="True" ButtonType="Button"
 SelectText="Select" />
And here's an example that shows a small clickable icon:
<asp:CommandField ShowSelectButton="True" ButtonType="Image"
 SelectImageUrl="select.gif" />
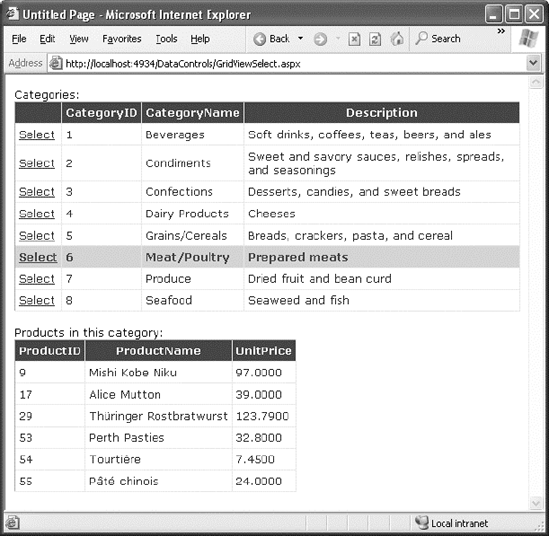
Figure 1 shows a page with a text select button (and product 14 selected).
When you click a select button, the page is posted
back, and a series of steps unfolds. First, the
GridView.SelectedIndexChanging event fires, which you can intercept to
cancel the operation. Next, the GridView.SelectedIndex property is
adjusted to point to the selected row. Finally, the
GridView.SelectedIndexChanged event fires, which you can handle if you
want to manually update other controls to reflect the new selection.
When the page is rendered, the selected row is given the selected row
style.
|
Rather than add the select button yourself, you can
choose Enable Selection from the GridView's smart tag, which adds a
basic select button for you.
|
|
1.1. Using a Data Field As a Select Button
You don't need to create a new column to support row
selection. Instead, you can turn an existing column into a link. This
technique is commonly implemented to allow users to select rows in a
table by the unique ID value.
To use this technique, remove the CommandField
column, and add a ButtonField column instead. Then, set the
DataTextField to the name of the field you want to use.
<asp:ButtonField ButtonType="Button" DataTextField="ProductID" />
This field will be underlined and turned into a
button that, when clicked, will post back the page and trigger the
GridView.RowCommand event. You could handle this event, determine which
row has been clicked, and programmatically set the SelectedIndex
property of the GridView. However, you can use an easier method.
Instead, just configure the link to raise the SelectedIndexChanged event
by specifying a CommandName with the text Select, as shown here:
<asp:ButtonField CommandName="Select" ButtonType="Button"
 DataTextField="ProductID" />
Now clicking the data field automatically selects the record.
2. Using Selection to Create Master-Details Pages
You can draw
a value out of a control and use it to perform a query in your data
source. For example, you can take the currently selected item in a list,
and feed that value to a SqlDataSource that gets more information for
the corresponding record.
This trick is a great way to build master-details pages—pages
that let you navigate relationships in a database. A typical
master-details page has two GridView controls. The first GridView shows
the master (or parent) table. When a user selects an item in the first
GridView, the second GridView is filled with related records from the
details (or parent) table. For example, a typical implementation of this
technique might have a customers table in the first GridView. Select a
customer, and the second GridView is filled with the list of orders made
by that customer.
To create a master-details page, you need to extract
the SelectedIndex property from the first GridView and use that to craft
a query for the second GridView. However, this approach has one
problem. SelectedIndex returns a zero-based index number that represents
where the row occurs in the grid. This isn't the information you need
to insert into the query that gets the related records. Instead, you
need a unique key field from the corresponding row. For example, if you
have a table of products, you need to be able to get the ProductID for
the selected row. In order to get this information, you need to tell the
GridView to keep track of the key field values.
The way you do this is by setting the DataKeyNames
property for the GridView. This property requires a comma-separated list
of one or more key fields. Each name you supply must match one of the
fields in the bound data source. Usually, you'll have only one key
field. Here's an example that tells the GridView to keep track of the
CategoryID values in a list of product categories:
<asp:GridView ID="gridCategories" runat="server"
DataKeyNames="CategoryID" ... >
Once you've established this link, the GridView is
nice enough to keep track of the key fields for the selected record. It
allows you to retrieve this information at any time through the
SelectedDataKey property.
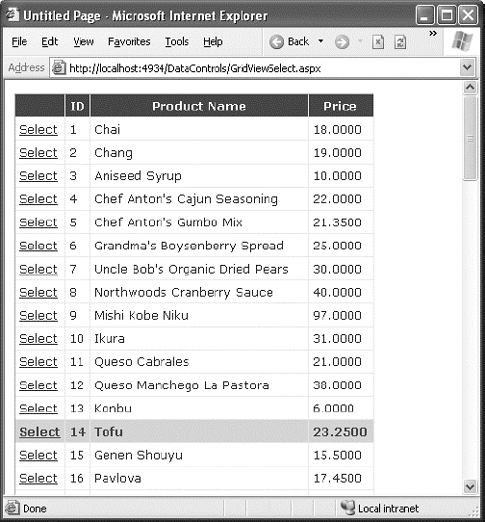
The following example puts it all together. It
defines two GridView controls. The first shows a list of categories. The
second shows the products that fall into the currently selected
category (or, if no category has been selected, this GridView doesn't
appear at all).
Here's the page markup for this example:
Categories:<br />
<asp:GridView ID="gridCategories" runat="server" DataSourceID="sourceCategories"
  DataKeyNames="CategoryID">
    <Columns>
      <asp:CommandField ShowSelectButton="True" />
    </Columns>
    <SelectedRowStyle BackColor="#FFCC66" Font-Bold="True"
     ForeColor="#663399" />
</asp:GridView>
<asp:SqlDataSource ID="sourceCategories" runat="server"
  ConnectionString="<%$ ConnectionStrings:Northwind %>"
  SelectCommand="SELECT * FROM Categories"></asp:SqlDataSource>
<br />

Products in this category:<br />
<asp:GridView ID="gridProducts" runat="server" DataSourceID="sourceProducts">
  <SelectedRowStyle BackColor="#FFCC66" Font-Bold="True" ForeColor="#663399" />
</asp:GridView>
<asp:SqlDataSource ID="sourceProducts" runat="server"
  ConnectionString="<%$ ConnectionStrings:Northwind %>"
  SelectCommand="SELECT ProductID, ProductName, UnitPrice FROM Products WHERE
CategoryID=@CategoryID">
    <SelectParameters>
      <asp:ControlParameter Name="CategoryID" ControlID="gridCategories"
        PropertyName="SelectedDataKey.Value" />
    </SelectParameters>
</asp:SqlDataSource>
As you can see, you need two data sources, one for
each GridView. The second data source uses a ControlParameter that links
it to the SelectedDataKey property of the first GridView. Best of all,
you still don't need to write any code or handle the
SelectedIndexChanged event on your own.
Figure 2 shows this example in action.