We demonstrate how to get started with
Amazon’s Web Services
While we’re used to Amazon -the massive
online retailer that we all know, and some love - providing a huge array of
products, you may be unaware that it also provides a range of tools and
services aimed at the IT market, too. Initially designed to make use of spare
capacity of within its servers, now Amazon offer a range of services that has
grown to rival that of Google, while differentiating itself with products aimed
at the power user, enthusiast and businesses rather than the average web user.
This area now forms a much larger part of the Amazon business plan than just
using the spare infrastructure capacity of its infrastructure, with data
centres across the US, Europe and Asia.
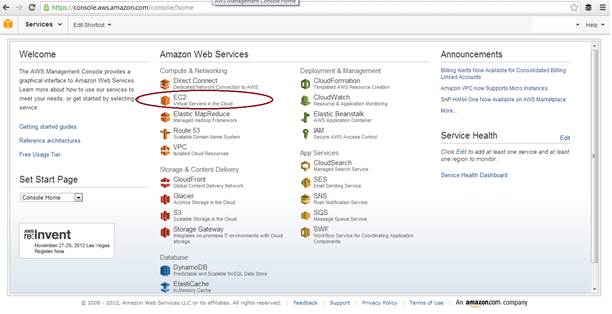
Amazon
Web Services dashboard
The specific service, that’ll be covered in
this article is the Elastic Compute Cloud (EC2) which, as the name suggests,
focuses on offering cloud computing solutions that are easily started and
stopped as needed (hence ‘Elastic’). Specifically, below we’ll offer some help
in the basic setup of the EC2 services that will get you up and running. The
Amazon documentation is far more considerable than this article -though a bit
less user friendly - so if you have any more specific queries, that’s where you
should head next.
Amazon EC2
The EC2 service lets you create a PC in the
cloud to the specifications you need, from the available services that Amazon
offer. The range of instances should cover everything you need and you have the
ability to run either Linux or Windows instances (you can also upload your own
image based on a VMWare image, but that’s probably a whole other article on
it’s own and not covered here).
“The EC2 service lets you create a PC in
the cloud, to the specifications you need”
Instances are priced based on the number of
EC2 Compute Units (see boxout), RAM and disk space available to the instance.
At the top end of the spectrum, Amazon also offer the ability to run GPU and
High Performance Computing Clusters, which allow researchers the ability to
quickly, and cheaply, setup modelling services in the cloud. The ability to
setup and have the machine fully running in under an hour, makes it ideal for
instances where a model or task only has to run for a short amount of time - it
means that there is no initial cost to the user - setup is free and you only
pay for what you use (be warned -costs can soon mount up).
“The
EC2 service lets you create a PC in the cloud, to the specifications you need”
You can get started on EC2 for free if
you’re a new Amazon Web Services customer. To encourage use of the service, the
company offers all new members a free period of use that’s enough to run the
instance 24/7 for a month, though you can spread this time out over a year,
should you wish. So, let’s take a look at the initial setup, which is the same
for both Windows and Linux, and then split the article to reflect the different
procedures of required to work with the different operating systems. The choice
of Linux or Windows is a personal preference, though Windows instances are more
expensive per hour (to pay for the licenses being used).
Getting Started
The first step is to connect to the AWS
website (aws.amazon.com) and create an account, which can be the same as your
normal Amazon account. Once logged in and verified (Amazon have to verify your account,
partly to prevent the services being used for spam and other illegal
activities), you can log in and visit the Console (console.aws.amazon.com).
There, you’ll be greeted with the page showing all the web services that you
have access to.
The
first step is to connect to the AWS website (aws.amazon.com) and create an
account, which can be the same as your normal Amazon account
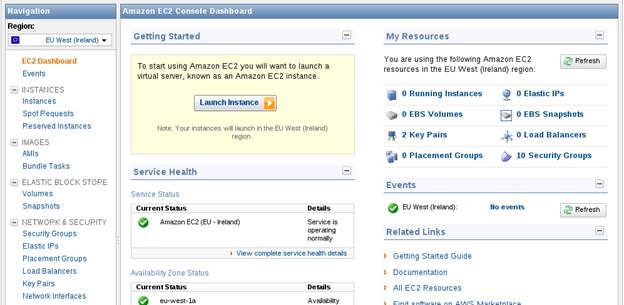
Select an EC2 service from the list and
you’ll be taken to the EC2 dashboard page, from where you can manage all your
EC2 instances. The top right hand corner houses a drop down menu allowing you
to choose where you want to run your server (for this article, we used
Ireland). The prices you’re charged with differ from region to region, but the
global reach of the EC2 servers allow you to locate the server where the most
people will be accessing it (for better transfer speeds, normally), hence our
choice.
The dashboard shows the status of any
running instances you have, the status of the Amazon servers, availability and
provides a summary of your resources. I’ve already used EC2, so I have a few
security groups and key pair setup - but your dash should show 0 in all
instances here.
The easiest way to get started is to click
the launch instance button and let Amazon walk you through setting up the
device. We’ll use the classic wizard as it helps us get everything sorted. Once
we select this, we’re greeted with a screen showing the available operating
systems the instance can run. If you want to make use of the free tier that
Amazon offer for new AWS customers, you have to choose an instance marked with
the star (though they make that clear). You can choose custom and community
based AMI’s (the images the server will use), but these are often specialised -
stick with a default one and you’ll be able to customise the server to what you
need.
Creating An Instance
This step lets us choose what instance size
we want to use and how many instances we want to setup at once. We’ll select 1
and use the Micro instance (this is the only free tier that Amazon offer).
There’s no need to change the availability zone.
RDP
connection details
You can then setup additional monitoring
tools which go beyond the basics that Amazon offer for free, and allow you to
be notified when events occur. We won’t set any up now, but feel free to
experiment in the future. We won’t import any users and we won’t set accidental
termination on, either, as we’re just experimenting. Changing the shutdown
behaviour is something you might want to consider, though. The default state is
to shut down the instance but keep the instance ‘in your name’ (and therefore
chargeable). Setting it to terminate will shut down the instance and stop it
(be warned though, when the instance is terminated, this will also delete the
disk image and all data!)
This stage also shows the disk space: each
instance has a set amount of desk space with it, which we’ll leave set at the
Windows AMI default of 30GB (Micro has up to 160GB available). You can then
create an optional tag to name the servers. If you just have one or two, this
isn’t really required but if you start running many for a business, this could
really help organise the instances.
Security of your server is important and at
this stage, Amazon asks you to create a keypair to access the server with.
You’ll need to keep this safe, as without it, you’ll be unable to access your
server. To quote Gandalf from Lord Of The Rings: “keep it secret, keep it safe”.
The last screen is where you setup the
firewall access to the server. This section can put you off if you’re new to
firewalls and there’s not much help regarding it. Thankfully, Amazon have
identified the ports that are commonly opened up on the server and you can
select these in the drop down box. As a bare minimum, you’ll need to open the
RDP or SSH protocols (depending on whether you’re using a Windows or Linux
linstance), otherwise you won’t be able to access the instance once it’s
created! You can edit the firewall groups after this point, so don’t worry if
you later want to open up additional ports. We’ll set the IP addresses to the
default 0.0.0.0/0 settings - this will allow any IP address to connect to your
instance. If you’ll only be administering from your own machine, you might want
to change these to your IP (if you google “What’s my IP?”, Google will kindly
tell you your IP address!) and it will only let you connect, as long as your IP
address remains the same.
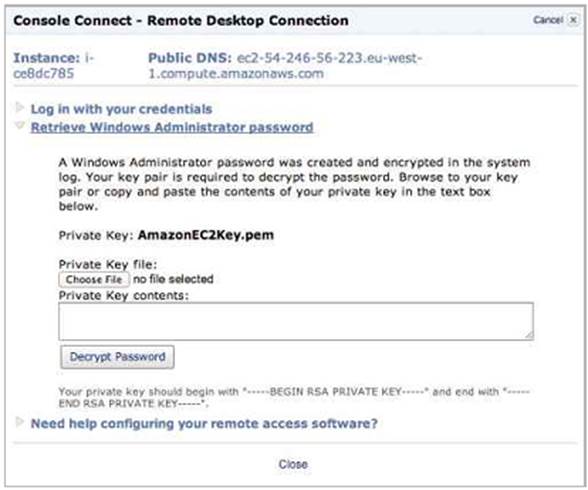
Unlock
the administrator password
A final screen then appears and lets you
review the setup. Once you’ve looked it over, click Launch and your server is
started (and Amazon start charging you). By selecting the instances menu, you
can get a summary of your server information. You might have to wait a while to
connect to the instance as it gets setup. This can take up to 15 minutes (which
you are charged for) but is often quicker.
Windows
To connect to a Windows instance, you need
to install the Remote Desktop Application on your PC. This should be done by
default, but if not you can download this from Microsoft’s website. It’s
available on OS X too, and Linux has programs that can access the server via
RDP as well.
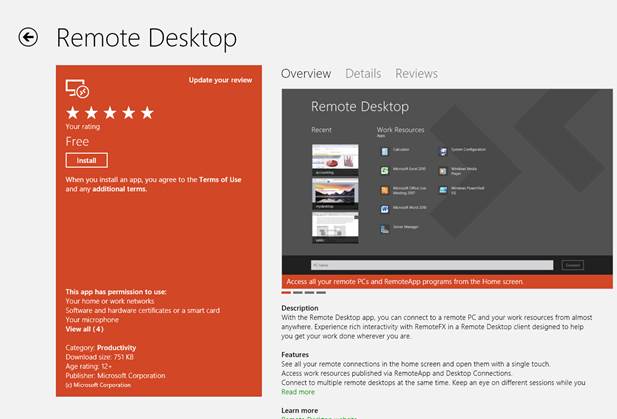
To
connect to a Windows instance, you need to install the Remote Desktop
Application on your PC
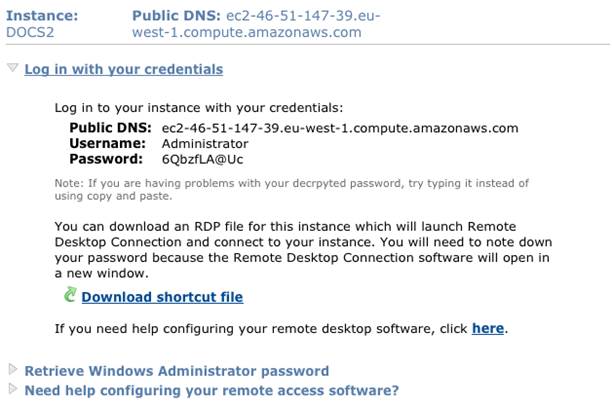
Right click on the instance and select
Connect. You’ll be presented with a screen showing you the Public DNS which is
the address you need to enter into the RDP client. To get the password for the
Admin account, you need to click retrieve password and point the webpage to
your keypair you downloaded earlier.
Once this has uploaded, Amazon will then
display the Admin password for you. Enter this into the RDP client and connect.
All being well, the Windows screen should appear, and you should be greeted
with a normal Windows desktop. After this, you can get on and use the machine
as you would normally.
Linux
To connect to the Linux instance, connect
in a similar way to the Windows instance. Right click and select connect. At
this stage, you can either connect via an SSH client in your browser or via a
standalone program such as PUTTY. Using PUTTY to connect requires conversion of
the PEM file - Amazon has a guide for this linked under the SSH client guide.
If you’re using Mac or linux, you can easily connect using the command
highlighted.
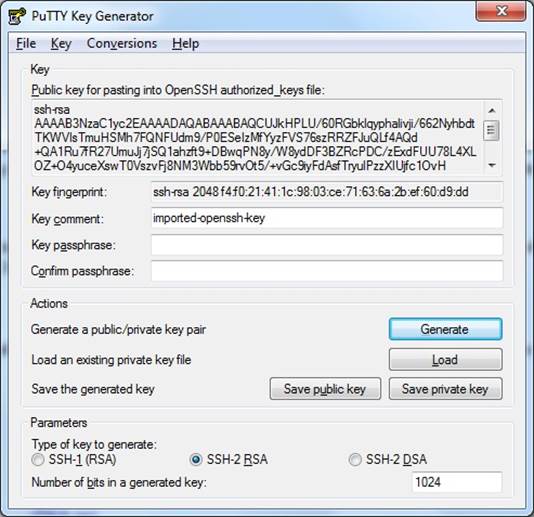
Using
PUTTY to connect requires conversion of the PEM file - Amazon has a guide for
this linked under the SSH client guide.
Once in, you’re presented with a command
line screen and are ready to install whatever you need - using the Ubuntu AMI
will require you login as user ubuntu (not root, as Amazon suggest) and sudo
commands will not require additional passwords (but you still need to sudo
commands).
Shutting Down
Once you’ve finished with the server and
done all you need to, don’t forget to terminate it. To do this, right click the
instance in the instance menu and select terminate. At this point, the instance
will shutdown and Amazon will delete all data that was on the server so make
sure you’ve downloaded everything you need! In using this for work purposes,
I’ve found that making use of the Amazon S3 storage can prove beneficial as
well, as you are able to transfer large volumes of data to it quickly from the
instance. Shutdown the instance and then download from Amazon S3 in your own
time - very handy for large datasets I was dealing with.
Conclusion
This guide has detailed how to get a basic
EC2 instance up and running. However, what you intend to use it for, and how,
will affect your choice of instance level, operating system and required system
functionality. So now it’s really time for you to get started and then begin to
experiment for yourself.