Production level WPF
applications will typically make use of dedicated tools to generate the
necessary XAML. As helpful as these tools are, it is a very good idea to
have an understanding of the overall structure of XAML markup.
1. Introducing Kaxaml
When you are first learning the grammar of XAML, it can be very helpful to use a free tool named kaxaml. You can obtain this popular WPF XAML editor/parser from the following web site:
http://www.kaxaml.com
Kaxaml is helpful in that it
has no clue about C# source code, event handlers or implementation logic
and is a much more straightforward way to test XAML snippets than using
a full-blown Visual Studio 2010 WPF project template. As well, kaxaml
has a number of integrated tools, such as a color chooser, XAML snippet
manager, and even a "XAML scrubber" option that will format your XAML
based on your settings.
When you first open kaxaml, you will find simple markup for a <Page> control:
<Page
   xmlns="http://schemas.microsoft.com/winfx/2006/xaml/presentation"
   xmlns:x="http://schemas.microsoft.com/winfx/2006/xaml">
  <Grid>
    <!-- Add your XAML here! -->
  </Grid>
</Page>
Like a Window, a Page contains various layout managers and controls. However, unlike a Window, Page objects cannot run as standalone entities. Rather, they must be placed inside of a suitable host such as a NavigationWindow, Frame or a web browser (and in that case, you have just made an XBAP!). The good news is that you can type identical markup within a <Page> or <Window> scope.
NOTE
If you change the <Page>
and </Page> elements in the kaxaml markup window to
<Window> and </Window>, you can press the F5 key to load a
new window onto the screen.
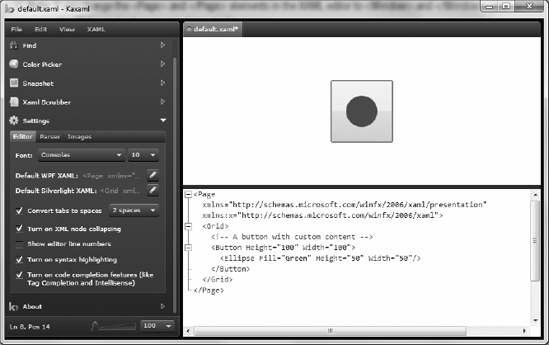
As an initial test, enter the following markup into the XAML pane at the bottom of the tool:
<Page
   xmlns="http://schemas.microsoft.com/winfx/2006/xaml/presentation"
   xmlns:x="http://schemas.microsoft.com/winfx/2006/xaml">
  <Grid>
    <!-- A button with custom content -->
    <Button Height="100" Width="100">
      <Ellipse Fill="Green" Height="50" Width="50"/>
    </Button>
  </Grid>
</Page>
You should now see your page render at the upper part of the kaxaml editor (Figure 1).
As you work with kaxaml,
remember that this tool does not allow you to author any markup that
entails code compilation (however, using x:Name is allowed). This includes defining a x:C lass
attribute (for specifying a code file), entering event handler names in
markup, or using any XAML keywords that also entail code compilation
(such as FieldModifier or ClassModifier). Any attempt to do so will result in a markup error.
2. XAML XML Namespaces and XAML "Keywords"
The root element of a WPF XAML document (such as a <Window>, <Page>, <UserControl> or <Application> definition) will almost always make reference to two predefined XML namespaces:
<Page
  xmlns="http://schemas.microsoft.com/winfx/2006/xaml/presentation"
  xmlns:x="http://schemas.microsoft.com/winfx/2006/xaml">
   <Grid>

   </Grid>
</Page>
The first XML namespace, http://schemas.microsoft.com/winfx/2006/xaml/presentation, maps a slew of WPF .NET namespaces for use by the current *.xaml file (System.Windows, System.Windows.Controls, System.Windows.Data, System.Windows.Ink, System.Windows.Media, System.Windows.Navigation, etc.).
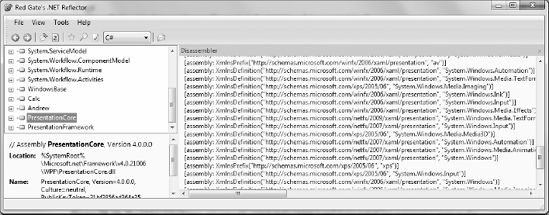
This one-to-many mapping is actually hard-coded within the WPF assemblies (WindowsBase.dll, PresentationCore.dll, and PresentationFramework.dll) using the assembly-level [XmlnsDefinition] attribute. Here is one such listing, which essentially imports System. Windows:
[assembly: XmlnsDefinition("http://schemas.microsoft.com/winfx/2006/xaml/presentation",
                           "System.Windows")]
If you load these WPF assemblies into reflector.exe, you can view these mappings firsthand. For example, if you select the PresentationCore.dll assembly (see Figure 3), and press the Space key, you will see numerous instances of the [XmlnsDefinition] attribute.
The second XML namespace, http://schemas.microsoft.com/winfx/2006/xaml, is used to include XAML-specific "keywords" (for lack of a better term) as well as the inclusion of the System.Windows.Markup namespace:
[assembly: XmlnsDefinition("http://schemas.microsoft.com/winfx/2006/xaml",
                           "System.Windows.Markup")]
One rule of any
well-formed XML document (remember, XAML is an XML-based grammar) is
that the opening root element designates one XMLnamespace as the primary namespace,
which typically is the namespace that contains the most commonly used
items. If a root element requires the inclusion of additional secondary
namespaces (as seen here), they must be defined using a unique tag
prefix (to resolve any possible name clashes). As a convention, the
prefix is simply x; however, this can be any unique token you require, such as XamlSpecificStuff:
<Page
   xmlns="http://schemas.microsoft.com/winfx/2006/xaml/presentation"
xmlns:XamlSpecificStuff="http://schemas.microsoft.com/winfx/2006/xaml">
  <Grid>
    <!-- A button with custom content -->
    <Button XamlSpecificStuff:Name="button1" Height="100" Width="100">
      <Ellipse Fill="Green" Height="50" Width="50"/>
    </Button>
  </Grid>
</Page>
The obvious downside of defining wordy XML namespace prefixes is you would be required to type XamlSpecificStuff each time your XAML file needs to refer to one of the items defined within this XAML-centric XML namespace. Given that XamlSpecificStuff requires many additional keystrokes, just stick with x.
In any case, beyond the x:Name, x:Class and x:Code keywords, the http://schemas.microsoft.com/winfx/2006/xaml XML namespace also provides access to additional XAML keywords, the most common of which are shown in Table 1.
Table 1. XAML Keywords
| XAML Keyword | Meaning in Life |
|---|
| x:Array | Represents a .NET array type in XAML. |
| x:ClassModifier | Allows you to define the visibility of the C# class (internal or public) denoted by the Class keyword. |
| x:FieldModifier | Allows
you to define the visibility of a type member (internal, public,
private, or protected) for any named subelement of the root (e.g., a <Button> within a <Window> element). A named element is defined using the Name XAML keyword. |
| x:Key | Allows you to establish a key value for an XAML item that will be placed into a dictionary element. |
| x:Name | Allows you to specify the generated C# name of a given XAML element. |
| x:Null | Represents a null reference. |
| x:Static | Allows you to make reference to a static member of a type. |
| x:Type | The XAML equivalent of the C# typeof operator (it will yield a System.Type based on the supplied name). |
| x:TypeArguments | Allows you to establish an element as a generic type with a specific type parameter (e.g., List<int> vs. List<bool>). |
In addition to
these two necessary XML namespace declarations, it is possible, and
sometimes necessary, to define additional tag prefixes in the opening
element of a XAML document. You will typically do so whenever you need
to describe in XAML a .NET class defined in an external assembly. For
example, say you have built a few custom WPF controls and packaged them
in a library named MyControls.dll.
Now, if you wish to create a new
Window that uses these controls, you can establish a custom XML
namespace that maps to your library using the clr-namespace and assembly tokens. Here is some example markup that creates a tag prefix named myCtrl s, which can be used to access members in your library:
<Window x:Class="WpfApplication1.MainWindow"
  xmlns="http://schemas.microsoft.com/winfx/2006/xaml/presentation"
  xmlns:x="http://schemas.microsoft.com/winfx/2006/xaml"
  xmlns:myCtrls="clr-namespace:MyControls;assembly=MyControls"
  Title="MainWindow" Height="350" Width="525">
  <Grid>
  <myCtrls:MyCustomControl />
  </Grid>
</Window>
The clr-namespace token is assigned to the name of the .NET namespace in the assembly, while the assembly token is set to the friendly name of the external *.dll assembly. You can use this syntax for any external .NET library you wish to manipulate in markup.