Tap the framed picture icon beside the '+'
sign on the start-up screen. This will bring you to an import screen, where you
can import your base image.
Add a New Layer
Once your base layer has been added, tap
the Add Layers icon on the bottom right of the Layers sidebar. Select 'Photo
Layer' and then import your second image. We think the previous landscape photo
could use a little more life, so we're bringing in an image of a horse.
Choose the Scribble Selection Tool
Make sure the horse layer is selected and
on top of the base layer. You can select layers simply by tapping on them, and
rearrange them by dragging them up and down. Tapping the circular icon on the
top left of a layer hides the layer, tapping it again brings it back.
On the tools sidebar on the left, find and
choose the Scribble Selection Tool
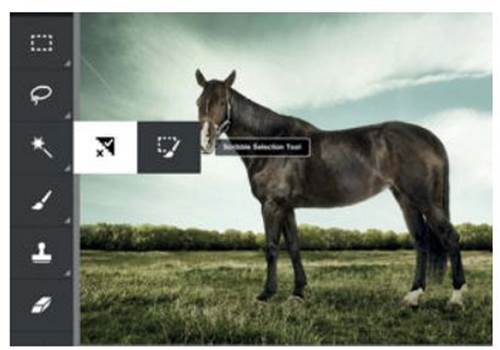
Make
sure the horse layer is selected and on top of the base layer.
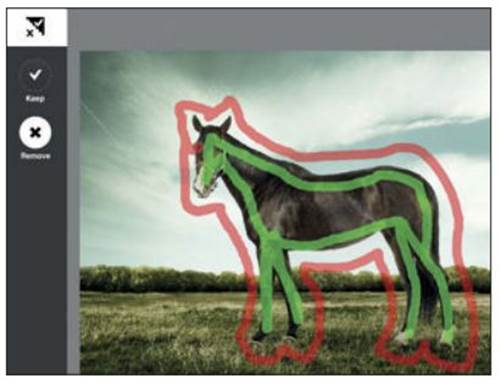
Keep the Outline
Make sure the 'Keep' option is selected in
the Scribble Selection Tool options. Now paint inside the edges of the horse.
It doesn't have to be precise, that's the magic of the Scribble Selection Tool.
Edge Out with Remove
Once you're finished, tap on 'Remove'. Now
draw along the outside edges of the horse. You don't have to touch the two
outlines together, just trace along the outside. You'll notice that PS Touch
might switch to a selection right after your first stroke (the 'moving ants'
selection pattern). Don't worry; you can still keep adding strokes – just keep
drawing until you've finished this outer edge.
Now
draw along the outside edges of the horse.
Refine Edges
Now that you've finished both edges, you
can see the outlines of where the actual selection will be made. You can
further refine this selection by toggling between the Keep and Remove options.
Use Keep to paint in areas you want to keep, and use Remove to paint in areas
you want out.
Feather to Soften
We're now going to soften the edges of the
selection so that the places where we've made mistakes aren't so obvious.
Feathering the selection will create a soft transition in-between the selected
and non-selected areas. Tap Select on the top toolbar, and choose Feather.
It's up to you how soft you want your
transition to look; the good thing is you can experiment with the slider to
preview how it'll eventually look. We've settled on an amount of 7 pixels.
Extract Your Subject
To extract your subject, or in other words;
to delete the unwanted background, tap Edit, then choose Extract. This will
remove the background outside of your selection; as a result the horse now
appears floating on top of the landscape.
Resize the Horse
The horse looks a little big. To get rid of
the selection, tap Select and Deselect. We're going to resize our horse so it
fits perfectly into our landscape. Tap the Move icon on the top toolbar. Here
you can move, as well as resize the horse just by dragging any of the round
points around it.
Having the 'Linked' icon active on the
bottom toolbar will ensure that any resizing will stay proportionate. The
magnet active makes any movement snap to an invisible grid, turning it off will
let you reposition the horse more freely.
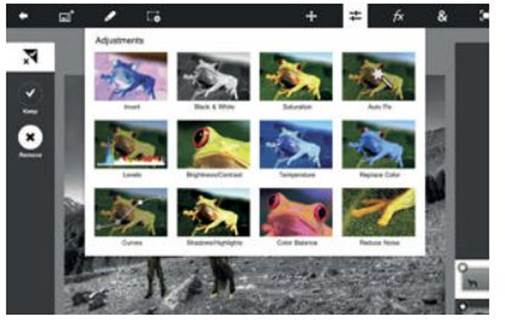
Make it Black & White
The brown horse stands apart from the black
and white landscape. To make it blend in, we tap the Adjustments icon on the
top right, and choose Black & White.
Make
it Black & White
Make it Retro
To give the image a little more edge, we're
going to apply an effect. But to do that we first need to flatten the image, so
the effect is applied to both the horse and the landscape. Making sure the
horse layer is selected; tap the layers icon on the layers toolbar, then tap on
the layers icon (with the downward arrow) on the pop-up box. Choose to flatten
the image.
Save and Share
The last step is to save and export your
image. Tap the back arrow on the top left, and PS Touch will prompt you to save
your project. Save and you'll be brought to the Projects menu. Once you're
there, you can tap on the Share icon, and choose the way you want to share your
image.