Internet
connection settings and proxies can be two of the biggest problems for
administrators. When you deploy new computers, you must configure the
connection and proxy settings manually or rely on an image build of a
machine that might not be up to date. When you make changes to the
network, you might need to update the connection settings as well.
Performing these procedures manually takes a lot of time that can be
better spent performing other tasks. Fortunately, Group Policy provides
a better way to manage connection and proxy settings, and the related
techniques are examined in this section.
Managing Connection Settings Through Group Policy
Connection settings for dial-up, broadband, and
virtual private network (VPN) access can be managed through Group
Policy. You can use Group Policy to deploy new configurations, to
update existing configurations when you need to make changes, and to
delete existing configurations and replace them with new ones. Local
area network (LAN) settings for automatic detection and proxy servers
are also imported with the connection configuration settings. The
address for automatic configuration scripts is not imported, however.
These settings are managed with the Automatic Browser Configuration
policy.
| Real World |
Whenever you manage connection settings through
Group Policy, you should create the necessary connections on a test
system following the techniques "Managing Mobile Networking and Remote Access,"
and then check the connections by dialing in to the network, connecting
through broadband, or using VPN as necessary. Then import the settings
into the Connection Settings policy from the test system. Be sure to
import settings at the appropriate level in Group Policy. In most
cases, you won't want to roll these settings out to the entire domain
and instead will want to apply these settings only to the appropriate
Microsoft Active Directory directory service organizational units.
|
To import connection settings into Group Policy, follow these steps:
-
Log on to the system where you created the connection settings that you want to use.
-
Access the Group Policy object you want to work with following the techniques discussed in the "Group Policy Essentials" , "Configuring User and Computer Policies," and then access User Configuration\Windows Settings\Internet Explorer Maintenance\Connection in Group Policy.
-
Double-click Connection Settings in the right pane. This displays the Connection Settings dialog box.
-
Select Import The Current Connection Settings
From This Machine. To view or modify the settings that will be
imported, click Modify Settings and then use the Connections
tab of the Internet Properties dialog box to work with the settings as
necessary. The options available are the same as those for the
Connections tab of the Internet Properties dialog box.
| Note |
Existing connections with the same names as the
imported connections are updated with the new settings, so you don't
need to delete the existing settings to make these updates. You need to
delete existing settings only if you are concerned that users or other
administrators have created connections that might no longer be valid
and you want to ensure they are removed to prevent connectivity
problems.
|
-
If you are replacing previously configured
connections, you might want to specify that existing connections should
be deleted. To do this, in the Connection Settings dialog box, select
Delete Existing Dial-Up Connection Settings.
| Caution |
All previously configured connections are deleted
if you elect to delete existing connection settings. This means that
previous connections created by both administrators and users are
permanently removed.
|
-
Click OK.
Enabling and Configuring Proxy Settings
When you enable proxy settings, Internet Explorer
acts as a Web proxy client. In this configuration, Internet Explorer
requests can be directed to a proxy service to determine whether access
to this protocol is allowed. If the protocol is allowed, the proxy
server sends the request on behalf of the client and returns the
results to the client securely. Because the proxy server uses network
address translation (NAT) or a similar protocol, the actual Internet
Protocol (IP) address of the client making the request isn't revealed
to the target server. You can configure proxy servers for Hypertext
Transfer Protocol (HTTP), Secure Sockets Layer (SSL), File Transfer
Protocol (FTP), Gopher, and Socks (the Microsoft proxy service
protocol).
You can manage settings for proxy servers in several
different ways. One of those ways is to use the Local Area Network
(LAN) Settings dialog box, which is accessible in the Internet
Properties dialog box. On the Connections tab, click LAN Settings to
access the dialog box. When you want to use Group Policy, the preferred
technique is to configure standard proxy servers using the Proxy
Settings policy. Using this policy, you can configure unique proxy
servers for each Web service (HTTP, SSL, FTP, Gopher, and Socks) or you
can use one or more proxy servers to handle all types of requests. You
can also configure exceptions so that a proxy isn't used for specific
servers, IP address ranges, and the local network.
To configure proxy settings through Group Policy, follow these steps:
-
Access User Configuration\Windows
Settings\Internet Explorer Maintenance\Connection in Group Policy and
then double-click Proxy Settings in the right pane.
-
In the Proxy Settings dialog box, shown in Figure 1, select Enable Proxy Settings.
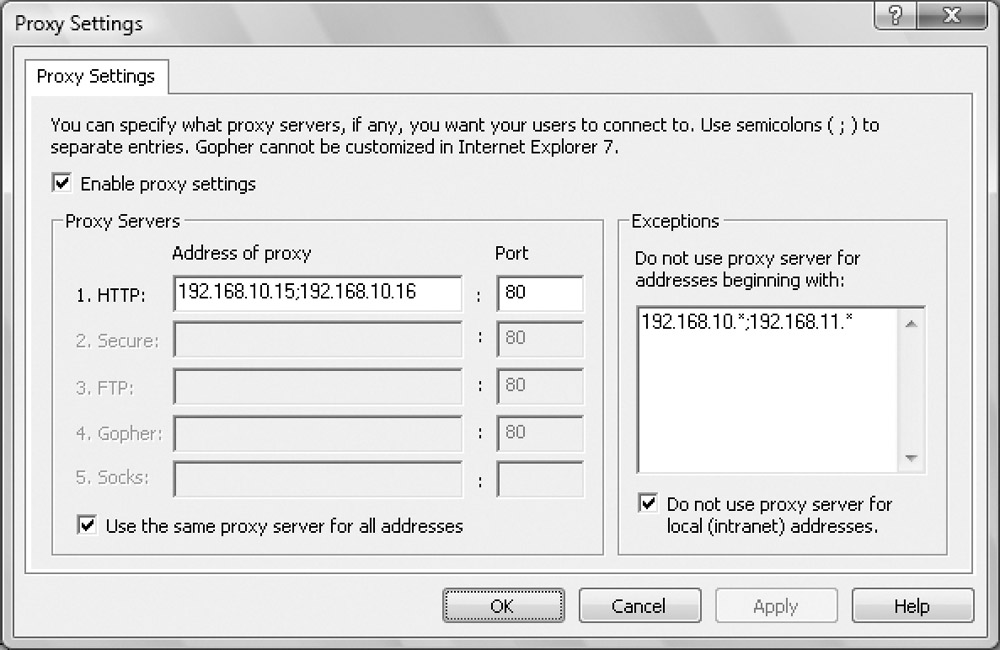
Figure 1: If your organization has proxy servers, you can configure Internet Explorer proxy settings using the Proxy Settings policy.
-
Set the IP address for proxies using the text boxes on the Proxy Servers panel. You'll find two columns of text boxes:
-
q Address Of Proxy
Sets the IP address of the related proxy server or servers. Type the IP
address for each service. If multiple proxies are configured for a
particular service, type the IP addresses for each proxy server in the
order in which you want the Web client to attempt to use them. Each
address must be separated by a semicolon. If a proxy isn't configured
for a service, don't fill in the related field.
-
q Port Sets the port
number on which the proxy server responds to requests. Most proxies
respond to port 80 for all requests. That said, however, the standard
ports are port 80 for HTTP, port 443 for SSL (listed as Secure), port
21 for FTP, port 70 for Gopher, and port 1081 for Socks. Check with
your organization's Web administrator for the proper settings.
-
The Use The Same Proxy Server For All Addresses
check box is selected by default. This setting enables you to use the
same IP address and port settings for the HTTP, SSL, FTP, Gopher, and
Socks services. You have two options:
-
q If your organization has proxy servers
that handle all requests, select Use The Same Proxy Server For All
Addresses and then type the IP address or addresses that you want to
use as well as the port number on which the server or servers respond.
-
q If you want to use a unique proxy
server or servers for each type of service, clear the Use The Same
Proxy Server For All Addresses check box and type the necessary IP
addresses and port numbers in the text boxes provided.
-
The Do Not Use Proxy Server For Local (Intranet)
Addresses check box is selected by default. The default value is a good
setting, in most cases, because you won't want to use a proxy for
requests made to servers on the same network segment. However, this
setting doesn't work well when your internal network uses multiple
network segments. In this case, you'll need to specify the IP address
range for each network segment on the exception list. An example is
shown in Figure 1.
Here you don't want a proxy to be used when accessing servers on the
same network segments as the proxy servers, so you configure the IP
addresses on these network segments as exceptions.
-
If your network has multiple segments or if
specific address ranges shouldn't be proxied when accessed, enter the
appropriate IP addresses or IP address ranges in the Exceptions list.
Each entry must be separated with a semicolon. The asterisk (*)
character can be used as a wildcard character to specify an address
range of 0 through 255, such as 192.*.*.*, 192.158.*.*, or 192.158.10.*.
-
Click OK.
To ensure that proxy settings are applied uniformly to
all users of a particular computer, you can set an additional policy
that assigns proxy settings per machine rather than per user. When you
enable this policy, proxy settings apply to all users of the same
computer and users cannot set their own proxy settings. This prevents
users from overriding the standard proxy settings for the organization.
You can make proxy settings per machine by following these steps:
-
Access Computer Configuration\Administrative
Templates\Windows Components\Internet Explorer in Group Policy and then
double-click Make Proxy Settings Per-Machine (Rather Than Per-User) in
the right pane.
-
Select Enabled and then click OK. The affected computer or computers need to be rebooted for this policy to be applied.
| Note |
If you disable or do not configure this policy,
users of the same computer can set their own proxy settings. These
settings might override those set through Group Policy.
|
|