All versions of Microsoft Windows beginning
with Windows 2000 include support for IPSec, as do several non-Microsoft
operating systems. IPSec is based on standards published by the
Internet Engineering Task Force (IETF), so all IPSec implementations
conforming to those standards should be compatible. In Windows operating
systems, the administration of IPSec is based on IPSec policies, which specify when and how IPSec should be used to secure network communications.
IPSec Components
The IPSec implementation in Windows Server 2003 consists of the following components:
IPSec Policy Agent
A service (appearing as IPSEC Services on every computer running
Windows Server 2003) that accesses IPSec policy information stored in
the Active Directory database or the Windows registry.
Internet Key Exchange (IKE)
IKE is the protocol that IPSec computers use to exchange information
about generating Diffie–Hellman keys and to create a security
association (SA). The IKE communication process proceeds in two stages.
The first stage, called the Phase 1 SA, includes the negotiation of
which encryption algorithm, hashing algorithm, and authentication method
the systems will use. The second stage consists of the establishment of
two Phase 2 SAs, one in each direction. This stage includes the
negotiation of which IPSec protocols, hashing algorithm, and encryption
algorithm the systems will use, as well as the exchange of information
about authentication and key generation.
IPSec Driver Performs
the actual preparations that enable secure network communication to
take place, including the generation of checksums, the construction of
IPSec packets, and the encryption of the data to be transmitted. The
driver receives a filter list from the IPSec policy the system is using
and compares each outgoing packet to that list. When a packet meets the
criteria of the filter list, the IPSec driver initiates the IKE
communications process with the destination system, adds the AH and ESP
headers to the outgoing packet, and encrypts the data inside, if
necessary. For incoming packets, the IPSec driver calculates hashes and
checksums as needed and compares them to those in the packet that just
arrived.
Planning an IPSec Deployment
Configuring computers running Windows Server
2003 to use IPSec is relatively simple. However, before the actual
deployment, you must consider just what network traffic you need to
protect and how much protection you want to provide. IPSec is resource
intensive in two different ways. First, the addition of AH and ESP
headers to each packet increases the amount of traffic on your network.
Second, calculating hashes and encrypting data both require large
amounts of processor time. Unless you have planned your network design
to account for the resources that IPSec needs, using IPSec for all your
network traffic simply because you can is usually not a good idea.
Windows Server 2003 IPSec enables you to specify
exactly what traffic to protect using IPSec, and what degree of
protection to apply. IPSec does this using packet filters. You can
specify IP addresses, protocols, and ports when creating a filter, and
the system secures all traffic that meets the filter criteria using
IPSec.
Another factor to consider when planning an
IPSec deployment is support for the protocols on your network’s various
computers. Systems running versions of the Windows operating system
earlier than Windows 2000 cannot use IPSec. In the case of operating
systems other than the Windows operating system, you must determine
whether they support IPSec and do your own testing to be sure that the
implementations are compatible.
Working with IPSec Policies
The IP Security Policies snap-in for Microsoft
Management Console (MMC) is the tool you use to view and manage IPSec
policies on a computer running Windows Server 2003. By default, the
snap-in is incorporated into the Group Policy Object Editor console, and
on member servers, into the Local Security Policy console. You can also
add the snap-in to a new MMC console and configure it to manage the
policies on any individual computer or Active Directory domain.
You deploy IPSec policies in much the same way
as other types of Windows Server 2003 policy settings; you can apply
them to individual computers, but for network installations, it is more
common to deploy IPSec policies by assigning them to Active Directory
sites, domains, or organizational units (OUs). IPSec policies flow down
through the Active Directory hierarchy just like other group policy
settings. When you apply an IPSec policy to an OU, for example, all the
computers in the domain inherit that policy.
Once
you have created IPSec policies in the appropriate places, you must
then activate them by selecting Assign from the Action menu in the IP
Security Policies snap-in. You can view the policy that is currently in
effect for any computer on the network, as well as detailed information
about IPSec activities, using the IP Security Monitor snap-in.
Using the Default IPSec Policies
When you open the IP Security Policies snap-in (shown Figure 1),
you see the three policies that Windows Server 2003 always creates by
default. These three policies are as follows, listed in order of
increasing security:
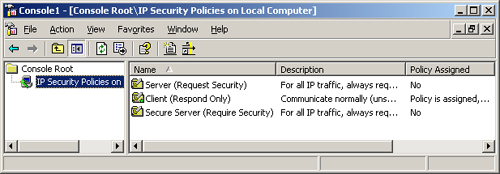
Client (Respond Only)
Configures the computer to use IPSec only when another computer
requests IPSec. The computer using this policy never initiates an IPSec
negotiation; it only responds to requests from other computers for
secured communications.
Server (Request Security)
Configures the computer to request the use of IPSec when communicating
with another computer. If the other computer supports IPSec, the IPSec
negotiation begins. If the other computer does not support IPSec, the
systems establish a standard, unsecured IP connection.
Secure Server (Require Security)
Configures the computer to require IPSec security for all
communications. If the computer attempts to communicate with a computer
that does not support IPSec, the initiating computer terminates the
connection.
These default policies are intended for
computers performing different roles. The Client (Respond Only) policy
is intended for computers that connect sometimes to secured servers, and
sometimes to systems that do not require the security of IPSec. Using
the Client (Respond Only) policy, the system incurs the additional
overhead generated by IPSec only when necessary. The Server (Request
Security) policy is intended for computers that do not require the
highest levels of security and might communicate with systems not
supporting IPSec. The Secure Server (Require Security) policy is
intended for computers working with sensitive data that must be secured
at all times. Before implementing this policy, you must make sure all
the computers that need to access the secured server support IPSec.
Modifying IPSec Policies
In addition to using the default IPSec policies as they are, you can modify them or create new policies of your own.
Tip
Although
you can modify the properties of the default IPSec policies, the best
practice is to leave them intact and create new policies of your own
using the default policies as models. |
IPSec policies consist of three elements, which are as follows:
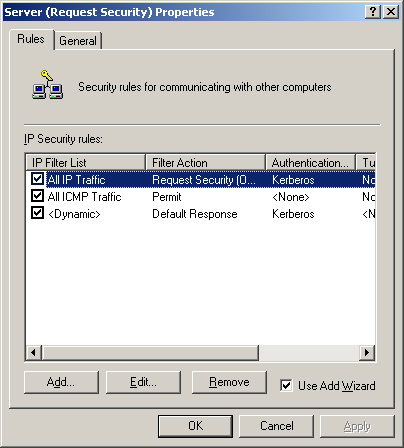
Rules
A rule is a combination of an IP filter list and a filter action that
specifies when and how the computer should use IPSec. An IPSec policy
can consist of multiple rules, as shown in Figure 2.
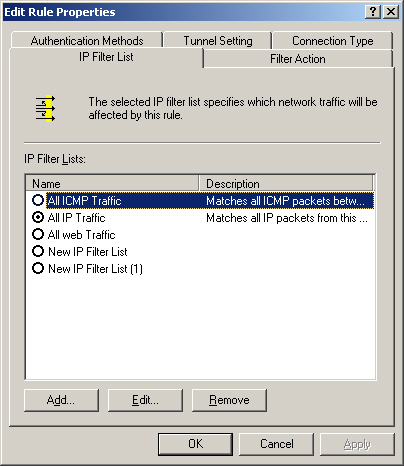
IP filter lists
A collection of filters that specify what traffic the system should
secure with IPSec, based on IP addresses, protocols, or port numbers.
You can also create filters using a combination of these criteria, as
shown in Figure 3.
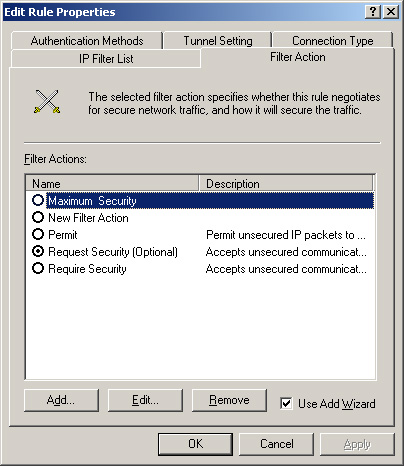
Filter actions Configuration
parameters that specify exactly how IPSec should secure the filtered
packets. Filter actions specify whether IPSec should use AH, ESP, or
both, as well as what data integrity and encryption algorithms the
system should use. (See Figure 4.)
To help create a new policy, the IP Security
Policies snap-in provides wizards for creating rules, filter lists, and
filter actions. However, you can elect not to use the wizards and create
the policy elements using standard dialog boxes.
Exam Tip
When
preparing for the upgrade exams, be sure you are familiar with the
components of an IPSec policy and with the functions of each component. |
Command-Line Tools
Netsh.exe
is a native Windows Server 2003 command-line scripting tool that you
can use to display or modify the local or remote network configuration
of a computer running Windows Server 2003. You can run Netsh from a
batch file or from the command prompt. The Netsh IPSec commands cannot
be used on other versions of Windows.
See Also
You
can find a complete list of Netsh IPSec commands in the Windows Server
2003 Help And Support Center. You can locate them by clicking Tools on
the Help And Support Center home page and then clicking Command Line
Reference A-Z. Note that many of the commands look complex, but they can
be simplified. If you use the same choices as the command uses for its
defaults, the commands you must type in can be reduced. For example, you
don’t need to use the word “Kerberos” if that is the form of
authentication you want to use. Enter nothing, and the command defaults
to using Kerberos authentication. |
Netdiag.exe is a
command-line tool that you can use to display IPSec information as well
as to test and view network configuration. Netdiag is available for
Windows Server 2003, Windows 200, and Windows XP. However, it must be
installed in a different way for each operating system. For Windows
Server 2003, Netdiag is installed with the Windows Server 2003 Support
Tools. For Windows 2000, Netdiag is included with the Windows 2000
Resource Kit tools that you can also download from the Microsoft Web
site. It is also available on the Windows XP Installation CD-ROM, and is
installed by running Setup.exe from the Support\Tools folder.
You can obtain general network diagnostic
information (not IPSec-specific) by using the Netdiag command. For
example, the Netdiag /v /l command provides the IP configuration and
routing configuration for a computer, tests WINS and DSN name
resolution, reports the build version of the computer and the hotfixes
that are installed, tests the validity of domain membership, verifies
that clients can contact domain controllers, and checks trust
relationships. All this information can be useful in eliminating general
networking problems before attempting to diagnose IPSec issues.
However, although the Netdiag.exe tool is
available for Windows Server 2003, the Netdiag /test:ipsec option is
removed. Use the Netsh command instead. Because Netsh IPSec context
commands will not work with down-level Windows computers, use Netdiag
for them. You might want to remotely examine the IPSec policy of a
computer running Windows XP or Windows 2000 that is communicating, or
attempting to communicate, with Windows Server 2003. In this case, use a
Remote Desktop session and the Netdiag tool.
Practice: Creating an IPSec Policy
In
this practice, you use the IP Security Policies snap-in to view the
properties of the default IPSec policies and create a new policy of your
own.
Exercise 1: Creating an MMC Console and Viewing the Default Policies
In this exercise, you create an MMC console
containing the IP Security Policies snap-in and use it to view the
default IPSec policies on your server.
1. | Log on to Windows Server 2003 as Administrator.
|
2. | Click Start, and then click Run. The Run dialog box appears.
|
3. | In the Open text box, type mmc and then click OK. The Console1 window appears.
|
4. | From the File menu, select Add/Remove Snap-in. The Add/Remove Snap-in dialog box appears.
|
5. | Click Add. The Add Standalone Snap-in dialog box appears.
|
6. | Scroll
down the Available Standalone Snap-ins list, select IP Security Policy
Management, and then click Add. The Select Computer Or Domain dialog box
appears.
|
7. | With the default Local Computer option selected, click Finish.
|
8. | Click
Close to close the Add Standalone Snap-in dialog box. The IP Security
Policies On Local Computer snap-in now appears in the Add/Remove Snap-in
dialog box.
|
9. | Click OK to close the Add/Remove Snap-in dialog box. The snap-in you selected now appears in the scope pane of the MMC console.
|
10. | Click
the IP Security Policies on Local Computer heading in the scope pane.
The three default IPSec policies described earlier in this lesson appear
in the details pane.
|
11. | Select
the Secure Server (Require Security) policy in the details pane and,
from the Action menu, select Properties. The Secure Server (Require
Security) Properties dialog box appears.
Notice that the Rules tab in the Secure Server (Require
Security) Properties dialog box contains three rules, one applying to
all IP traffic, one for all ICMP traffic, and one that is dynamic.
|
12. | Select All IP Traffic from the IP Security Rules list, and then click Edit. The Edit Rule Properties dialog box appears.
Notice that the All IP Traffic option is selected in the IP Filter List tab.
|
13. | Click the Filter Action tab.
Notice that the Require Security option is selected in the Filter Actions list.
|
14. | Click the Authentication Methods tab.
Notice that the policy is configured to use Kerberos for authentication.
|
15. | Click OK to close the Edit Rule Properties dialog box.
|
16. | Click OK to close the Secure Server (Require Security) Properties dialog box.
|
Exercise 2: Creating a New IPSec Policy
In this exercise, you use the IP Security Policies snap-in to create a new IPSec policy on the computer.
1. | In the console you created in Exercise 1,
select the IP Security Policies On Local Computer heading in the scope
pane and, from the Action menu, select Create IP Security Policy. The IP
Security Policy Wizard appears.
|
2. | Click Next. The IP Security Policy Name page appears.
|
3. | In the Name text box, type Web Server Security and then click Next. The Requests For Secure Communication page appears.
|
4. | Click
Next to accept the default Activate The Default Response Rule setting.
The Default Response Rule Authentication Method page appears.
The default authentication method for Active Directory systems
is Kerberos V5 protocol, but on this page, you could elect to use a
digital certificate or a preshared key in the form of a character string
that you supply to all the computers involved in secured
communications.
|
5. | Click
Next to accept the default Active Directory Default (Kerberos V5
Protocol) option. The Completing The IP Security Policy Wizard page
appears.
|
6. | Make
sure the Edit Properties check box is selected, and then click Finish.
The Web Server Security Properties dialog box appears.
|
7. | In the Rules tab, make sure that the Use Add Wizard check box is selected and then click Add. The Security Rule Wizard appears.
|
8. | Click Next. The Tunnel Endpoint page appears.
On this page, you specify whether you want IPSec to run in
transport mode or tunnel mode. To use tunnel mode, you must specify the
IP address of the system functioning as the tunnel endpoint. This is
usually a router that provides a WAN connection to a remote site.
|
9. | Click Next to accept the default This Rule Does Not Specify A Tunnel option. The Network Type page appears.
This page enables you to specify whether you want the rule to
apply to local area network (LAN) traffic only, remote access traffic
only, or both.
|
10. | Click Next to accept the default All Network Connections option. The IP Filter List page appears.
|
11. | Click Add. The IP Filter List dialog box appears.
|
12. | In the Name text box, type All Web Traffic and then click Add. The IP Filter Wizard appears.
|
13. | Click Next. The IP Filter Description And Mirrored Property page appears.
|
14. | Click
Next to accept the default Mirrored. Match Packets With The Exact
Opposite Source And Destination Addresses check box. The IP Traffic
Source page appears.
|
15. | In the Source Address list, select Any IP Address and then click Next. The IP Traffic Destination page appears.
|
16. | In the Destination Address list, select My IP Address and then click Next. The IP Protocol Type page appears.
|
17. | In the Select A Protocol Type list, select TCP and then click Next. The IP Protocol Port page appears.
|
18. | Click the To This Port option, type 80 in the text box provided, and then click Next. The Completing The IP Filter Wizard page appears.
|
19. | Click Finish. The new IP filter you created appears in the IP Filters list. Click OK to close the IP Filter List dialog box.
|
20. | In
the IP Filter List page of the Security Rule Wizard, select the All Web
Traffic filter option you just created, and then click Next. The Filter
Action page appears.
|
21. | Make sure the Use Add Wizard check box is selected, and then click Add. The Filter Action Wizard appears.
|
22. | Click Next. The Filter Action Name page appears.
|
23. | In the Name text box, type Maximum Security and then click Next. The Filter Action General Options page appears.
|
24. | Click
the Negotiate Security option, and then click Next. The Communicating
With Computers That Do Not Support IPSec page appears.
|
25. | Click
Next to accept the default Do Not Communicate With Computers That Do
Not Support IPSec option. The IP Traffic Security page appears.
|
26. | Click the Custom option, and then click Settings. The Custom Security Method Settings dialog box appears.
|
27. | Select
the Data And Address Integrity Without Encryption (AH) check box to
activate the IP Authentication Header protocol, and then click OK to
return to the IP Traffic Security page.
|
28. | Click Next. The Completing The IP Security Filter Action Wizard page appears.
|
29. | Click Finish to return to the Filter Action page in the Security Rule Wizard.
|
30. | Select the Maximum Security filter action option you just created, and then click Next. The Authentication Method page appears.
|
31. | Click
Next to accept the default Active Directory Default (Kerberos V5
Protocol) option. The Completing The Security Rule Wizard page appears.
|
32. | Clear the Edit Properties check box, and then click Finish.
|
33. | Click OK to close the Web Server Security Properties dialog box.
|
34. | The new Web Server Security policy you created now appears in the IP Security Policies On Local Computer snap-in.
|
35. | Click the Web Server Security policy in the details pane and, from the Action menu, select Assign.
|
36. | Close the IP Securities Policies On Local Computer snap-in. |