The .NET Framework Configuration tool (Mscorcfg.msc) is a Microsoft Management
Console (MMC) snap-in supplied with the .NET Framework that provides
a graphical interface to manage various aspects of .NET
configuration. We are concerned with the administration of security
policy only and will not discuss the other features (refer to the
.NET Framework documentation).
|
You can run Mscorcfg.msc only if
you have MMC version 1.2 or later installed on your computer. If you
do not have MMC 1.2, you can download it from the Microsoft web site.
|
|
The steps to
execute Mscorcfg.msc from the
Windows user interface depend on the operating system you are using:
Windows 2000 Professional
-
Run Microsoft .NET Framework Configuration
from the
Administrative Tools group of the Control Panel.
Windows 2000 Server or Windows .NET Server
-
Click Start, Programs, Administrative Tools, and
finally Microsoft .NET Framework
Configuration
Windows XP Professional
-
From the Control Panel, click Performance and
Maintenance then
Administrative Tools and run Microsoft .NET Framework Configuration
Regardless of the operating system you choose, you can start
Mscorcfg.msc from the command
line using the following command, where version is
the version of the .NET framework, such as
"v1.0.3705" for Version 1.0:
%Systemroot%\Microsoft.NET\Framework\version\Mscorcfg.msc
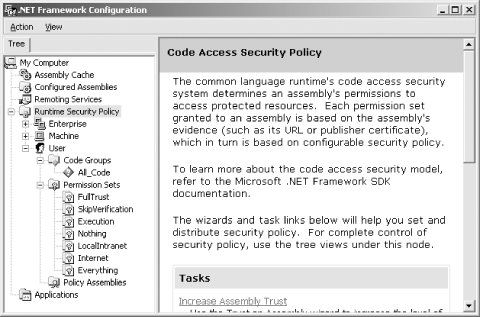
Figure 1 shows the main window of Mscorcfg.msc. Expanding the Runtime Security
Policy node of the console tree, you will see child nodes for each of
the enterprise, machine, and user policy levels.
By expanding the node representing the policy level you want to
administer, you can see three subtrees, one for each of the following
policy-level elements :
The following sections focus on the management of these three
elements.
1. Managing Fully Trusted Assemblies
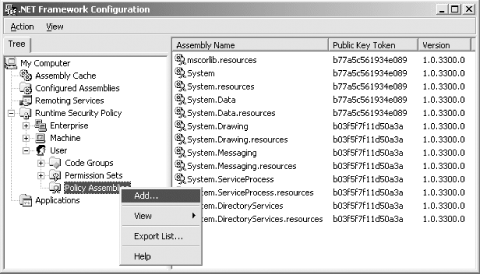
By right-clicking the Policy
Assemblies node, as shown in Figure 2, a shortcut
menu provides you with the following options:
Add...
-
Allows you to add an assembly to the fully trusted assembly list,
which we discuss further in Section 1.1
View
-
Allows you to control the righthand console pane to display either
the current list of fully trusted assemblies (shown in Figure 2) or help information that describes the
purpose of fully trusted assemblies
Export List...
-
Allows you to export the list of fully trusted assemblies to a text
file, including version numbers and public key token values
Help
-
Displays MMC help information
1.1. Adding a fully trusted assembly
Before you can add a new assembly to the
fully trusted assemblies list, you must install the assembly into the
global assembly cache.
After you have installed the assembly in the global assembly cache,
right-click the Policy Assemblies node of the console tree, as shown
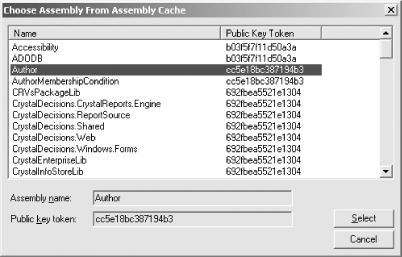
in Figure 2 and select Add... from the shortcut
menu. The Choose Assembly From Assembly Cache dialog box (shown in
Figure 3) is displayed, listing all of the
assemblies installed in the global assembly cache. Select the
assembly you want to make fully trusted and click the Select button.
|
You must make an assembly fully trusted in every policy level in
which you will use the security classes that the assembly contains.
|
|
1.2. Deleting a fully trusted assembly
To remove an assembly from the fully trusted assemblies list, make sure the
righthand pane of the console displays the current list of fully
trusted assemblies, as previously shown in Figure 9-3. To configure this, right-click the Policy
Assemblies node in the console tree and click View followed by
Assemblies from the shortcut menus.
With the list displayed, right-click the assembly that you want to
remove and select Delete from the shortcut menu that appears. You
will be prompted to confirm the delete action; click the Yes button
and the assembly is removed.
|
Security policy resolution will not function correctly if you remove
an assembly containing classes on which the active policy
configuration depends.
|
|
2. Managing Named Permission Sets
By expanding a policy level's Permission Sets node in the console tree, you
will see the list of named permission sets defined in that policy
level. Figure 4 shows the list of named
permission sets defined in the default user policy.
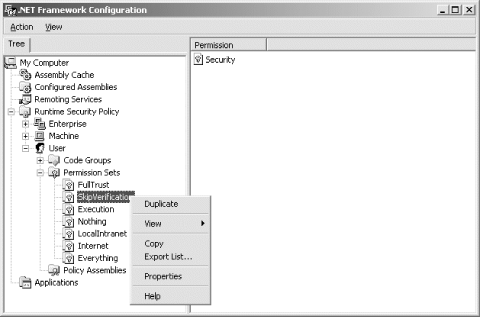
As shown in Figure 4, right-clicking any of the
default permission set nodes displays a shortcut menu containing the
following options:
Duplicate
-
Creates a copy of the selected permission set in the current policy
level. For example, if you right-click the
Internet permission set and select Duplicate, you
create a new permission set named Copy of Internet in the user policy
level.
View
-
Allows you to control the contents of the righthand console pane to
display either the permissions contained in the selected permission
set (shown in Figure 4) or help information that
describes the permission set.
Properties
-
Displays a dialog box containing the name and description of the
permission set. Because the default permission sets (except
Everything, which we discuss shortly) are
immutable, the dialog box does not allow you to edit the property
values.
Copy
-
Copies the permission set to the clipboard, allowing you to make
copies of the permission set in other policy levels using the
clipboard's Paste facility.
Help
-
Displays MMC help information.
The shortcut menu for the default Everything
permission set or any other non-default permission set includes these
additional options:
Change Permissions...
-
Brings up a dialog box that allows you to change the permissions
contained in the permission set. The dialog boxes for editing the
permission sets' content are the same dialog boxes
used to create permission sets; we will discuss them in Section 2.1.
Cut
-
Copies the permission set to the clipboard and deletes it from the
current policy level. You cannot cut permission sets that are in use
by code groups.
Delete
-
Allows you to delete the permission set as long as it is not in use
by any code group.
Rename
-
Allows you to rename the permission set as long as it is not is in
use by any code group.
Properties
-
Displays a dialog box that allows you to edit the name and
description of the permission set. As with Rename, you cannot change
the name of a permission set that is currently in use by a code
group.
2.1. Creating named permission sets
To create a new named permission set,
right-click Permission Sets node in the console tree and select
New... from the shortcut menu.
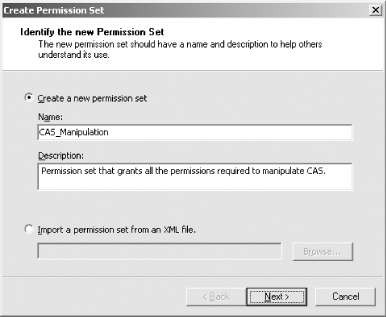
The Create Permission Set dialog box, shown in Figure 5, appears. You have two options for creating
the new permission set: manual creation using the graphical interface
or importing the definition of the permission set from an XML file.
To import the named permission set from a file, select the Import
a permission set from an XML file radio button, enter the name of the
file containing the definition, and press the Next button. The XML
description of the permission set must have the structure shown in
the following example, which describes a permission set named
TestSet containing the unrestricted
FileIOPermission, as well as the
Assertion and Execution
permissions from SecurityPermission:
<PermissionSet class="System.Security.NamedPermissionSet"
               version="1"
               Name="TestSet">
   <IPermission class="System.Security.Permissions.FileIOPermission, mscorlib,
Version=1.0.3300.0, Culture=neutral, PublicKeyToken=b77a5c561934e089"
                version="1"
                Unrestricted="true"/>
   <IPermission class="System.Security.Permissions.SecurityPermission, mscorlib,
Version=1.0.3300.0, Culture=neutral, PublicKeyToken=b77a5c561934e089"
                version="1"
                Flags="Assertion, Execution"/>
</PermissionSet>
The complexity of information in the XML description of a named
permission set means that it is easier to create this information
programmatically. This is easy to do by creating a
System.Security.NamedPermission object,
populating it with permission objects,
and calling the ToString method on the
System.Security.SecurityElement returned by the
ToXml method. The following code demonstrates the
creation of the TestSet named permission set
(whose XML description we just listed) and displays it to the
console:
# C#

// Create an empty NamedPermissionSet
NamedPermissionSet ps = new NamedPermissionSet("TestSet", PermissionState.None);

// Add an unrestricted FileIOPermission
ps.AddPermission(new FileIOPermission(PermissionState.Unrestricted));

// Add a SecurityPermission with Assertion and Execution permissions
ps.AddPermission(new SecurityPermission(SecurityPermissionFlag.Assertion |
    SecurityPermissionFlag.Execution));

// Display an XML version of the named permission set to the console.
Console.WriteLine(ps.ToXml(  ).ToString(  ));

# Visual Basic .NET

' Create an empty NamedPermissionSet
Dim ps As NamedPermissionSet = _
New NamedPermissionSet("TestSet",PermissionState.None)

' Add an unrestricted FileIOPermission
ps.AddPermission(New FileIOPermission(PermissionState.Unrestricted))

' Add a SecurityPermission with Assertion and Execution permissions
ps.AddPermission(New SecurityPermission(SecurityPermissionFlag.Assertion Or
SecurityPermissionFlag.Execution))

' Display an XML version of the named permission set to the console.
Console.WriteLine(ps.ToXml(  ).ToString(  ))
|
Imported permission set definitions can include entries for custom
code-access permission classes. Before you import custom code-access
permissions, make sure you have added the assembly that contains the
custom class to the fully trusted assemblies list of the current
policy level; see "Managing Fully Trusted
Assemblies" earlier in this chapter for details.
|
|
Instead of importing the named permission set, you can create
it manually by selecting the Create a new permission set radio
button. Enter a name and a description for the new permission set. In
Figure 9-6, we entered the name
"CAS_Manipulation" because we are
creating a permission set that includes all of the permissions
necessary to manipulate CAS programmatically. Press the Next button
to display the dialog box shown in Figure 6,
which allows you to select the set of permissions to include in the
permission set.
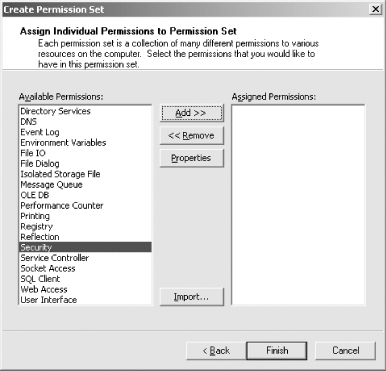
Select the permission you want to include in your permission set from
the Available Permissions list and click
the Add button. You will see a Permission
Settings dialog box. The contents of this dialog box depend on which
permission you selected to add. Figure 7 shows
the Permission Settings dialog box for the Security permission, which
represents the
System.Security.Permissions.SecurityPermission
class .
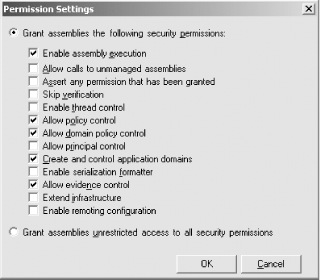
In Figure 7, we select the individual elements of
the SecurityPermission that we want to include in
the new permission set. The permissions we have selected here map to
the Execution, ControlPolicy,
ControlDomainPolicy,
ControlAppDomain, and
ControlEvidence members of the
System.Security.Permissions.SecurityPermissionFlag
enumeration.
Pressing the OK button takes you back to the list of available
permissions shown in Figure 6. You can add more
permissions or remove any that you have already added.
Figure 6 also shows a button named Import...
(which allows you to import an individual custom permission to your
permission set). Pressing the Import... button displays a dialog box
that allows you to select the file containing the XML description of
the custom permission. The XML description of the permission must be
of the appropriate structure to allow the runtime to create an
instance of the permission using the permission
class's FromXml method. The
following example contains the XML description of the custom
RadioPermission class . This specific example grants access to turn
the radio on and off:
<IPermission class="OReilly.ProgrammingDotNetSecurity.RadioPermission,
Radio, Version=1.0.0.0, Culture=neutral, PublicKeyToken=cc5e18bc387194b3"
             version="1"
             StartStop="true"/>
After configuring the contents of the new permission set, clicking Finish
returns you to the main Mscorcfg.msc
window.
|
Before you import custom code-access permissions, make sure you have
added the assembly that contains the custom class to the fully
trusted assemblies list of the current policy level; see
"Managing Fully Trusted Assemblies"
earlier in this chapter for details.
|
|
3. Managing Code Groups
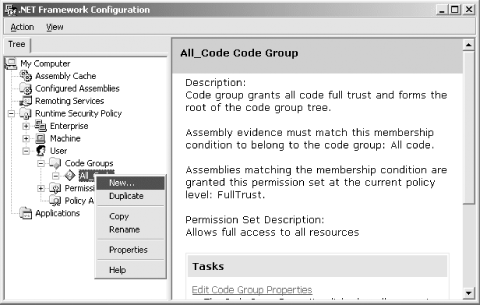
By expanding a policy level's Code Groups node
in the console tree, you will see the root code group for the policy
level, as shown in Figure 8.
|
Code group names must be unique within a policy level.
|
|
Right-clicking the root code group brings up a shortcut menu with the
following options:
New...
-
Allows you to create a new child code group, which we discuss in Section 3.1.
Duplicate
-
Creates a deep copy (including all child code groups) of the selected
code group and adds it as a child node to the current code group. For
example, if you right-click on the All_Code group
and select Duplicate, you create a new child group under
All_Code named Copy of
All_Code.
Copy
-
Copies the code group to the clipboard, allowing you to create copies
of the code group as children of other code groups using the
clipboard's Paste facility.
Paste
-
Pastes a previously copied code group as a child of the selected code
group.
Rename
-
Allows you to edit the name of the code group.
Properties
-
Displays a dialog box that allows you to edit the configuration of
the code group. With the exception of the code
group's attributes, the property pages contain the
same settings as the dialog boxes used during the creation of the
code group. We detail these settings in Section 3.1.
The key use of the property pages is to configure the
Exclusive and LevelFinal
attributes for the code group. However, the interface does not use the
attribute names and provides check boxes with the following
human-readable interpretations from which to choose:
Exclusive
-
This policy level will only have the permissions from the permission
set associated with this code group.
LevelFinal
-
Policy levels below this level will not be evaluated.
Help
-
Displays MMC help information.
By expanding the node representing the root code group, and the
subsequently displayed child nodes, you can navigate through the code
group hierarchy of the policy level. Right-clicking any code group
node (except the root node) displays a shortcut menu the same as that
we have already described, but with the following two additional
options:
Cut
-
Copies the code group and its children to the clipboard and deletes
it from the current policy level
Delete
-
Deletes the code group and its children.
3.1. Creating code groups
To create a new code
group, right-click the existing code group under which you want to
create the new child code group and select New... from the shortcut
menu.
|
You can only create code groups of type
System.Security.Policy.UnionCodeGroup using the
graphical interface of Mscorcfg.msc. To create code groups of other
types, you must import the XML description of the code group.
|
|
In the Create Code Group dialog box shown in Figure 9, you have the option to create the new code
group manually or to import an XML description of the code group from
a file.
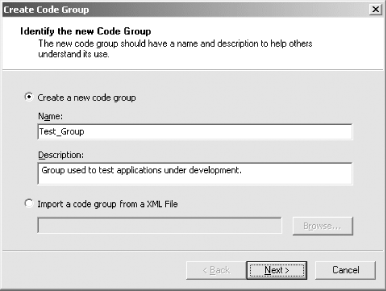
To import a code group from a file select,
the Import a code group from a XML file radio button, enter the name
of the file containing its XML description, and press the Next
button. The XML description of the code group must have the structure
shown in the following example, which defines a code group with the
configuration listed in Table 1:
<CodeGroup class="System.Security.Policy.UnionCodeGroup, mscorlib, Version=1.0.3300.
0, Culture=neutral, PublicKeyToken=b77a5c561934e089"
           version="1"
           Attributes="Exclusive"
           Name="TestGroup"
           Description="A code group for testing">
   <IMembershipCondition class="System.Security.Policy.SiteMembershipCondition,
mscorlib, Version=1.0.3300.0, Culture=neutral, PublicKeyToken=b77a5c561934e089"
                         version="1"
                         Site="*.oreilly.com"/>
   <PermissionSet class="System.Security.NamedPermissionSet"
                  version="1"
                  Name="FileAccess">
      <IPermission class="System.Security.Permissions.FileIOPermission, mscorlib,
Version=1.0.3300.0, Culture=neutral, PublicKeyToken=b77a5c561934e089"
                   version="1"
                   Unrestricted="true"/>
   </PermissionSet>
</CodeGroup>
Table 1. Parameter values of the TestGroup code group
|
Parameter
|
Setting
|
|---|
|
Name
|
TestGroup
|
|
Description
|
A code group for testing
|
|
Membership Condition
|
All code downloaded from a Site in the oreilly.com
domain
|
|
Permission Set
|
A custom permission set named FileAccess,
containing unrestricted access to the filesystem
|
|
Attributes
|
Exclusive
|
As with the permission set you imported in Section 2.1, the complexity of a code
group's XML description means it is easier and less
error-prone to create. . As an
example, here is the code that will generate the
TestGroup code group we just described and print
an XML representation of it to the console:
# C#

// Create the named permission set and add unrestricted file access.
NamedPermissionSet pset =
    new NamedPermissionSet("FileAccess",PermissionState.None);
pset.AddPermission(new FileIOPermission(PermissionState.Unrestricted));

// Create the policy statement and set the Exclusive attribute.
PolicyStatement pstate =
    new PolicyStatement(pset, PolicyStatementAttribute.Exclusive);

// Create the membership condition to match all "*.oreilly.com" sites.
IMembershipCondition mcon = new SiteMembershipCondition("*.oreilly.com");

// Create and configure the UnionCodeGroup
UnionCodeGroup cg = new UnionCodeGroup(mcon, pstate);
cg.Name = "TestGroup";
cg.Description = "A code group for testing";

// Display the CodeGroup to the console
Console.WriteLine(cg.ToXml(  ).ToString(  ));

# Visual Basic .NET

' Create the named permission set and add unrestricted file access.
Dim pset As NamedPermissionSet = _
New NamedPermissionSet("FileAccess",PermissionState.None)
pset.AddPermission(New FileIOPermission(PermissionState.Unrestricted))

' Create the policy statement and set the Exclusive attribute.
Dim pstate As PolicyStatement = _
New PolicyStatement(pset,PolicyStatementAttribute.Exclusive)

' Create the membership condition to match all "*.oreilly.com" sites.
Dim mcon As IMembershipCondition = _
New SiteMembershipCondition("*.oreilly.com")

' Create and configure the UnionCodeGroup
Dim cg As UnionCodeGroup =  New UnionCodeGroup(mcon,pstate)
cg.Name = "TestGroup"
cg.Description = "A code group for testing"

' Display the CodeGroup to the console
Console.WriteLine(cg.ToXml(  ).ToString(  ))
|
Imported code group definitions can include entries for custom code
group types, membership conditions, and permissions. Before you
import custom code groups, make sure you have added the assembly that
contains any custom classes to the fully trusted assemblies list of
the current policy level; see "Managing Fully
Trusted Assemblies" earlier in this chapter for
details.
|
|
Instead of importing the code group, you can create it
manually using a series of dialog boxes by selecting the Create a new
code group radio button, and entering a name and a description for
the new code group. In Figure 9, we entered the
name "Test_Group" to create a code
group that we will use to grant permission to applications we are in
the process of developing.
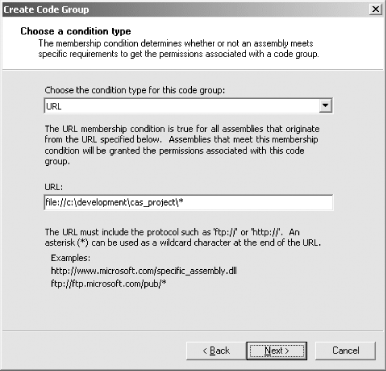
Press the Next button to display the dialog box shown in Figure 10, which allows you to configure the membership
condition for the new code group. The graphical interfaces allow you
to base membership on any of the standard evidence types . Figure 10 shows
the use of Url evidence to match any code loaded
from the c:\development\cas_project directory.
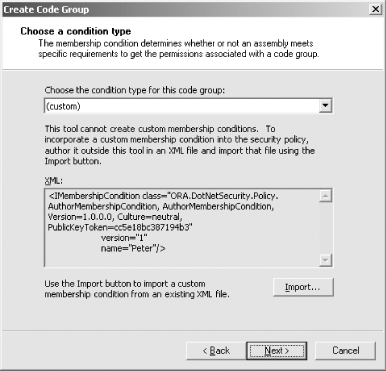
You can also choose to import a custom membership condition such as
the AuthorMembershipCondition class . Selecting (custom) from
the list of membership condition types causes the dialog box to
change its appearance to that shown in Figure 11.
Pressing the Import button allows you to specify the file that
contains an XML description of the custom membership condition. In
Figure 11, we have imported the XML description of
an AuthorMembershipCondition that matches any code
with Author = Peter evidence.
|
Before you import custom membership conditions, make sure you have
added the assembly that contains the custom class to the fully
trusted assemblies list of the current policy level; see
"Managing Fully Trusted Assemblies"
earlier in this chapter for details.
|
|
After configuring the code
group's membership condition, press the Next button
to display the dialog box shown in Figure 12,
which allows you to select the permission set that the code group
grants to its members. You can choose an existing named permission
set from the current policy level, or you can choose to create a new
code group. If you choose to create a new code group, you will begin
the process we described earlier in Section 2.1.
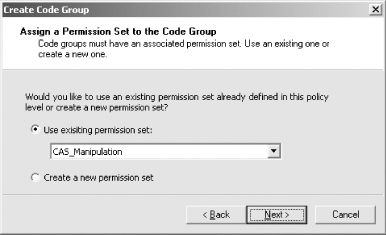
Selecting the named permission set for the code group and pressing
the Next button completes the creation of the code group and returns you
to the Mscorcfg.msc
main window.
4. Other Security Policy Administration Options
The previous sections have shown you how to perform the
security policy configuration tasks you will use most frequently
during the development and testing process. Here we outline a number
of other operations available through Mscorcfg.msc that you may find useful. By
right-clicking the Runtime Security Policy node in the console tree,
you will see the shortcut menu shown in Figure 13.
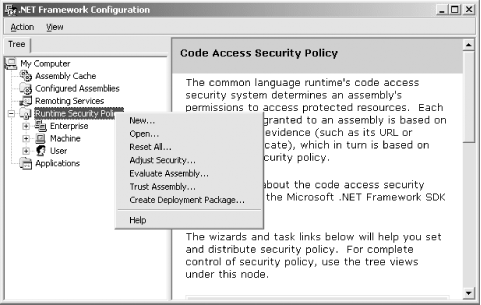
The commands available to you are:
New...
-
Creates a new policy level based on the default security
configuration . You
can also specify the location where the policy file will be stored.
Open...
-
Opens a new policy level from a specified file.
Reset All...
-
Allows you to reset all security policy to the default configuration . You can also reset individual policy levels to the
default settings by right-clicking the individual policy level nodes
in the console tree and selecting
"Reset" from the shortcut menu.
Adjust Security...
-
Provides a simple interface through which to adjust the default
machine security policy. You can configure the level
of trust you want to grant to each of the Internet Explorer zones,
which modifies the named permission set assigned to that code group.
Evaluate Assembly...
-
Allows you to test an assembly to see what code groups the assembly
is a member of and what permissions policy resolution would grant to
the assembly.
Trust Assembly...
-
Allows you to define the minimum level of trust that will be assigned
to an assembly.
Create Deployment Package...
-
Allows you to create a Windows Installer (.msi)
file containing the definition of a security policy level from the
current machine. Running this file on a target machine will configure
the policy level of that machine. This simplifies the task of
configuring security policy on a large number of machines, but .NET
contains no mechanism to perform the distribution process. You can
simply send the file to people that need it via email or use the
normal software distribution
processes used by your organization.