In this section, you are
going to use the Magic Wand tool to select a part of the scene in order
to apply an exposure adjustment.
Creating the selection
First, create the selection using the Magic Wand tool.
1. | Select the Magic Wand tool (
 ) from the Tools panel.
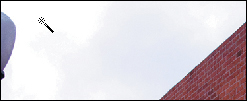
| 2. | Move the cursor over the sky portion of the image, and click once. As illustrated here, a selection appears.

| 3. | To
see how our alteration blends with the rest of the photo, choose View
> Edges (or press Ctrl+H on Windows or Option+F9 on Mac). This hides
the selection from view but still lets you perform actions on it, such
as applying filters.
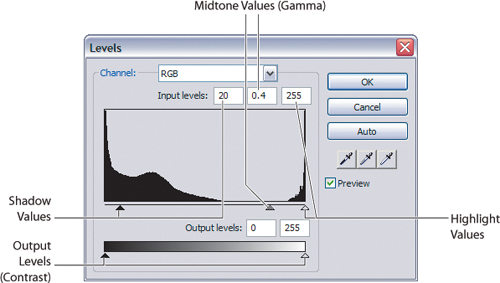
| 4. | Choose Filters > Adjust Color > Levels.
| 5. | Set the Shadow (Minimum Intensity) value to 20.
| 6. | Set the Midtone (Gamma) value to 0.4, and leave the Highlight value at 255. You can do this by typing into the input boxes or dragging the middle sliders.
Note
When applying a
filter adjustment to a bitmap selection, you must use the main Filters
menu. You should also create a copy of the image before you begin.
| 7. | Toggle Preview off and on again repeatedly to see how the cloud definition has changed, and then click OK to apply the filter.
Tip
It’s a good idea to zoom in on the area you are selecting to ensure a more accurate selection.
| 8. | Close the file without saving.
|
Using the Magic Wand tool with keyboard modifiers
Because
the Magic Wand tool selects based on contiguous pixel color, areas you
want included may not always become part of your original selection. You
can use modifier keys to add to the selection.
In this exercise, you are
going to use the Magic Wand tool to select parts of the actors’ faces in
order to apply an exposure adjustment. You will also modify the
selection by applying a feathered edge.
1. | Choose File > Open, and browse to the Lesson04 folder.
| 2. | Select actors_together.jpg, and then click Open.
Notice the skin tones on the left cheek of the man. They’re almost
washed out. A similar problem exists with the woman’s face. You will be
applying a bitmap filter to a bitmap selection, which will permanently
change the pixels in the image. When you are going to apply permanent
changes to a bitmap object, you should create a duplicate of the image
first so that the original is not damaged.
| 3. | Select the Pointer tool, and click the image to make it active.
| 4. | Press Ctrl+Shift+D (Windows) or Command+Shift+D (Mac) to create a clone of the image, and rename this duplicate Retouching.
| 5. | If necessary, select the Magic Wand tool (
) from the Tools panel.
| 6. | In the Properties panel, set the Edge to Feather, input a value of 4, set the Tolerance to 32, and make sure the Live Marquee option is selected.

| 7. | Move the cursor to the bright area of the detective’s cheek, and click once. A selection appears.
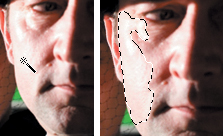
Notice that the other bright areas on the woman
(her cheek and nose) are not part of the selection. This is because
these areas are separated by pixels that are much darker and of
different colors, and not within the Tolerance setting of the tool.
Increasing the tolerance is not the answer, either, because we would end
up selecting more areas than we want for this adjustment.
| 8. | Hold down the Shift key, and click on the bright part of the woman’s cheek, between her ear and her eye.
| 9. | Hold
down the Shift key one more time, and click on the bright side of the
bridge of her nose. You now have three separate selections.
| 10. | Choose
Filters > Repeat Levels. (This option is available for the last
filter applied, as long as you have not restarted Fireworks.)
| 11. | Set the Gamma slider to a value of 0.6.

Note
To subtract from a selection,
hold down the Alt (Windows) or Option (Mac) keys. These modifiers work
with the Rubber Stamp, Lasso, Marquee, and Oval Marquee tools.
| 12. | Click
OK to apply the filter. You’ll see that the skin tones of the actors’
faces look much more even and are no longer washed out.
If you create a particularly complex selection, such as the one you’ve
just done, you might want to save your efforts as an alpha channel in
order to reuse the selection at a later time. See the sidebar “Saving and restoring bitmap selections.” (Your file is currently in the perfect position to use these bitmap-selection functions.)
Finally, it’s time to finish up with this file.
Tip
Sometimes the marquee itself
can get in your way. You can quickly show or hide the marquee by
pressing Ctrl+H (Windows) or Option+F9 (Mac).
| 13. | Choose File > Save.
Fireworks recognizes that this altered image has properties that are not
supported in a flat JPEG file, so you will see a dialog box asking you
for a decision about which type of file you’d like to save. If you want
to retain the editability of the file, save it as a Fireworks PNG file.
If the original image and the bitmap selection are not important, you
can opt to save the file as a flat JPEG.
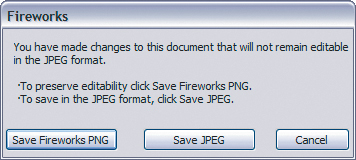
| 14. | Click Save Fireworks PNG. This will maintain the selection information and both bitmap images. The Save dialog box appears.
| 15. | Name the file actors_together_retouched.png, save it to the Lesson04 folder, and click OK.
|
Note
If you had chosen File > Save
As, Fireworks would assume you want to save the file as a JPEG. There’s a
warning message in the Save As dialog box; pay attention to it! Some
people don’t notice the warning and later reopen their file only to
learn the edits have been flattened, and the original unaltered image
has been lost. Make sure you click on the Save As Type options and
choose the format you prefer.
Once you’ve created a
complex selection, you can save it, giving you the option to deselect
it, work on other parts of the image, and come back to that selection
later. These functions are available regardless of the selection tool
you’ve used in the first place. To save a selection, you first need to
have an active bitmap selection.
1. | Choose Select > Save Bitmap Selection.
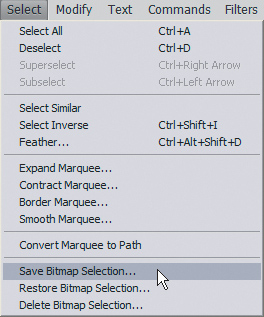
| 2. | In the Save Selection dialog box, change the name to cheek. Leave all other settings as they are.
| 3. | Click OK.
Once a selection is saved, you can then call it up any time you need it
during your session. If you save the file as a Fireworks PNG file, the
selection remains with the file and can be restored even after the file
has been closed and reopened.
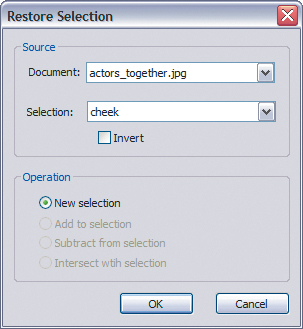
Note
If you have more than one
saved selection, you can choose the correct one from the Selection menu
in the Restore Selection dialog box. In the current exercise, the
“cheek” selection is the only one in the list.
| 4. | Press
Ctrl+D (Windows) or Command+Shift+A (Mac) to deselect the bitmap
selections on the canvas (so that you can see how to restore it).
| 5. | Choose Select > Restore Bitmap Selection.
| 6. | Click OK. The selection reappears on the canvas. |
|