Two additional selection
techniques—channels and Calculations—are advanced (in that they utilize
channels). Remember, channels represent the components of color. The
brighter the area in the individual channel, the more coverage there is
for that color. By harnessing the black and white details of one (or
more) channel you can create a mask. These two techniques won’t be
appropriate to use every time (they are image dependent), but they are
pretty easy to use and should be part of your skill set.
Using a Channel
In
many images, there is often high contrast between the different
elements. For example, a person framed by a bright blue sky may clearly
stand out, since there are a lot of red values in skin and a lot of
blue in the sky. You can make a quick decision whether the channel
selection technique will work by looking at the Channels panel. Look
for a single channel that is high contrast. It doesn’t need to be
perfect; you can use the Paintbrush tool to touch up the channel to
make a more accurate selection.
Selecting with a Channel
Let’s use the channel selection techniques to select
and modify a logo on the side of a building. By isolating the logo, you
can make a targeted selection to improve its appearance:
1. | Open the image Ch05_Hotel.tif .
|
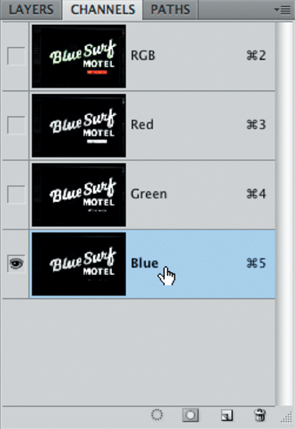
2. | Open
the Channels panel. Click the Channels panel submenu (the triangle in
the upper-right corner). Choose Palette Options and set the thumbnail
to the largest size.
|
3. | In the Channels panel, click on the word Red
to view just the red channel. Examine the channel for contrast detail.
Repeat for the green and blue channels. Look for the channel with the
cleanest separation of the motel’s name. The blue channel should appear
the cleanest.
|
4. | Right-click (Ctrl-click) on the blue channel and choose Duplicate Channel. Name it Selection and click OK to create a new (alpha) channel.
|
5. | The new channel should automatically be selected.
|
6. | Press
Command+L (Ctrl+L) to invoke a Levels adjustment. This will allow you
to adjust contrast on the mask. Make sure the Preview check box is
selected.
|
7. | Move the Black Input Levels slider to the right to increase contrast in the black areas.
|
8. | Move the White Input Levels slider to the left to increase contrast in the white areas.
|
9. | Move the middle (gray) input slider to the right to touch up the spotty areas.
|
10. | Click OK to apply the adjustment to the channel.
|
11. | To soften the edges of the channel, choose Filter > Blur > Gaussian Blur. Apply the filter with a value of 2 or 3 pixels to soften the edge.
|
12. | To
load the selection, Command-click (Ctrl-click) the Selection channel to
create an active selection. By selecting the logo, you can make a
controlled adjustment.
You now have a great selection that’s ready to use for image adjustments or layer masking. |