Step by step: Crazy rave lasers
Click
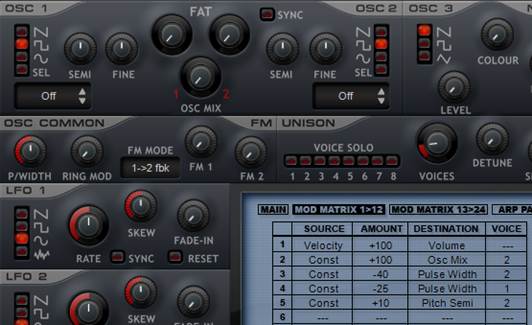
the Mod Matrix 1>12 button to bring up the modulation matrix, and set the
source slot of the second row to LFO 1
- There’s nothing like a laser effect for
adding intensity to a track, and it’s possible to make these simple sounds
with practically any virtual analogue synth. Let’s use Dune CM. start by
clicking the Bank B button to get an initialized preset. This gives
us a sawtooth oscillator by default, which is perfect, as that’s the basis
of this sound.
- All we need to do to get the most basic
laser effect is modulate the pitch of the sawtooth oscillator. Click the Mod
Matrix 1>12 button to bring up the modulation matrix, and set the
source slot of the second row to LFO 1. Set the destination to Osc
1 Semi, and try increasing the Amount value as you play a note.
- You’ll hear that the sound starts to
oscillate in pitch. This doesn’t really give us the effect we’re after,
though, as the LFO is set to a sine wave, which gives the sound a seasick,
undulating feel. Click the sawtooth button in the LFO 1 panel to make it a
sawtooth shape.
- Now, with a positive Amount value
– say +36 – this gives us a download laser effect. That can be
useful, but what we really want is a laser sound that goes from low to
high. To invert the modulation, simply set the amount to -36
instead. This results in a sound that’s perfect for club tracks.
- Currently the LFO is free-running, which
means that it starts at a different point each time you play a note. We
want to get a consistent sound, so activate the Reset button in the
LFO 1 panel. Now every time you play a note, the laser will start from the
same pitch. Check out Rave Laser.mp3 to hear the sound in action.
- You can set the tempo of the laser
manually using LFO 1’s Rate knob and modulate this parameter to get
some really mental effects. You can also sync it to your DAW’s project
tempo by activating the Sync button in the LFO 1 panel. Now the Rate
knob controls the resolution of the tempo, which makes getting it in time
with your beats a piece of cake.
Step by step: Wide saw pads
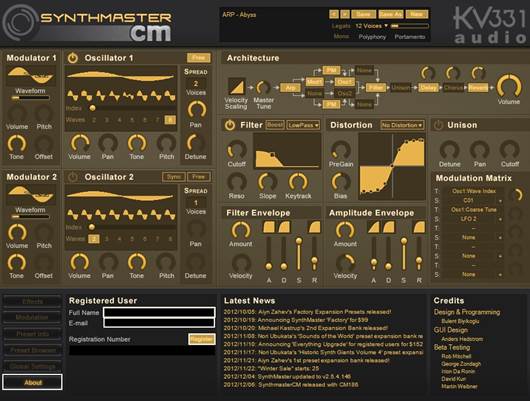
Getting
good stereo width is an important element in making tracks sound polished and
professional
- Getting good stereo width is an important
element in making tracks sound polished and professional. Here’s how to
make a pad with tons of stereo width that will sound great in your
breakdowns. Start by loading SynthMaster CM in your DAW. Right-click the
leftmost sine was in the Oscillator 1 panel, and select Basic>>Sawtooth.
- As easily as that, we’ve already got a
useful sawtooth-based polysynth sound, but it’s resolutely mono. Let’s get
that stereo width in there. First, we want to use as many voices as
possible – click the Voices parameter in the Oscillator 1 panel,
and select 4.
- Using more voices boosts the synth’s
output, and now when you play the patch back it’s going to clip the master
buss. To remedy this, turn the Volume knob in the Architecture
panel down to +42. Now you can play chords without clipping, but
the sound is still mono.
- Back in the Oscillator 1 panel, turn the Pan
knob all the way up. Instantly this gives us a super-wide stereo sound,
which not only sounds impressive but also leaves room in the middle of the
mix for mono sounds such as kick drums and sub-bass.
- Currently, the Detune parameter
below the Pan is set to +64. Turn this down to +8 and
play a chord. You’ll hear a phasing effect at the start of the sound. This
is because all the voices are restarting with each new note. Click the Free
button above the Voices parameter to activate free-running mode.
- This gives the sound quite a different
feel – each new chord sounds smoother rather than punchy, which is the
effect we’re after. Turn the Detune knob up to +40. Have a
listen to Smooth Saw Pad.mp3 to hear how this sounds. For an even
richer sound, set Oscillator 2 up the same as Oscillator 1, but with its Pitch
set to +7 Semitones.
Step by step: 8-bit mono arps
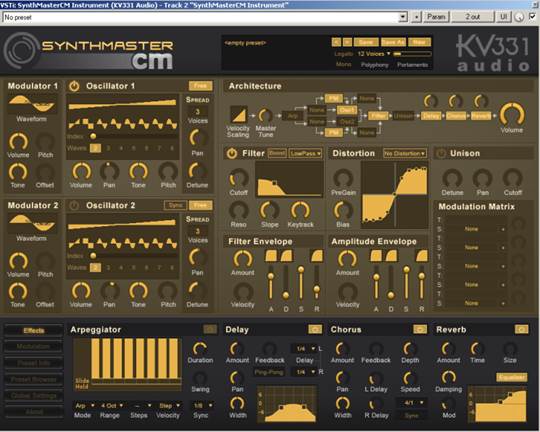
You’ll
see the Arpeggiator panel at the bottom of the interface