Taking a picture is easy, but it’s
only the start when it comes to digital photography. Combine your camera with
your Mac and a whole new world opens up.
Your Mac is one of the most fully featured
and powerful image editing machines on the planet, and Macs are used by
photographic professionals the world over. Our guide to using your Mac for
photography isn’t aimed at professionals, however, but rather at enthusiastic
amateurs with a camera and a Mac who are wondering how to make the two works
together more smoothly.
With its many gigabytes of storage and
powerful processors, a Mac can chew through as many digital images as you can
throw at it. It can make a catalogue of your photographs, tell you who’s in
them and allow you to search for specific photos taken on specific days in
specific places. It can make your color images black and white, bring out the
fine details in the feathers of a bird or make children’s smiles pop off your
screen. You can even go online and order a beautiful bound book of your
photographs, without leaving the comfort of your home.
The
complete guide to photography on your Mac!
Professionals choose Macs because of their
ease of use, Apple’s early adoption of the fastest file transfer technologies
and the new high res Retina displays. While their chosen software is often made
by Adobe, Apple has its own battery of image editors that are available for a
much more reasonable price and don’t lag too far behind the market leaders.
So read on for techniques, tips, hardware,
software and an entire world of Apple-based photography. We’ve not forgotten
iOS either – those Retina screens were made for photographs, and we’ve gathered
together some of the best picture-editing apps for when you’re not tied to your
desk. It’s a great time to use your Mac for photography, so let’s get stuck in.
Getting it in camera
Taking a better picture starts with
what you see through the viewfinder
Looking through the viewfinder or LCD
screen of your camera allows you to frame the picture; but rather than just
placing your subject in the center of the frame and pressing the button, there
are ways to make your picture more pleasing simply with positioning.
The simplest of these is the rule of
thirds. Imagine there are four lines across your viewfinder (some cameras will
provide an overlay of this) that divide it by three both horizontally and
vertically. The points at which those lines cross are considered the places
your eyes naturally go to when looking at a photograph, so are the places where
important elements of your composition should reside. It makes for a
comfortable, natural arrangement.
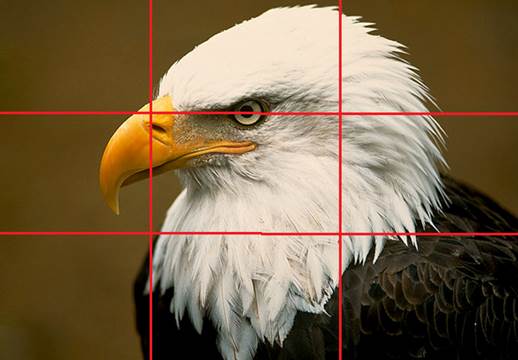
The
rule of thirds indicates the areas in which the viewer’s eyes tend to rest
naturally, allowing for more interesting framing
In the image here, for example, the bird’s
eye sits on a vertical line just above an intersection, while its beak
stretches along a horizontal line to the next vertical line, ending at a cross
point. The eye, extremely important in any portrait, is perfectly in focus and
just a tiny bit above two cross lines; judicious cropping could put it bang on
if you wanted to. For a landscape photo, you could consider having the horizon
follow a horizontal line, or large tree on a vertical one.
Golden hours
Time of day can also make a huge difference
to your photos. Shooting at noon will provide lots of light, but it can look
harsh, and being lit directly from above can be unflattering, as well as
casting shadows under the brims of hats. Around sunset or sunrise, however, are
the golden hours when sunlight comes in at an angle that flatters the faces of
portrait sitters, and the sky is filled with drama for landscapes. The golden
hours are not for shooting sports or anything that requires a fast shutter
speed, as light levels are low, but a tripod or even just setting your camera
on a handy wall will provide support to avoid blur. Supporting the camera will
also allow you to use a lower ISO setting.
The golden hours are also a great time to
try making high dynamic range images, where three shots are taken with
different exposures, one for dark tones, one for mid tones and another for
highlights, which are blended together later on your Mac. A bright sunset above
dark cliffs can result in the shoreline being completely black if you expose
purely for the sky, so an HDR blend will bring out the subtle colors of the
rocks as the last rays of the sun hit them.
If shooting city scenes at high, stopping
down your aperture will turn any lights into starbursts. If its’ dark and you
need to use long exposures, a tripod and cable release will hugely reduce
camera shake.
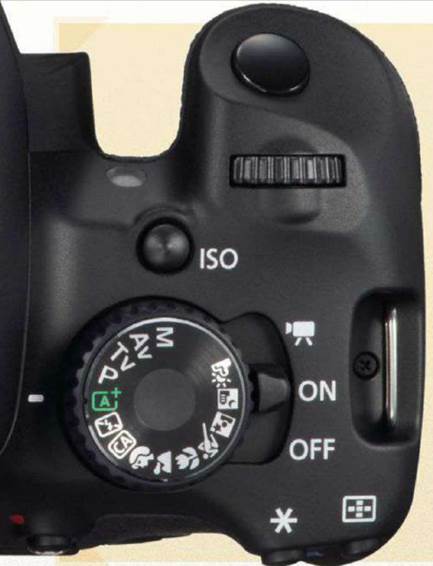
Camera modes explained
On any SLR or advanced compact camera there
will be mode dial. It’s not always self-explanatory, so here’s what those
letters mean. We’ve used a Canon SLR to illustrate the dial, but included Nikon
and Sony equivalents too.
Common modes
Auto (or A) Puts the camera into fully
automatic mode. You have no control over the exposure, only where the camera is
pointed. On some cameras, this mode locks out features such as shooting raw
files or higher ISOs. P Program auto exposure is a highly automatic mode, but
you can adjust aperture or shutter speed settings, Av (or A) Aperture priority
mode. You set the desired aperture and ISO, the camera works out the shutter
speed.
Tv (or S) In Shutter priority mode, you set
the desired shutter speed and ISO, the camera works out the aperture setting.
Can be used in conjunction with auto ISO if your camera has it.
M Full manual control. Using this mode
depends on a solid understanding of the exposure triangle.
BB or Bulb mode keeps the shutter open for
as long as you hold the release, be that seconds or hours.
Camera
modes explained
Scene modes Manufacturers differ, but icons
of heads (portrait), runners (sports) or mountains (landscape) indicate modes
tailored toward particular types of photography (refer to your manual). Among
the most useful is No Flash (often a lightning bolt with a line through it)
which turns the flash off for moments when it’s not appropriate.