Teleprompter software
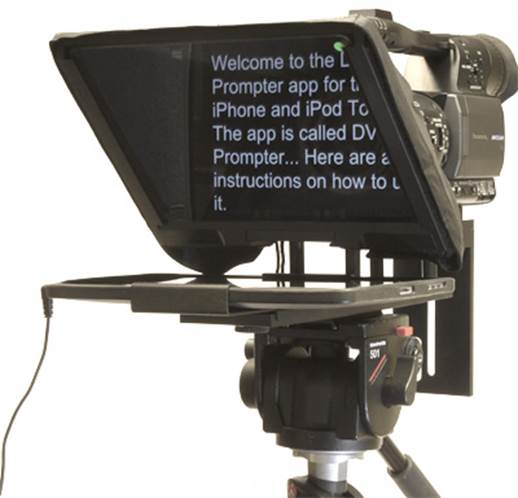
As we’ve already explained, a teleprompter
works by reflecting the image displayed on a monitor positioned below the
camera, out towards the presenter. However, it might have occurred to you that
reflecting the image of regular text would result in you staring blankly at a
back-to-front image. Fortunately, special teleprompter software gets around
this particular problem by displaying a back-to-front image, which is then
reflected the correct way around by the teleprompter’s glass.
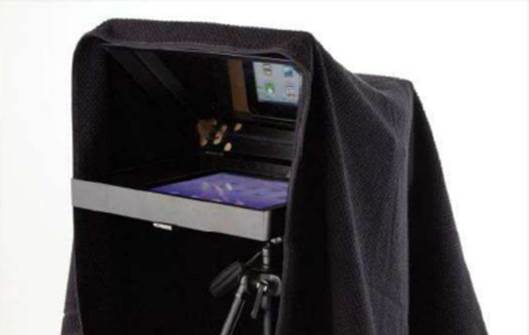
This
professional iPad teleprompter is available from autocue.com – a great option
if you’re willing to spend hundreds of pounds.
Although you can also buy teleprompter
software for OS X, we’re going to focus solely on software designed to run on
iOS devices. Like you’d expect, there are a number of different applications
that you can choose from, offering everything from basic text inversion through
to iCloud and Google Docs integration, remote control and even live recording
functionality.
If you want basic teleprompting
functionality, you’ll want to check out the free i-PromptPro app from OurApps4U
Limited. Designed to be used with i-Prompter.com’s range of iPhone and iPad
teleprompter attachments, (details can be found at i-prompter.com) i-PromptPro
features everything you need in a basic teleprompter, including script
creation, editing and emailing, variable speed output, and the all-important
text-mirroring functionality.
For even more bells and whistles, including
iCloud and Google Docs integration, we love Teleprompt+ ($15.75) from Bombing
Brain Interactive (bombingbrain.com).
One of our favorite features of Teleprompt+
is the ability to remotely control your iOS device using a second iPad, iPod
touch or iPhone.
Simply download the free Teleprompt+ Remote
app onto your second device, and then connect to your teleprompter iPad over
Wi-Fi or Bluetooth connection.
Autocue rehearsals
You can then not only start and stop the
teleprompter but change the scripts and text speed remotely.
This makes it ideal for situations when
someone is taking the role of the director and needs to follow the script
off-camera as it is being read.
Teleprompt+ lets you remotely control your
iOS device using a second, iPad, iPhone, or iPod touch
The
Teleprompt+ app offers iCloud syncing for your scripts as well as Retina
display support for your iPad.
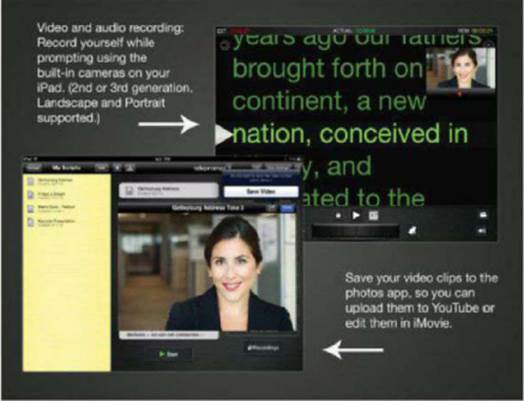
If your iOS device has a camera, the
Teleprompt+ application will even let you rehearse and record your performance
before you are in front of the teleprompter. This is great tool to let your
presenter practice using a teleprompter away from the studio if they have not
used one before.
How to: Male your own teleprompter
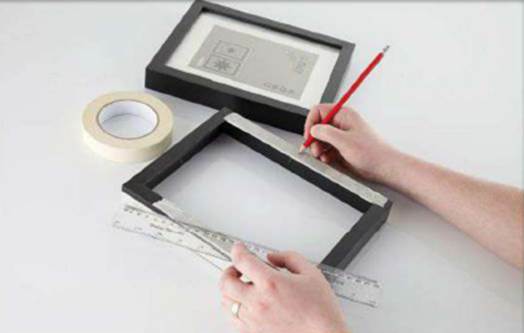
1. Frame preparation
First, remove the glass and any cardboard
inserts form your frames, leaving just the wooden sides intact. Then, turn one
of your frames over so that the front of the frame is facing upwards in
landscape orientation. Put a piece of masking tape along the bottom and top of
the frame and then measure and mark the mid-point of each. This is where you’ll
attach the metal bar with wood screws. Next, measure the distance between the
two mid-points. You’ll need this for Step 2. Finally, stack both frames
back-to-back, and mark the location of each butt hinge where the frames meet.
First,
remove the glass and any cardboard inserts form your frames, leaving just the
wooden sides intact
2. Measure, drill and cut metal
Cover one side of the metal bar with
masking tape. Then mark a drill point near to one end of the bar. Use the
measurement you took in Step 1 to mark a second drill point on the bar. Your
third drill point is two-thirds of the way between your first and second drill
point. The location of the final drill point depends on the camera and length
of lens you intend to use with your teleprompter, but a position of around
20-15cm from your second drill point is a good start. With all the holes
marked, drill them using a 6.5mm drill bit, and cut off any excess metal. File
any rough edges.

Cover
one side of the metal bar with masking tape. Then mark a drill point near to
one end of the bar
3. Assembly
Attach the quick-release camera bracket to
the third hole you drilled in the metal rod with a nut. Then pass your long
bolt through the final hole your drilled in Step 2, tightening it with a nut.
Screw the metal bracket onto the front of the bottom picture frame. Turn the
frame over so that the metal bracket is on eth bottom. Join both picture frames
together along one edge using the butt hinges. Finally, refit the wooden back
to the bottom frame, and either the standard or beam-splitting glass to the top
frame. Attach the glass securely using the picture frame tabs.
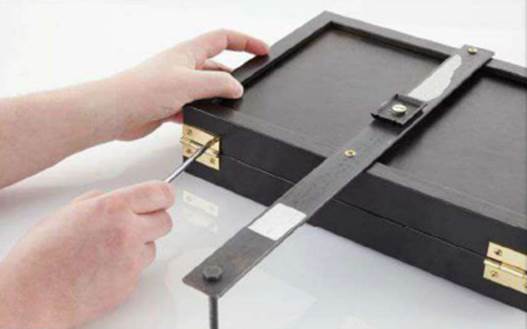
Attach
the quick-release camera bracket to the third hole you drilled in the metal rod
with a nut
4. Attach catch, hood, camera, and use!
Measure, mark and then fit the cabin hooks
on one side of the teleprompter so that it holds the top frame open at an angle
of 45 degrees. Attach the teleprompter to the tripod, and bolt on your camera.
Attach the hood to the front and sides of the top frame with self-adhesive
Velcro strip, draping it over your camera so you can’t see the camera behind
the glass. Now you can place your iOS device in the center of the bottom frame,
and open your teleprompting software. Align it so you can easily see the text
scrolling past.
Attach
the teleprompter to the tripod, and bolt on your camera
Even lighting
As with any video or photo shoot, the
better your lighting, the better the finished result. To avoid shadows and get
a clear image, light your subject form both sides of the teleprompter not from
behind or above.
Height matters
To give your presenter the best possible
on-camera presence, set the teleprompter at a comfortable height for them to
read from. Ideally, it should be at head height, so your presenter doesn’t have
to tilt their head up or down to look at the camera.
Jargon Buster
Beam-splitting glass: Glass which literally
splits light in two, reflecting more light than it lets through. Sometimes
known half-mirrored glass.
Two-way mirrored Perspex: Perspex with a
special coating which operates in a similar fashion to beam-splitting glass.