Creating The Time-Lapse Movie
Now that you have the frames shot, it's
time to make the movie. If you have an in-camera movie option, try that first.
I'm amazed at the quality of the finished time-lapse movies my D4 creates. I
choose the movie quality settings before shooting the sequence, and the camera
creates the movie after all the frames are shot. I simply download the movie
off my flash card, and it's ready to go.
Most time-lapse sequences are created in
the computer using image-editing software. There are many ways to create
time-lapse movies, including advanced workflows using Final Cut Pro X and Adobe
After Effects. But if you're just starting out, two of the easiest methods are
using QuickTime 7 Pro or Lightroom 4.
The quickest and easiest way to create a
time-lapse movie in the computer is using QuickTime 7 Pro. This inexpensive
software provides you simple control of the movie creation. To start, put all
your sequence images into one folder on your desktop. Open QuickTime 7 Pro, and
choose File > Open Image Sequence.
Creating
The Time-Lapse Movie
Navigate to your folder of images, and
select the first image in the sequence. Click Open, and choose the frame rate
for your movie. I like to use 24 fps for smooth video clips, but you can choose
any frame rate you like. QuickTime 7 Pro doesn't work with RAW images, so
you'll need to convert your shots to IPEG or TIFF. Once your time-lapse is
created, you can edit and export the movie according to your end use Lightroom
4 also offers an easy way to create a time-lapse sequence, but with that added
benefit of being able to batch-process RAW files to create the movie. RAW files
will produce the best end result, especially if you need to adjust exposure,
saturation, sharpening, etc.
My normal time-lapse workflow involves
shooting the images in RAW, then importing the shots into Lightroom in a
separate folder. Next, I choose one image in the sequence and do adjustments to
optimize the shot. Then I select the rest of the images and "sync"
these adjustments to all the shots in the sequence. Now the files are ready to
be made into a movie.
you
can edit and export the movie according to your end use Lightroom 4 also offers
an easy way to create a time-lapse sequence
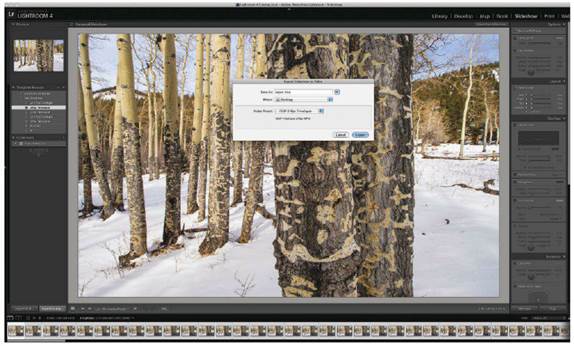
To create the time-lapse movie, you'll
first need to download some presets. Sean McCormack at Pixiq (www.pixiq.com)
has developed some time-lapse movie presets you can download for free. Once
this is done, go to the Slideshow module in Lightroom 4. Under User presets,
choose the frame rate you would like to use. Next, hit the Export Video button,
which will prompt you to choose the frame rate again. Choose the same frame
rate as you chose in the User presets, and hit the Save button. Now Lightroom
will render your time-lapse movie, which may take a while depending on your
file size.
Using Advanced Time-Lapse Techniques
Once you've mastered simple time-lapse
movies, you may want to explore more advanced techniques. Here are two that
will really spice up your time-lapse moviemaking.
The Panning Time-Lapse Shot. Have you ever
watched a time-lapse movie that slowly pans sideways past rocks and flowers as
the clouds whiz past overhead? The lateral movement in the shot adds a very
professional look. I low do you create this panning motion over hours of
shooting a time-lapse sequence? You need a special motorized dolly system.
Advanced
Time-Lapse Techniques
When I first saw a panning time-lapse
sequence, I knew I needed to shoot one. For that task, I purchased a motorized
dolly system from Dynamic Perception (www.dynamicperception.comy This company
offers the Stage Zero system, which includes a six-foot track, a motorized
slider and a controller with an interval meter.
Dynamic Perception has excellent tutorials
on their website, and I was up and shooting in minutes with their system. The
Stage Zero not only can be set up horizontally, but you also can create
vertical panning movement, as well. Imagine slowly panning past the trunk of a
bristlecone pine tree as the stars rotate above. Adding movement to your
time-lapse movies opens up endless creative possibilities.
The Sunset/Sunrise Time-Lapse Shot. Some of
the most dramatic time-lapse movies record sunrise and sunsets. Visualize warm
light slowly illuminating snowy mountains and crystalline lakes as the sunrises
into the clear sky. But this scene presents a big challenge. How do you set
your exposure for this dramatic shift in lighting?
One option would be to use shutter priority
or auto ISO mode. But anytime the camera changes the exposure during a
time-lapse sequence, the result is choppy video. The easiest option is to use
the Lightroom technique mentioned above, but with a few different adjustments.
For a sunrise sequence, try using this
technique. When you process your images in Lightroom, choose the first frame in
the sunrise sequence and set the exposure to approximately one stop
underexposed. When you apply these Develop settings to the rest of the sequence
images, the final overexposed images after the sun has risen should be about
the right exposure, with few blown-out highlights.
The
Sunset/Sunrise Time-Lapse Shot. Some of the most dramatic time-lapse movies
record sunrise and sunsets.
Your movie will start out a little
underexposed, but should have detail in the shadow areas. The movie will
quickly transition into brighter scenes, and the final shots shouldn't be
overexposed.
You can adjust the underexposure depending
on how bright the last scene is. For sunsets, start with the brightest shot and
add more light to it, just to the point of being overexposed. Then apply this
bump in exposure to all the images in the sequence, and the final shots after
the sun goes down shouldn't be too dark.
Time-lapse photography is a quick and easy
way to liven up your photography. The next time you're watching clouds race
overhead, grab your camera and shoot a time-lapse sequence. You won't believe
how good accelerated time can look.
Check out a few of Tom Bol's time-lapse
movies, which are featured on the DP website at dpmax.com/bol-time-lapse.