Learn how to process your RAW files to
perfection
Most of us probably began shooting images
in Jpeg, and while some have made the switch to RAW, others are more reluctant.
While it’s true that Jpegs have their advantages, in some ways RAW is the less
complicated format. A RAW file is a complete record of all the information
captured by your camera. In contrast, Jpegs are processed in camera, with any
unused information discarded. This means that RAW files are much more forgiving
of mistakes as the extra information makes it easier to correct exposure, tease
out details and tweak colours.
Adobe
Camera RAW.
Perhaps the main reason some don’t make the
switch to RAW is the relatively limited options in post-processing.
You can open a Jpeg in almost any image
editor, whereas RAW files require converting before you can open them into
Photoshop. The best place to convert them is in Adobe Camera RAW. But it’s far
more than just a file converter. ACR has a range of powerful tools and
commands, whether you want to adjust tones, remove noise, correct distortion,
convert to mono or perform many other useful edits.
We’ll show you how to get the most out of
ACR’s superb tools. And we’re not just talking simple tweaks either. You can
use ACR to create a range of effects from HDR to hand-colouring.
As always, you’ll find accompanying videos
among this month’s project files and a range of RAW files to play with.
Camera RAW interface
Get familiar with the interface and tools
you need to improve your RAW photos
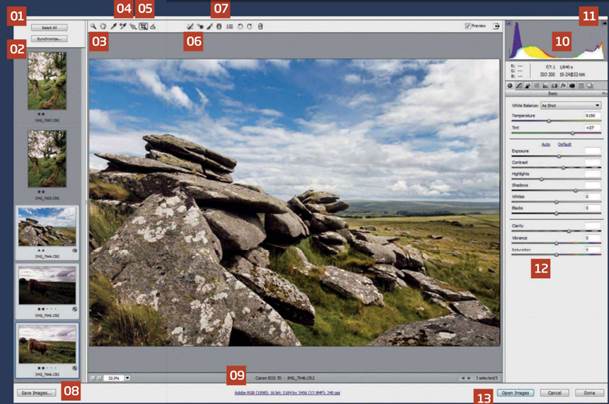
ACR has a simple layout; all the main
controls and setting are on the right-hand side of the display, with a toolbar
along the top. You can use these tools and settings to take advantage of a RAW
file’s greater range of tones and detail. Every move you make in ACR is
reversible, so you’re free to try out any combination of settings you like. You
can close the image, then come back to it later and all the settings remain
editable. And while Photoshop offers similar tools, doing the job in ACR will
ensure the maximum possible quality.
Camera
RAW interface
01.
Select all
If you have multiple files open, click the
Select All button to make universal changes to the whole set. This is great for
processing multiple images. For example, to correct a recurring sensor mark,
open the set of images, click Select All, then simply remove the mark in one
image with the Spot Removal tool.
02.
Synchronise
If you’ve made a series of adjustments that
you really like, and you want to apply them to rest of your image set, click
the Synchronise button to apply them to the other images. You can choose
exactly which settings to include or omit from the synchronization.
03.
Zoom and hand tools
You can use these tools to zoom in and out,
and pan around your image, or alternatively, you can use the trusty keyboard
shortcuts Cmd/Ctrl and + or – to zoom in or out, and the Space Bar to pan.
Double-click the Zoom tool to zoom to 100%, and double-click the Hand tool to
pull back to full screen.
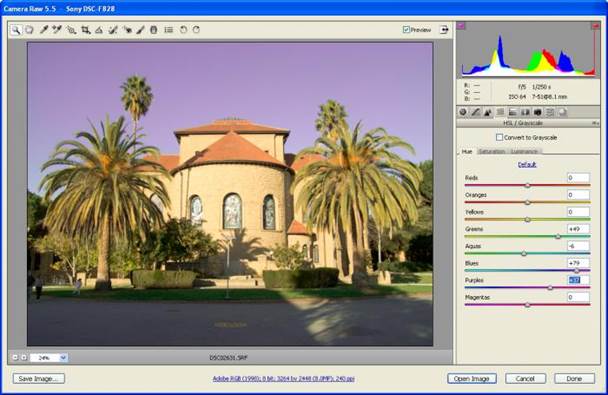
04.
The targeted adjustment tool
This powerful tool enables you to target
and adjust particular tones and colour sin your image simply by dragging left
or right over them. Click and hold over the tool to choose from Parametric
Curve, Hue, Saturation, Luminosity or Grayscale Mix.
05.
Crop tool
Click and hold the Crop tool choose from a
handy list of crop ratios such as 1 to 1 and 2 to 3. Nothing is irreversible in
ACR, so if you change your mind about a crop, click back on the tool to
re-adjust it.
06.
Spot removal tool
Fix small marks and blemishes with the Spot
Removal tool. It’s useful for removing a recurring sensor mark from a batch of
images, but for most ordinary tasks the Healing Brush and Clone Stamp tools in
Photoshop offer more flexibility.
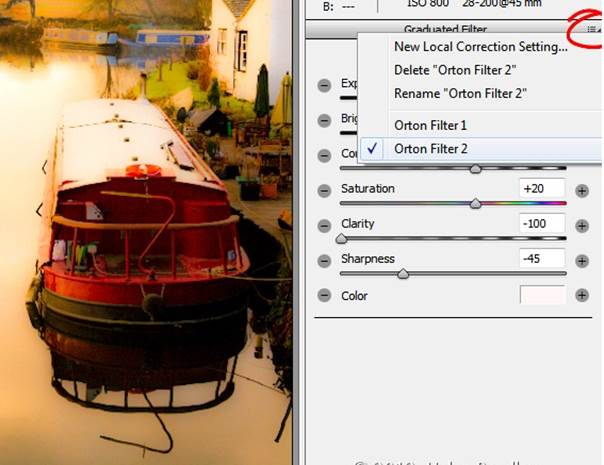
07.
Adjustment brush and graduated filter
Two of the most powerful tools in ACR, the
Adjustment Brush and Graduated Filter enable you to make selective adjustments
to colours, tones and detail across your image. The Graduated Filter is
especially useful for improving dull, flat skies.
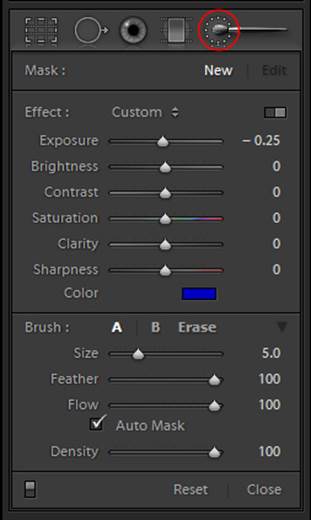
Adjustment
brush…
…and
Graduated Filter are Two of the most powerful tools in ACR
08.
Save images
This is really more like a ‘Save As’
command. Click the button to access your saving options. It’s great if you need
to batch rename files, save a set of RAW files as jpegs, or convert a
manufacturer’s RAW file (such as Nikon’s NEF) to the universal DNG format.
09.
Workflow options
Click here to access output options such as
Bit Depth. Choosing 16 Cits/Channel will ensure the image has the maximum
number of colours when you open it in Photoshop (so many, in fact, that your
monitor and printer are capable of displaying them all). But it will also limit
your image-editing options. Selecting 8 Bits/ Channel will give you fewer
colour, but more options. You can also alter the bit depth in the main editor
interface.
10.
Histogram
The histogram displays the image’s tonal
range from shadows on the left, to highlights on the right. The height of the
graph at any point indicates the number of pixels with a certain brightness
value. For most images, a healthy histogram should taper off at both ends. If
it intersects the side of the box, it means areas of the image are lacking
detail, having been clipped to pure black or white. If this is the case, you
may be able to recover detail using the sliders in the Basic Panel.
11.
Clipping warnings
You can toggle flashing clipping warnings
on or off by pressing U for shadows (thinks under-exposed) and 0 for highlights
(think over-exposed). Alternatively, hold down Alt while dragging the Exposure,
Shadows, Highlights, Whites or Blacks sliders in the Basic Panel to see the
clipped pixels overlaid on the image as you adjust the settings.
12.
Sliders
Most panels display a set of sliders. You
can double-click a slider to reset it, so you can get a handy before and after
by holding your mouse still over a point on the slider then alternating between
a single and double-click.
13.
Open image
Click this button to open the file into
Photoshop, or hold down Shift and click to open the image as a Smart Object,
which enables you to go back and edit the file in ACR by clicking the Smart
Object’s thumbnail in Photoshop’s Layers Panels.
Versions of ACR
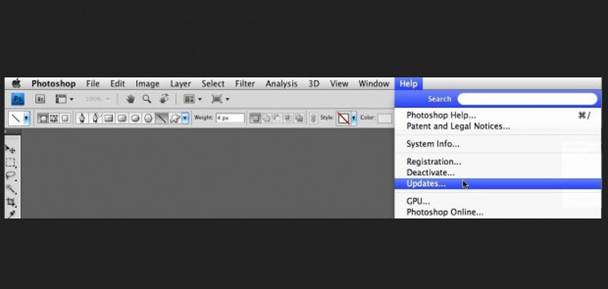
Usually
update new ACR
ACR is regularly updated with new data and
tweaks to the settings, so make sure you keep Photoshop up to date (Help >
Updates). Your version of Camera RAW will depend on your copy of Photoshop. For
example, if you have CS5 you will have version 6.7, whereas SC6 owners can use
version 7.1. Some of the slider names have been changed, but the majority of
the features remain the same in all versions. Elements users can also edit
their RAW files in the ACR plug-in, but the Elements version is more basic,
with access to three panels: Basic, Detail and Camera Calibration. A few tools
are also missing, including the Adjustment Brush. It’s still a powerful plug-in
(the Basic panel alone makes it an essential step in your workflow) but you’ll
have to enter the main interface for more advanced adjustments.