Sprites have a fairly limited set of operations that
can be performed, so it was easy to wrap up a significant amount of
their functionality in the game framework's SpriteObject
class. When we render with matrices, there are many more variables to
take into account, such as the flexibility of specifying the object's
transformation matrix, the different primitives that can be rendered,
and the different types of effect (BasicEffect is just one of several effects that are available).
As a result, the game framework's support for matrix
rendering is a little less comprehensive than it was for sprite
rendering. It provides the features that are most likely to be useful
and then allows the individual object classes to use or ignore them as
they see fit. They are present in a new class: MatrixObjectBase.
1. The MatrixObjectBase Class
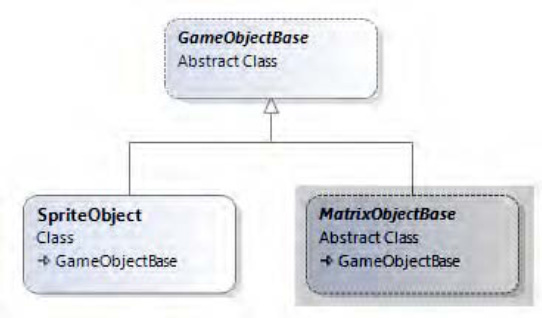
MatrixObjectBase is an abstract class that derives from GameObjectBase (see Figure 1).
It provides useful properties and functions that we might want to use
within our derived game object classes (though in many cases they will
be insufficient in isolation and will require additional
object-specific properties to be added to the derived classes).
The first content that is present in the class is a
range of properties that can be used to control how instances of
derived classes will be rendered. The properties contained within the
class are as follows:
ObjectTexture: a reference to a texture that will be used when rendering the object (or null if no texture is required). Defaults to null.
Transformation: a matrix that defines the transformation to use when rendering the object. This will normally be set during the object's Update call and then used as the world matrix when rendering from the Draw call.
Position, PositionX, PositionY, and Position Z: a 3D position for the object, represented both as a Vector3 and a series of floats
(though they share the same underlying storage, so modifying the vector
will affect the float values, and vice versa). Defaults to (0, 0, 0).
Angle, AngleX, AngleY, and AngleZ: three angles that can be used to track rotation of the object around each axis. The Angle property sets or returns the same values as a Vector3. Defaults to (0, 0, 0).
Scale, ScaleX, ScaleY, and ScaleZ: the scaling factors for each axis, available as a Vector3 or as three float values. Defaults to (1, 1, 1).
ObjectColor:
just as with sprites, this allows the color and alpha for the object to
be specified. The red, green, and blue components will be passed into
the effect object's DiffuseColor property, and its alpha component will be used to determine a value for the effect's Alpha property.
1.1. Object Transformation
The general approach when rendering objects is to calculate their transformation matrix during the call to each object's Update method, and then use that calculated matrix in its Draw method. Let's take a look at how the transformation is calculated.
There is clearly some overlap between the class's position properties: Transformation is used to store the calculated transformation for the object; whereas the Position, Angle, and Scale
properties each make up a part of that transformation. Transformations
can be much more complex than simply applying a translation, rotate,
and scale matrix, however, because many transformations might need to
be applied in an appropriate sequence to achieve the final matrix to
use for rendering.
To allow us to achieve a balance between simplicity
and flexibility, the class offers a few different approaches for
calculating the Transformation matrix.
The first approach is to fully calculate the
transformation matrix within the derived class. Essentially this
requires the derived Update code to simply place the required matrix into the Transformation property ready to be read back during rendering.
SetIdentity simply loads the identity matrix into the Transformation property, as shown in Listing 1.
Example 1. The SetIdentity function implementation
protected void SetIdentity()
    {
        Transformation = Matrix.Identity;
    }
|
ApplyTransformation takes a transformation matrix as a parameter and multiplies it with the existing Transformation matrix, as shown in Listing 2.
Example 2. The ApplyTransformation function implementation
protected void ApplyTransformation(Matrix newTransformation)
    {
        Transformation = newTransformation * Transformation;
    }
|
These are clearly very simple and are almost
unnecessary, but they allow simple step-by-step transformations to be
applied in an Update function. Listing 3 shows an example of such an Update function from a derived class in a game project (it can actually be found in the GameFrameworkExample.TexturedSquareObject
class in the example project). This code resets the object
transformation to the identity matrix, rotates by the angle stored in
the AngleZ property, scales the matrix as per the object's Scale vector, and then translates according to the object's Position. At each stage, the resulting matrix is updated in the Transformation property.
Example 3. Applying a series of transformations using the ApplyTransformation function
// Calculate the transformation matrix
        SetIdentity();
        ApplyTransformation(Matrix.CreateRotationZ(AngleZ));
        ApplyTransformation(Matrix.CreateScale(Scale));
        ApplyTransformation(Matrix.CreateTranslation(Position));
|
Listing 4 achieves the exact same result using direct matrix multiplications instead of the SetIdentity and ApplyTransformation functions.
Example 4. Applying a series of transformations using direct matrix multiplication
Transformation = Matrix.CreateRotationZ(AngleZ);
        Transformation = Matrix.CreateScale(Scale) * Transformation;
        Transformation = Matrix.CreateTranslation(Position) * Transformation;
|
NOTE
If you have experience of programming using OpenGL, the approach that specifies a sequence of transformations shown in Listing 3
will probably feel more comfortable because it approximates the
approach used by OpenGL to specify its world transformation. Both
approaches are functionally identical, though, so use whichever you
prefer.
Note that, although these code samples have used some of the standard properties (AngleZ, Scale, and Position),
nothing else within the class is taking any notice of them. In this
example, they are being used simply as handy places to store
information about the location of the object, but they have no further
meaning to the class.
The second approach that we can use is to get MatrixObjectBase to apply all the transformation properties automatically. When we do this, it will perform the following steps, in this order:
Translate the object according to its Position vector.
Rotate the object around the x axis according to its AngleX value.
Rotate the object around the y axis according to its AngleY value.
Rotate the object around the z axis according to its AngleZ value.
Scale the object according to its Scale vector.
The code that performs these transformations is shown in Listing 5.
Example 5. The MatrixObjectBase.ApplyStandardTransformations function
protected void ApplyStandardTransformations()
    {
        Matrix result;

        // First obtain the object's underlying transformation
        result = Transformation;

        // Apply the object position if any of the coordinates are non-zero
        if (PositionX != 0 || PositionY != 0 || PositionZ != 0)
        {
            // Yes, so apply the position to the current transformation
            result = Matrix.CreateTranslation(Position) * result;
        }

        // Rotate the object if any of the angles are non-zero
        if (AngleX != 0) result = Matrix.CreateRotationX(AngleX) * result;
        if (AngleY != 0) result = Matrix.CreateRotationY(AngleY) * result;
        if (AngleZ != 0) result = Matrix.CreateRotationZ(AngleZ) * result;

        // Scale the object if any of the scale values are set to a value other than 1
        if (ScaleX != 1 || ScaleY != 1 || ScaleZ != 1)
        {
            // Yes, so apply the Scale to the current transformation
            result = Matrix.CreateScale(Scale) * result;
        }

        // Store the final calculated matrix
        Transformation = result;
    }
|
Sometimes this set of steps will be quite sufficient for a game object, in which case no further processing is required. Listing 6
shows how to apply these steps to the object to calculate its
transformation matrix. Note that these steps are applied in addition to
the existing transformation, so it is important to remember to call SetIdentity first so that they are applied to an identity matrix rather than to any matrix left over from a previous update.
Example 6. Applying the standard transformations to an object
// Calculate the transformation matrix
        SetIdentity();
        ApplyStandardTransformations();
|
Finally, a combination of these two approaches can
be used, mixing both custom transformations and the standard
transformations together. The transformation matrix can be set both
before or after the standard transformations are applied so that
customized behavior can be achieved. Listing 7
first offsets the object position to the left by one unit and then
applies the standard transformations and then translates one unit along
the (potentially rotated) y axis.
Example 7. Mixing custom and standard transformations
SetIdentity();
        ApplyTransformation(Matrix.CreateTranslation(-1, 0, 0));
        ApplyStandardTransformations();
        ApplyTransformation(Matrix.CreateTranslation(0, 1, 0));
|
Generally, however, it is best to stick to simple transformations prior to calling ApplyStandardTransformations
and no further transformations afterward. Because the standard
transformations are not listed step by step within the code as all the
other transformations are, it can be confusing to visualize exactly
what happens during the ApplyStandardTransformations function call, so mix the two approaches with caution.
1.2. Object Rendering
With the transformation matrix for the object
calculated, the object can now be drawn. As with sprite rendering, this
is achieved using a method named Draw, but this time it is passed an Effect object instead of a SpriteBatch. The function is declared as an abstract function, as shown in Listing 8, because it has no default implementation, but must be overridden in each derived class.
Example 8. The declaration of the MatrixObjectBase.Draw function
public abstract void Draw(GameTime gameTime, Effect effect);
|
When a class overrides this, it is its
responsibility to perform the required steps to draw the object to the
screen. Some of this will vary from one class to another, but there are
some properties of the effect that can be looked after by MatrixObjectBase. They are handled within a function called PrepareEffect.
The PrepareEffect function ensures that the
appropriate texture is set into the effect, that the texturing is
enabled or disabled as required, that the DiffuseColor and Alpha properties are set according to the ObjectColor value, and that the calculated Transformation is set. Once all these are in place, the object is ready for rendering. Listing 9 shows the implementation of the PrepareEffect function.
Example 9. Preparing an effect ready for rendering
protected void PrepareEffect(BasicEffect effect)
    {
        // Do we have a texture? Set the effect as required
        if (ObjectTexture == null)
        {
            // No texture so disable texturing
            effect.TextureEnabled = false;
        }
        else
        {
            // Enable texturing and set the texture into the effect
            effect.TextureEnabled = true;
            if (ObjectTexture != effect.Texture) effect.Texture = ObjectTexture;
        }

        // Set the color and alpha
        effect.DiffuseColor = ObjectColor.ToVector3();
effect.Alpha = (float)ObjectColor.A / 255.0f;

        // Apply the transformation matrix
        effect.World = Transformation;

        // Now the effect is ready for the derived class to actually draw the object
    }
|
This can then be easily used within a derived class to set the required effect properties before rendering. Listing 10 shows another piece of code from the TexturedSquareObject example class, this time for the Draw function.
Example 10. Drawing an object in a derived class
public override void Draw(Microsoft.Xna.Framework.GameTime gameTime, Effect effect)
    {
        // Prepare the effect for drawing
        PrepareEffect(effect);

        // Draw the object
        foreach (EffectPass pass in effect.CurrentTechnique.Passes)
        {
            // Apply the pass
            pass.Apply();
            // Draw the square
            effect.GraphicsDevice.DrawUserPrimitives(PrimitiveType.TriangleStrip,
                                                                        _vertices, 0, 2);
        }
    }
|
This should all be looking very familiar. If you examine the TexturedSquareObject
class as a whole, you will see that it has very little code present,
but it still manages to render our textured object to the screen.
There is, of course, no strict requirement to call PrepareEffect, and this work could instead be carried out directly within the derived class if necessary.