4. Preparing the Effect for Texture Mapping
The final thing we need to do is tell the
XNA effect that we want it to use texture mapping. In the earlier
examples, we told the effect to observe the vertex coloring by setting
its VertexColorEnabled property to true. This time we will set it to false and instead set its TextureEnabled property to true. The complete effect initialization code for texturing is shown in Listing 4.
Example 4. Configuring the effect for texture mapping
_effect = new BasicEffect(GraphicsDevice);
        _effect.LightingEnabled = false;
        _effect.VertexColorEnabled = false;
        _effect.TextureEnabled = true;
        _effect.Projection = projection;
        _effect.View = view;
        _effect.World = Matrix.Identity;
|
NOTE
If you want to use the VertexPositionColorTexture structure to combine texturing and coloring, you will, of course, need to set both the VertexColorEnabled and TextureEnabled properties to true.
Our Draw code remains entirely unchanged.
Because we have set the state of the effect object to use textures and
provided a reference to a texture we have loaded, and we have provided
texture coordinates for each vertex, XNA will automatically apply the
texture to the object when it draws.
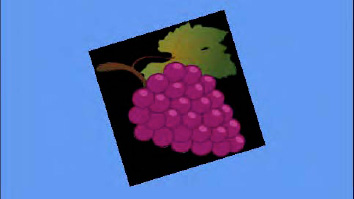
The TexturedSquare example project contains all the code needed to get this up and running; an image from the running example is shown in Figure 5.
Try experimenting with the texture coordinates to get a feel for how
they work. Some things that you can try to achieve with these are the
following:
Provide a texture coordinate range that
spans only part of the texture (for example, ranging from 0 to 0.5
instead of from 0 to 1) and observe how the texture is stretched across
the square.
Provide texture coordinates
outside of the range of 0 to 1 (for example, 0 to 3) and observe how
the texture is squashed and repeated across the square.
Provide
coordinates that don't correlate with the position of the vertex and
observe how the texture is distorted and stretched to fit within the
rendered object.
5. Configuring the Sampler State
When XNA renders your texture, it queries a set of values known as the sampler state
in order to fine-tune the resulting graphics. There are a couple of
properties that we might want to change within the sampler state to
alter the way in which the textures are processed.
5.1. Updating the Sampler State
The sampler state data can be read from the SamplerStates property of the GraphicsDevice object. This actually returns a collection of SamplerState objects, but the object at index 0 is the one that XNA will use for rendering.
However, the properties of this object are all read-only once the object has been attached to a GraphicsDevice (which it has by the time we can query it), and attempting to set one will result in an exception being thrown.
To change the sampler state properties, we must instead create a new SamplerState object, set its properties, and then set it into the SamplerStates collection. Listing 5 shows how this is achieved.
Example 5. Providing a new SamplerState object for XNA
// Create a new SamplerState object
        SamplerState samplerstate = new SamplerState();
        // Set its properties as required...
        // (set properties here)
        // Give the object to XNA
        GraphicsDevice.SamplerStates[0] = samplerstate;
|
The SamplerState class also provides a series of static properties that return preinitialized SamplerState objects in various configurations. If one of them matches your needs, you can set it directly into the SamplerState collection without having to instantiate and configure it yourself. The available preconfigured sampler states are AnisotropicClamp, AnisotropicWrap, LinearClamp, LinearWrap, PointClamp, PointWrap. The purpose of each of these will become clear once you have read through the following sections.
It is important to remember not to create new SamplerState objects during each Update or Draw
because this will quickly cause garbage collection problems as we
discussed earlier. If you need to use multiple sampler states within
your drawing code, create them all once during initialization and just
reuse these existing objects when drawing.
5.2. Texture Addressing Modes
The first SamplerState properties that we might want to set are the texture address mode properties. Back in Figure 4
we saw a texture with a coordinate range that causes the texture to be
repeated across the object when the texture coordinates exceed the
range of 0 to 1. This is known as Wrap mode, and it is the default behavior of XNA.
There are two other modes available, however: Clamp and Mirror. The Clamp
mode tells XNA to observe texture coordinates only in the range 0 to 1.
Any texture coordinate that falls outside of that range will be clamped
back into the range (in other words, all values greater than 1 will be
treated as if they were 1, and values less than 0 will be treated as if
they were 0).
The primary effect is that the texture will not wrap
within the rendered object. The secondary effect is that any texture
coordinate that does fall outside of the 0 to 1 range will stretch out
the pixel at that texture boundary for the whole of the clamped area.
In other words, setting a horizontal texture coordinate range of 0 to 2
with clamping would display the texture as normal in the left half of
the rendered object, and would then stretch the pixels from the right
edge of the texture image across the whole of the right half of the
rendered object.
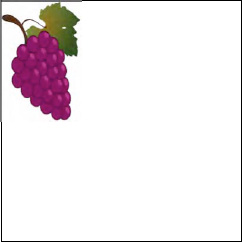
The same texture coordinates shown in Figure 4 are shown again in Figure 6 with a Clamp address mode active.
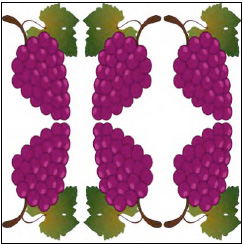
The final mode, Mirror, works very much like Wrap,
except that every alternate repeat will be flipped back to front (on
the u axis) or upside down (on the v axis). The same texture can once
again be seen in Figure 7 with Mirror addressing active.
The addressing modes can be set independently for
each axis, so if you want you can mirror horizontally and wrap
vertically. The horizontal address mode is set using the RenderState.AddressU property, and the vertical address mode is set using the RenderState.AddressV property.
5.3. Texture Filtering
The other sampler state property that we might want to set is the Filter
property. This specifies the mechanism with which XNA will enlarge and
shrink textures as it renders them to the screen. Three options are
available: Linear, Point, and Anisotropic.
The Point filter is primarily noticeable
when enlarging textures so that they are rendered at greater than their
native size. When XNA uses a point filter, it determines for each pixel
rendered on the screen which of the underlying texture pixels most
closely matches in position. This texture pixel color is then directly
displayed on the screen. The result is that the resulting graphic
becomes very pixelated and blocky, reminiscent of early 3D games before
dedicated graphics hardware became commonplace.
The Linear filter (which is active by
default) is a little clever when it comes to enlarging textures.
Instead of directly mapping texture pixels onto the screen, it blends
together the surrounding pixels to approximate a smooth blend of the
underlying texture pixels. This is not magic, of course, and the image
will quickly become blurry, but it generally provides a substantially
better result than the Point filter.
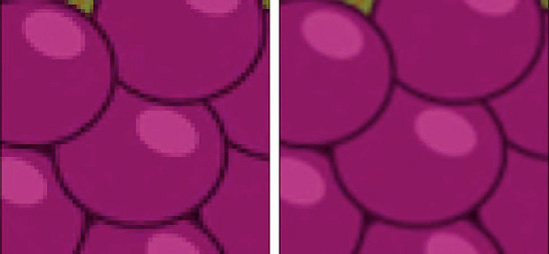
Figure 8
shows the textured square from in the earlier example projects, but
greatly zoomed in. On the left it is rendered with a point filter and
on the right with a linear filter.
The final filter, Anisotropic, comes into
play when textures are being rendered so they stretch off into the
distance of the screen. The perspective transformation will result in the texture in the distance
appearing much smaller than the texture in the foreground.
Linear filtering can cause noticeable
visual artifacts to appear on texture that are rotated in this way.
They are particularly noticeable when the texture is moving toward the
player because it would be on the road in a racing game, for example.
Using an anisotropic filter in this environment would provide the same
general results as the linear filter, but with these texturing
artifacts lessened so as to be much less apparent.