Colored shapes are all very nice, but
they're not generally what we need when we are creating a game. For our
games, we want to be able to display graphics onscreen. How do we do
this with XNA when rendering with vertices?
Fortunately, it is very easy to do so. First, we
need to load a texture and then we tell XNA to display that texture on
the triangles that it draws. The following sections show how this is
done.
1. Loading Graphics
Even though we can render 3D objects when we render
with vertices, the graphics that we apply to them are still 2D bitmap
graphics. The graphics are wrapped around the 3D objects as if they
were stickers that we are applying to a solid object.
Textures are therefore added to the Content project
and loaded ready for use by our 3D objects using the exact same code as
we used when loading textures for sprites.
Alpha channels and color keys can still be used with
textures just as they were with sprites, but there is a wide range of
different ways that we can process them.
2. Setting the Active Texture
When we are ready to render with our texture, we
first need to instruct XNA to use the texture. Just as with the other
state properties inside XNA, it will remember the specified texture
until we tell it to use a different texture. The code in Listing 1 tellsXNA to use our loaded texture for subsequent textured objects.
Example 1. Loading and activating a texture
// Load our texture
        _texture = Content.Load<Texture2D>("Grapes");
        // Set it as the active texture within our effect
        _effect.Texture = _texture;
|
3. Applying the Texture to an Object
When we rendered triangles using colored vertices,
we specified a color for each vertex. Now that we are rendering with
textures, we instead tell each vertex to map to a point within the
texture instead.
You will recall that sprite rendering allowed us to
render either the entire texture across the surface of the sprite or a
subsection of the texture. When we render using vertex buffers we can
also render subsections of the texture, although we achieve this in a
different way. We can also distort or stretch the texture in a variety
of ways that were not available to sprites.
Just as coordinates on the screen are measured using
axes called x and y, textures have axes called u and v. The u axis
covers the distance across the width of a texture, whereas the v axis
covers the distance across its height.
NOTE
If you are familiar with OpenGL, you might expect the texture axes to be called s and t. Although XNA uses the letters u and v instead, the function and purpose of these axes are identical to the axes in OpenGL.
Regardless of the resolution of the graphic that has
been loaded, the u and v coordinates will scale from 0 to 1, where 0
represents the left edge of the u axis and the top edge of the v axis,
and 1 represents the right edge of the u axis and the bottom edge of
the v axis, as shown in Figure 1.
This is a very useful feature because it lets you switch between high-
and low-resolution textures without needing to modify your code in any
way.

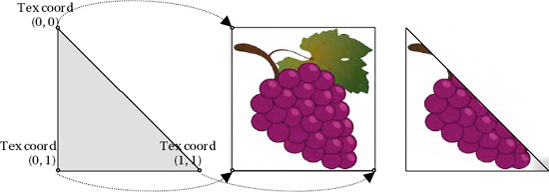
When we want to draw using texture mapping, we
provide a (u, v) coordinate for each vertex that tells it the position
within the texture that should be applied at that vertex. Just as
colors are interpolated between the vertices of rendered objects, so
too are texture coordinates. The area inside the triangle formed by the
texture coordinates will be stretched to fill the triangle formed
onscreen by the vertex coordinates. This can be seen in Figure 2,
which shows a triangle along with its vertex coordinates, the positions
of those coordinates on a texture, and the resulting textured triangle.
Although the vertices are specified in three
dimensions and therefore contain three values per vertex, texture
coordinates are reading from a 2D image. So we provide just two values
per vertex: the u and v coordinates for that vertex to use. They are
provided to each vertex in a Vector2 structure. Because the Vector2 uses X and Y for its property names, we will use the X property to store the texture's u value and the Y property to store the texture's v value. The value is stored in the TextureCoordinate property of each vertex.
But hold on—the vertex structure that we have been using doesn't have a TextureCoordinate property! This is because we have been using the VertexPositionColor
vertex structure, which (as its name suggests) can only store a
position and a color for each vertex. To store texture coordinates, we
need to switch to a different structure that supports texture
information. We will use the VertexPositionTexture structure, which stores position and texture information.
NOTE
You could alternatively use the VertexPositionColorTexture
structure, which has properties for both colors and texture
coordinates. This will allow a texture and per-vertex colors to be used
together.
In the TexturedSquare example project, you will see that the _vertices array has been modified to use this new structure, as shown in Listing 2.
Example 2. The _vertices array using the VertexPositionTexture structure
private VertexPositionTexture[] _vertices = new VertexPositionTexture[4];
|
To draw a square so that it displays the entire
texture mapped on it, we specify u and v coordinates of (0, 1) for the
bottom-left corner; (1, 1) for the bottom-right corner; (0, 0) for the
top-left corner; and (1, 0) for the top-right corner. Each of these
coordinates is specified for the vertex's TextureCoordinate property. Listing 3 contains the code required to initialize the vertex positions and texture coordinates for such a texture mapped square object.
Example 3. Creating a square from two triangles and displaying an entire texture on its surface
_vertices[0].Position = new Vector3(-1, −1, 0);
        _vertices[1].Position = new Vector3(-1, 1, 0);
        _vertices[2].Position = new Vector3(1, −1, 0);
        _vertices[3].Position = new Vector3(1, 1, 0);

        _vertices[0].TextureCoordinate = new Vector2(0, 1);
        _vertices[1].TextureCoordinate = new Vector2(0, 0);
        _vertices[2].TextureCoordinate = new Vector2(1, 1);
        _vertices[3].TextureCoordinate = new Vector2(1, 0);
|
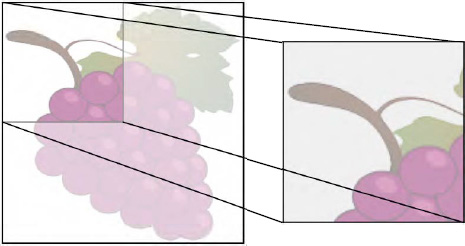
Alternatively, we can specify just a section of the
texture that we want to map. Remember that the physical vertex
coordinates are completely unaffected by this; all we are doing is
specifying the area of the texture that will be applied to the object.
If we provide texture coordinates that cover only a smaller portion of
the texture image, this portion will be stretched to fit the shape
being drawn.
Figure 3
shows an example of using a subsection of the texture in this way. The
texture coordinates span from 0 to 0.5 along both the u and v axes.
Another feature of the texture coordinates is that
they are not restricted to staying within the range of 0 to 1. If we
specify coordinates outside of this range, we can get the texture to
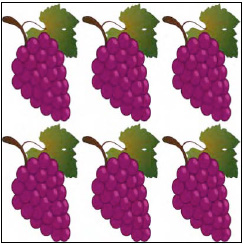
repeat within our rendered graphics. Figure 4
shows a square object rendered with values from 0 to 3 on the u axis
and 0 to 2 on the v axis. This might not be so useful when our texture
is a bunch of grapes, but if you use a texture that tiles seamlessly
(maybe a pattern of bricks or a stone texture), this can be a very
handy way of filling the entire body of the object with a relatively
small source image repeated over and over again.