Testing configuration
We did all of our tests on the
configuration that is built up by the following parts:
·
Gigabyte GA-Z77-D3H rev. 1.1 mainboard (LGA1155,
Intel Z77 Express, BIOS version F18);
·
Intel Core i5-3570K CPU (3.6-3.8 GHz, 4 cores,
Ivy Bridge rev.E1, 22nm, 77 W, 1.05 V, LGA 1155);
·
2 x 4 GB DDR3 SDRAM Corsair Vengeance
CMZ16GX3M4X1866C9R (1866 MHz, 9-10-9-27 timings, 1.5 V voltage);
·
Gigabyte GV-T797OC-3GD (AMD Radeon HD 7970,
Tahiti, 28 nm, 1000/5500 MHz, 384-bit GDDR5 3072 MB);
·
Crucial m4 SSD (CT256M4SSD2, 256 GB, SATA 6
Gbps);
·
Noctua NH-D14 CPU cooler;
·
ARCTIC MX-2 thermal interface;
·
Enhance EPS-1280GA 800 W PSU;
·
Open testbed built using Antec Skeleton system
case.
Microsoft Windows 8 Enterprise 64 bit OS
(Microsoft Windows, Version 6.2, build 9200), Intel Chipset Device Software
version 9.3.0.1026, AMD Catalyst 13.1 graphics card controller are also used.
Operational and overclocking details
When being launched, at the bottom of the
Gigabyte GA-Z77-D3H, you will see a startup picture as well as a list of
hotkeys. Pressing Del will lead you to the mainboard’s BIOS, F9 to show a
window in which displays information of the system (same buttons would make the
paths to the same windows if they are pressed in BIOS), and F12 to open a menu
to choose which device to be started up. To launch the integrated update tool
Q-Flash, press End.

Gigabyte
GA-Z77-D3H shows a startup picture in the bottom
The Tab key is not listed here, although
this button is usually used to remove the startup picture. You can deactivate
it using BIOS, but actually, unlike most of the mainboards from other brands,
those from Gigabyte do not display any information about booting on the screen.
You will only see an AMI logo as the BIOS is built based on the AMI’s code. We
would call it a drawback in the past, but the startup process of contemporary
mainboards is usually very fast, so you hardly have a chance to press the key
to enter BIOS. Therefore, just let all information that are put on the screen
go. We mention this because there is no actual drawback can be found in the
GA-Z77-D3H. It is not like most of the mainboards to follow the current trend
of increasing CPU clock rate by default. It also sets the default frequency of 1333
MHz and timings for the system memory according to the SPD information.
Adjusting frequency manually or via a XMP profile and changing the memory
timing are easy. All power saving technology works by default – changing BIOS
options from Auto to Enabled is not required like on other mainboards.
The only odd things that we noted that IDE
is chosen to be the operational mode for the disk instead of AHCI by default. In
our review, the ECSZ77H2_A2X (v1.0) is the only mainboard that set IDE as its
default whereas the others choose AHCI. You can easily switch to your favorite
operational options, but the reason why the mainboard chooses such out-dated
setting as its default is still unclear. By the way, a special Disk Mode Switch
utility is loaded in the mainboard, allowing you to change the operational mode
of the drive controller from Microsoft Windows. Exclusive software would be
clarified more detailed in the later part.
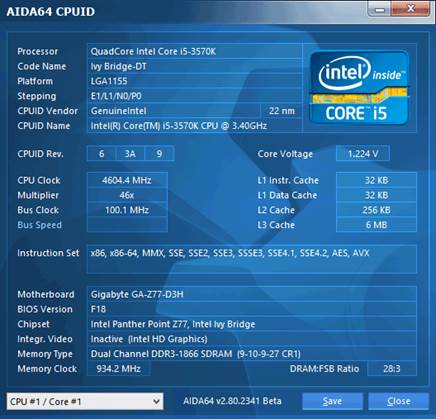
There is no auto-overclock feature in
Gigabyte mainboards’ BIOS. However, the Easy Tune6 utility can replace it, as
it is not really a downside because auto-overclocking does not bring you the
similar result to that when you do it manually. The Gigabyte GA-Z77-D3H
performs very well in our overclocking test, making out CPU stable at its
maximum frequency of 4.6 GHz. We do not usually see that result in those
mainboards that we have reviewed on. The memory frequency was also pushed up to
1866 MHz and we also adjusted the memory timings.
The
chosen operational mode for the disk is IDE
We would like to remind you that we are
fond of retaining overclocking, which means that the overclocked system would
be used non-stop. No feature or controller is disabled during the test. Intel
power saving technology was used and remained, so the frequency multipliers and
CPU voltage were lowered, and not-in-use CPU subunits are disabled; the CPU was
also switched to the power saving mode at low load.
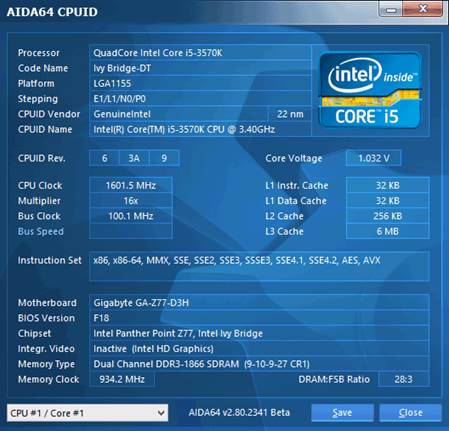
No
feature or controller was disabled
Gigabyte exclusive software
Gigabyte mainboard’s software has not been
reviewed for a very long time, but they are actually unchanged. You will find
all utility familiar and recognize them in your previous review. Therefore, we will
just remind you of each component’s function.
One of the oldest utilities is the @BIOS. The
appearance and function do not change much over so many years. Its mission is
to update and save the software. By accessing into Internet, it is capable of
searching and loading the latest BIOS version automatically. It is also possible
for it to update a mainboard’s BIOS and save the software on a local disk.
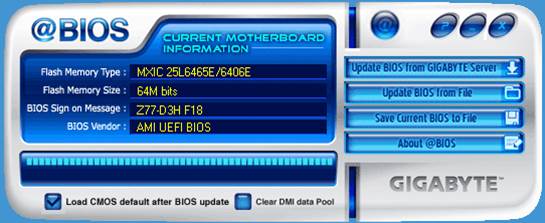
@BIOS
Opposite to the @BIOS, the EZ Setup is a
very new addition to the accompanying software of Gigabyte. It is functioned of
activating and setting up the Smart Response technology of Intel, the Rapid
Start and Smart Connect too. Everything, including any necessary change in the
BIOS, is implemented automatically by the EZ Setup. All you need to do is mark
the required technology in the list and click Setup (It is impossible to mark
the Intel Smart Response in the screen below as our profile just includes one
single SSD).
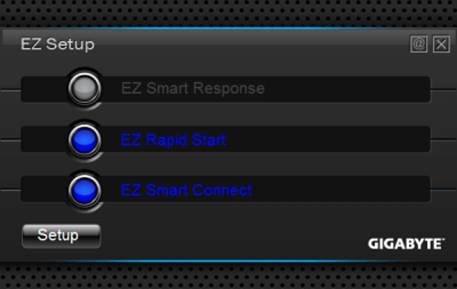
The
EZ Setup
It seems that the USB Blocker tool is not
only useful for huge corporations to manage their system but also for parents
to monitor their not-so-obedient children. It can be used to prevent the use of
USB devices. When you first launch the USB Blocker, a password would be
required, and that password will also be used later to change the utility
settings or deactivate it.
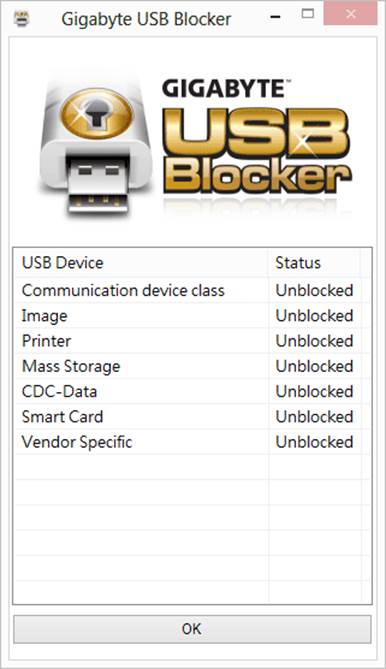
The
USB Blocker utility
The On/Off Charge tool was also installed.
This tool is a special controller which is used for recharge the Apple
utilities even when your computer is switched off but still connected to the
power source.
There are also many more utilities for many
different purposes. The Xpress Recover 2 is able to save and recover backup
data. The 3D Power utility helps the users setting up the namesake power system
right from the Microsoft Windows. To change the frequency, voltage and memory
timings can be changed by the TweakLauncher server. The LAN Optimizer will help
optimizing the network setup. We have also mentioned the Disk Mode Switch
utility, which is able to change the operational mode of the disk controller
without accessing into the BIOS. However, these tools are not available for our
Microsoft Windows 8 64 bit, so we did not install them. Therefore, we have no
photo for illustration.
There are some issues between the Windows 8
and utilities that might be compatible with it. We planned to start our
description about Gigabyte’s exclusive software from the Easy Tune 6. It
reports the information about the mainboard, CPU and memory, as well as
allowing you to change the clock frequency, frequency multiplier and voltage,
and to activate the preset overclocking configuration. It is also able to
adjust the fans’ setting and review the recorded data for monitoring. We know
all of these things because we have used it already before, but this time,
after that utility was installed and we rebooted our computer, there was no
icon on the desktop or in the Metro interface. When we tried to re-install it,
an announcement was displayed on the screen to warn us that we have to get rid
of the old version so that the new version could be installed.
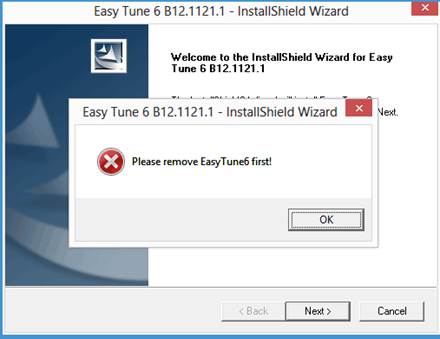
There
are some issue between Windows 8 and the utilities
However, we could not implement it
successfully as the Easy Tune6 name did not appear in the list of installed
software. Its folder could not be even found on our SSD for us to launch the
uninstalled files manually. Undoubtedly, the first installation has some
problems, but due to some Windows registry entries, we could not try installing
it again.
By the way, none of the Gigabyte utility
asks for a whole installation route. All of them are installed automatically on
the system disk, in the folder C:\Program Files\Gigabyte or C:\Program Files
(x86)\Gigabyte (for 64-bit system).