In previous review of MSI mainboards, we discussed
MSI Click BISO II, representing for a quite successful of UEFI (Unified
Extensible Firmware Interface). The top platform that not only provides info
but also allows choosing interface language and changing boot priority by dragging
and dropping them with the cursor. Operating devices will be marked.
The screen’s center display BIOS setting,
with main selectable icon on the left and right sides. Move to the first
section called “Settings”, which contain some sub-sections.
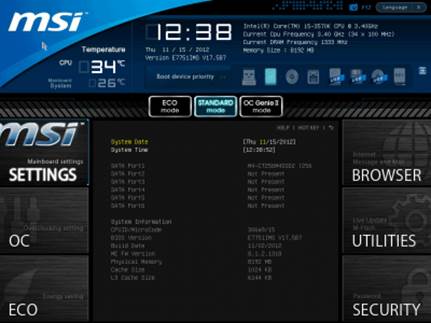
The “system status” section is actually the
same start screen we saw when logging into the conventional BIOS. It indicates info
of the main system.
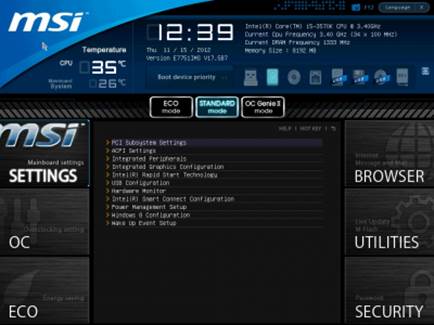
“Advanced”
The variety of setting in “Advanced”
section didn’t surprise us, as they are moved from the common BIOS without
being adjusted. Here, you can activate and configure Intel’s proprietary technologies,
such as “Intel Rapid Start” and “Intel Smart Connect”.
Configuring
the technological setting
There’s a new small “Windows 8
Configuration”, in which you can activate the typically own start-up system of
this specific OS and boost start-up time.
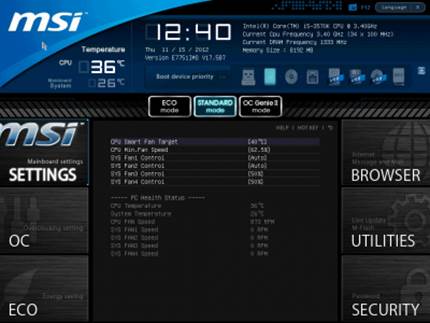
Now, let’s check “Hardware Monitor”
section, where you can activate dynamic mode of CPU’s fan speed based on the
current temperature of the processor. The adjustment only takes effect with 4-pin
fans. All 3-pin fans will run at maximum speed. However, if you connect a 3-pin
with one of 4-pin’s four connectors, its speed will be as slow as needed. Speed
adjustment for connectors of these two fans may be left at Auto or a specific
level.
“Hardware
monitor”
“Boot” sub-section will allow you to set up
boot priority and a few things used during system start-up.
“Save & Exit” sub-section’s function
is as clear as crystal, no explanation is needed.
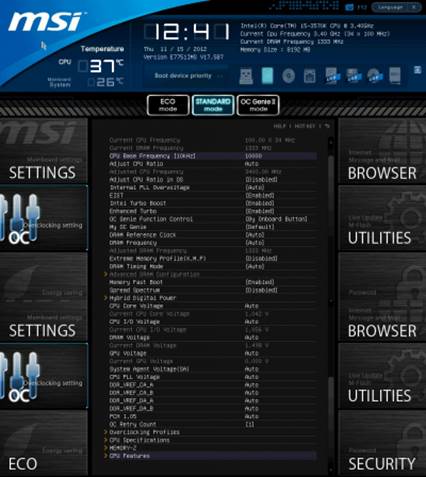
“OC” section is the largest in default
installation. It contains most of options necessary for configuring and
overclocking successfully. It also has some informational parameters reporting
current system status.
“OC”
You can use “Enhanced Turbo” BIOS in case
you want to slightly overclock while keeping energy-efficient technologies all
running. When these functions are on, under any kind of load, the processor
clock frequency multiplier will increase to the maximum level allowed for this
Intel’s typical Turbo Boost processor. If you desire a higher result, you
should use OC Genie II function, enabling overclocking by selecting options
suitable for BIOS mainboard or by pressing OC Genie button. Any dynamic
overclocking system has some drawbacks, which can be partly erased via user’s adjustment.
“My OC Genie” allows adjusting some parameter to the favorable values, used
when overclocked with “OC Genie II’ function.
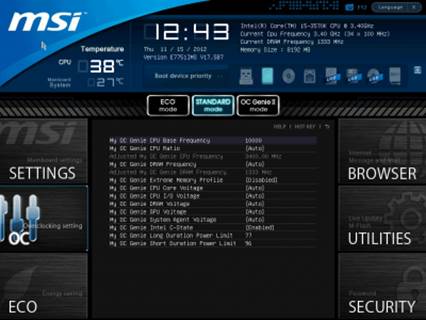
Several
parameters were moved to other pages
For an easier work with this multi-function
section, some parameters were moved to other pages. Specifically, the memory
timings are isolated in an individual sub-section. They may be the same for all
memory channels, or configured individually for each channel.
All parameters relative to processor
voltage regulator configuration have been transferred to an individual page
dubbed as “Hybrid Digital Power”.
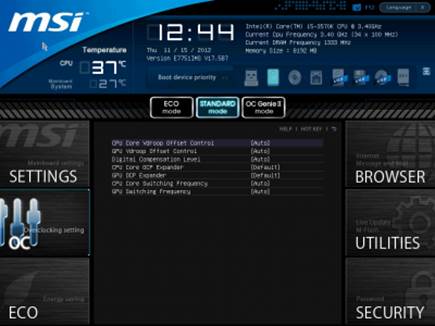
“Hybrid
Digital Power”
The mainboard can save up to 6 full BIOS
settings in “Overclocking Profiles” sub-section. It allows saving and re-downloading
setting profiles from external media. A little inconvenience is that you
couldn’t realize which setting has been used when looking at the list.
However, the actual effectiveness with the
settings is no problem at all. The timing of creating setting as well as BIOS
version that it belongs to are automatically saved for each setting. You can
give each setting a memorable name, or remove one setting from the memory if
necessary.
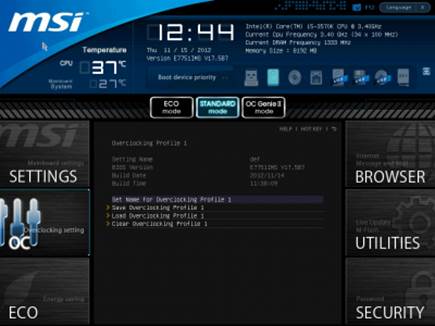
Removing
a setting from the memory if necessary
The next two sub-sections are called “CPU
Specifications” and “Memory-Z”, performing purely informational functions. The
first informs all basic info of the CPU.
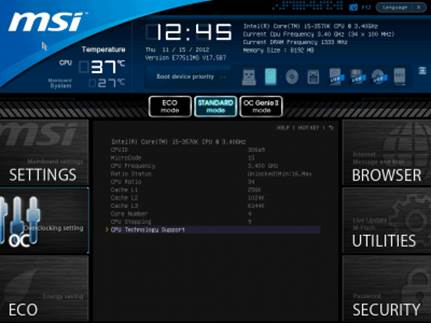
Purely
informational functions
You can dig deeper, if you want, and check
the list of supported processor technologies
“Memory-Z” subsection is arranged in a similar
way. The first that you will notice is info recorded in SPD module. The
mainboard will use these specific settings by default.
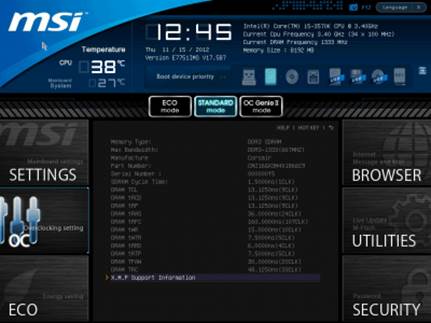
“Memory-Z”
However, the actual potential of the memory
modules can only be found in the “X.M.P.” setting, where you can also log into.
In “CPU Features” sub-section, we can
assign processor clock frequency multipliers, acceptable power consumption
range and various processor technologies. This crucial sub-section is in the list’s
bottom for some reason, yet it is still very easy to be entered, as all
parameters in the “OC” section are repeated. You don’t have to press the “down”
key endlessly to access the last sub-sections or settings. Just press the “up”
key once and you will get there instantly.
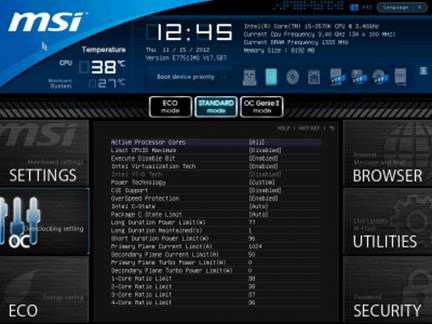
“CPU
Features”
“ECO” section is the previous “Green
Power”. Here, we can work with some energy-saving parameters, disable LEDs in
the circuit and control current values of the most important voltages in the
system.
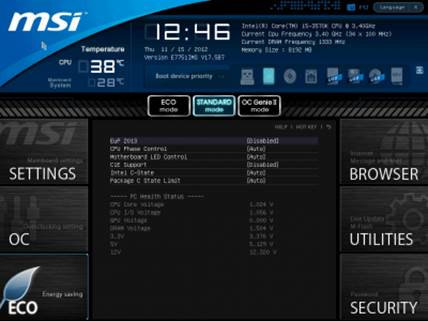
“ECO”
The “Browser” icon in the right side will
let you browse the Internet, check emails, use some office apps or IM, but only
when you have installed Winki 3 Linux – based on the OS from the accompanied
DVD.
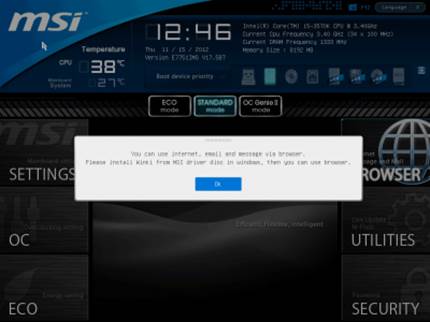
Browse
the Internet, check emails…
The similar will work with HDD Backup and
Live Update hidden behind “Utilities” icon.
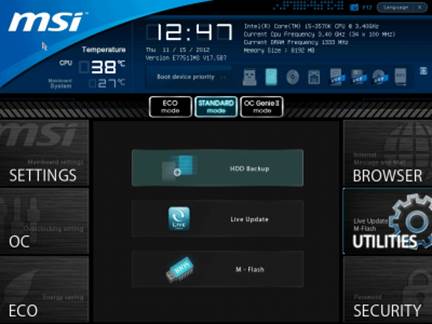
“Utilities”
In “M-Flash” sub-section, we can try and
boot, use a BIOS image on a flash drive, save the current BIOS version or
update it. It is quite inconvenient when images are not just saved in the
source folder, they should be there for successful updates. There’s no file
management or arrangement, NTFS file system is not supported and the flash
drive has to be formatted as FAT or FAT32.
In “Security” section, you will be able to
set up password for system login, which is what other boards allow. There’s an
interesting proprietary feature of MSI that lets you turn a common flash drive
into a login key.
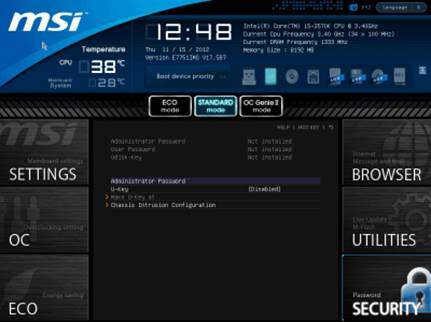
“Security”
You can press F1 at any time in any folder
of BIOS to display general help. They also introduced new hot keys – F8 and F9,
allowing you to download profiles and installation based on external media. I
wish they could have created a key letting you safely remove changes and return
to the previous installation by just one key stroke.
Overall, MSI Click BIOS II looks friendly
to work with and illustrative, and the company is improving it. They introduce
newer parameters, making working with this board much easier. However, they
still didn’t eliminate the typical drawback that MSI boards all face: MSI
mainboards are still unable to increase the processor core voltage in “Offset”
mode simply by adding the necessary value to the nominal. Moreover, the biggest
difficulty user may experience with Micro-Star mainboard often stems from BIOS concerns
which we are discussing later in this review.