Want a powerful system, but don’t
have enough space for a mid-tower cabinet? With a mini-ITX board, you can have
a rig which does much more than a mere HTPC. We feature 13 boards in this
shoot-out using top Intel and AMD processors
In the November 2012 issue, we had tested
mini-ITX boards with on-board processors and had promised to cover the
non-processor sporting boards soon. This month we have covered the other end of
the mini-ITX board spectrum. This segment is slowly but surely catching on,
what with a lot of mother-board makers having a healthy number of mini-ITX
boards without processors in their port-folio. It makes sense specially in a
country like ours, where not everyone has ample space to house a mid-tower or
full-tower cabinet.
The main idea behind building a mini-ITX
rig is to save on space, but at the same time get a powerful PC. Also with
processors these days coming with a lower TDP than their predecessors around
three years back, it makes for a power efficient system. With mini-ITX boards
sporting a Z77 chipset, it is not hard to make a decently powerful PC if you
use the right components. For the purists who already have a power hungry
high-end rig, but want more than a basic HTPC to complement their flat-screen
TV, the mini-ITX boards with chipsets such as A75, H77 & H61 come to the
rescue. Although in our test, we have used a 620W power supply, you do not
really need a PSU rated that high if you are looking at a mainstream system
build.
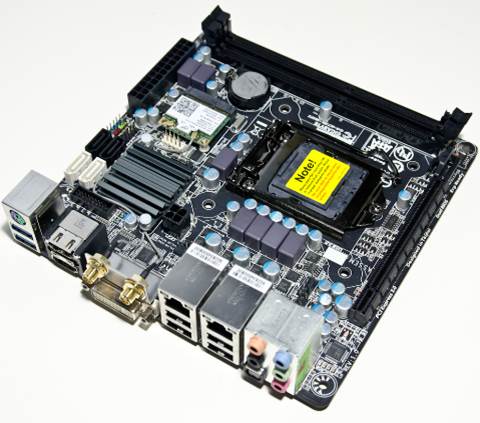
The Z77 boards
We got three Z77 boards, namely ASUS
P8Z77-I Deluxe, ASRock Z77E-ITX and ZOTAC Z77-ITX. All three boards look quite
different from each other thanks to different color themes and board layouts.
The ASUS board layout is markedly different
from the ASRock and ZOTAC boards. While on the former you have the chipset
located between the PCIe x16 slot and the CPU socket, on the latter boards it
is the CPU socket which lies between the chipset and the PCIe x16 slot. This is
thanks to the extra PCB – the daughterboard which houses the Digi+ VRM (voltage
regulator module) circuitry. The idea to add in another PCB on top of the ITX
board was to get rid of the space-constraints of the mini-ITX form factor, and
at the same time give the user a power-packed board. The daughterboard is 4.2
cm in height, rising at a right angle to the P8Z77-I board. Not only does it
house the solid state capacitors but also a passive heat-sink. It is an
intelligent layout as by taking the VRM circuitry on the daughter-board, there
is enough space around the CPU socket for adding in a fan. On the lower side of
the boards, things are pretty dense, with a PCIe 3.0 slot running at x16
speeds, packed very close to the chipset which has four SATA ports (2xSATA 2
and 2xSATA 3) on the right and the Wi-Fi and bluetooth card on the left-hand
side.
Gigabyte
H77N-WIFI
When it comes to heat-sinks, all the three
Z77 boards are impressive. The heat-sink on the ZOTAC board is quite good, with
the VRM heat-sink connected to the chipset heat-sink via a heat-pipe helping in
quicker heat dissipation. The ASRock heat-sink is not as elaborate as the ones
seen on ZOTAC & ASUS but is decent enough. All the three boards have the
SATA ports pointing upwards, with a 2x2 arrangement on ZOTAC and ASRock boards
and a 1x4 arrangement on the ASUS board. There are two USB 2.0 headers and a
USB 3.0 header on all boards. All the boards come with on-board Wi-Fi card
which fits in the mini PCIe slot. Out of the box, the wire management of the
WiFi card was the best on ASUS and ASRock boards where it was nicely maneuvered
through the components on the board. The ZOTAC board’s wire was found to be
dangling. These are little things, but it shows the attention to detail by the
board makers.
The ZOTAC board was the only one which had
dedicated power and reset buttons on board along with a POST error-code readout
LED. These are desirable features in a board. The ASUS P8Z77-I offers the MemOK
button which helps to check on faulty memory modules, and on the back I/O panel
it features the clear CMOS and BIOS flash but-tons. The region around the CPU
was the best in the ASUS board followed by ASRock and ZOTAC boards. The 8-pin
CPU power connector found on all three boards is placed most strategically on
the ASUS board. The back I/O panels on all the boards are quite well
represented. Both ASUS and ASRock offer four USB 3.0 ports and sport a DVI,
HDMI and a DisplayPort each whereas the ZOTAC board sports two HDMI ports along
with one mini-DisplayPort. It has two LAN ports as opposed to one each on the
ASUS and ASRock boards.
The UEFI BIOS is present on all the boards,
but ASUS’s implementation is really good. It also offers shortcuts within the
BIOS to quickly navigate to the option you want to tweak. The number of
over-clocking options offered by the ASUS board was more than ASRock or ZOTAC.
We were able to overclock the Intel Core i7-3770K on the ASUS P8Z77-I Deluxe to
4.4 GHz whereas the other two boards could only manage 4.1 GHz on the stock
cooler. This is courtesy the daughterboard which gives the ASUS board enough
headroom to over-clock. Ease of overclocking was decent on all the boards in
this segment. When it came to utilities, again the ASUS offerings were way
better than the other two.
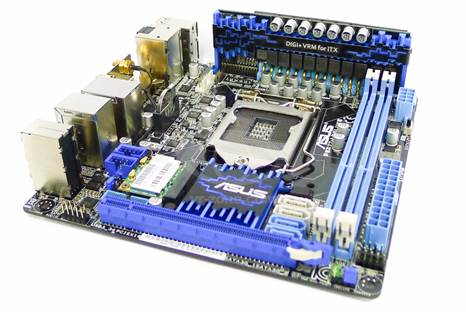
ASUS
P8Z77
The A75 boards
AMD processors have been quite impressive
when it comes to their on-board gaming performance, but it seems that mother board
makers aren’t very enthusiastic about expanding that portfolio. We were
expecting some FM2 socket based AMD boards so that we could try out the latest
AMD A10-5800K APU which gives a brilliant gaming performance along with
mid-range CPU performance. We got only two boards with the AMD A75 chipset,
namely ZOTAC A75-ITX and ASRock A75M-ITX, both sporting the older FM1 socket
for which we used an AMD A8-3850 APU. The layout on both the boards is quite
different with the ZOTAC board appearing rather cramped as compared to the
ASRock board. The placement of the 4-pin power module on the ZOTAC board is
quite strange, lodged as it is between the Wi-Fi antenna out and the USB 3.0
ports on the back panel IO as compared to the more mainstream placement of the
power port on the ASRock A75M-ITX. The heat-sinks on the ZOTAC boards are quite
better than the one on ASRock. Thanks to the A75 chipset, all the four SATA
ports are SATA 6 Gbps. One striking ommision from the ASRock A75M-ITX is a USB
3.0 header, whereas the ZOTAC board has one despite having six USB 3.0 ports
(as opposed to four on ASRock A75M-ITX) on the back panel IO. Another advantage
that the ZOTAC board has over-boards so that we could try out the latest AMD
A10-5800K APU which gives a brilliant gaming performance along with mid-range
CPU performance. We got only two boards with the AMD A75 chipset, namely ZOTAC
A75-ITX and ASRock A75M-ITX, both sporting the older FM1 socket for which we
used an AMD A8-3850 APU. The layout on both the boards is quite different with
the ZOTAC board appearing rather cramped as compared to the ASRock board. The
placement of the 4-pin power module on the ZOTAC board is quite strange, lodged
as it is between the Wi-Fi antenna out and the USB 3.0 ports on the back panel
IO as compared to the more mainstream placement of the power port on the ASRock
A75M-ITX. The heatsinks on the ZOTAC boards are quite better than the one on ASRock.
Thanks to the A75 chipset, all the four SATA ports are SATA 6 Gbps. One
striking ommision from the ASRock A75M-ITX is a USB 3.0 header, whereas the
ZOTAC board has one despite having six USB 3.0 ports (as opposed to four on
ASRock A75M-ITX) on the back panel IO. Another advantage that the ZOTAC board
has over the ASRock board is the presence of a dedicated Wi-Fi card in the mini
PCIe slot. But as was seen on the Z77-ITX board, the wire coming out of the
Wi-Fi card is just dangling and not managed well along the components. Due to
the absence of a heatsink around the VRM, the A75M-ITX board has more space
around the CPU socket than the ZOTAC board which has taller heatsinks on both
the VRM as well as the chipset. Back panel I/O ports on the ZOTAC board are
quite varied thanks to the presence of on-board Wi-Fi and an extra LAN port.
The ASRock board lacks a dedicated DVI port, which may be attributed to its
layout which allots a significant portion along the back panel I/O to
accommodate the edge of the DIMM slots, two capacitors and the fan connectors.
As expected, there are no on-board dedicated power/reset or other buttons. Only
the Z75-ITX A-E has a clear CMOS button on the back I/O panel, just under the
two Wi-Fi antenna outs. The BIOS on the ZOTAC board is quite boring so to
speak, offering mouse functionality whereas the one on ASRock board is quite
good looking thanks to the graphical UEFI BIOS. Overclocking isn’t really the
strong point of these boards though.
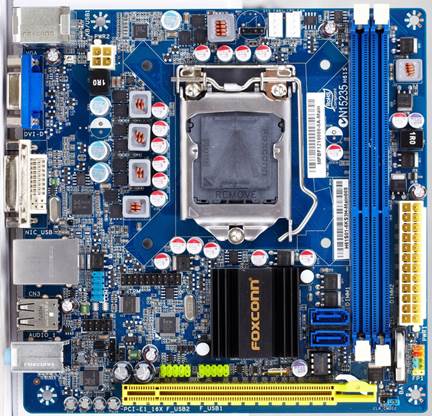
Foxconn
H61S