In business today, information spreads very fast,
thereby making it difficult to track and maintain records. The demand to
maintain records of communication between people has increased in order
to satisfy legal requirements. There have been many cases in recent
years of large companies that could not comply with government email
compliance mandates, and many of them paid large penalties, to the tune
of millions of dollars.
These legal
responsibilities are accompanied by several technical challenges. When
users are required to keep email messages about specific topics, they
need a place to put them. Keeping them in their mailbox eats precious
space that contributes to the user's email quota. If messages are kept
in personal folders (PST files), they are moved off the mail server and
onto the user's local hard drive or onto a network share. This makes the
mail data hard to collect and search for. You have to find the PSTs on
various client computers and on your network, hope that they are not
password protected, and search through them for what you are looking
for. When you are required by law to produce proof in a legal matter,
not having access to these messages can cost your organization dearly.
Exchange Server 2010 brings a lot
to the table to ease these pains. This section discusses how to
implement the mechanisms that will keep your organization legally sound.
1. Enforce Records Management
There are two ways to
enforce records management in Exchange Server 2010. The old method,
adopted from Exchange Server 2007, uses managed folders. Managed folders
operated on the notion that users would drag messages into an
administrator-defined folder that meets the records management
requirement of the message. This method assumed that users would be
"filers" and file their messages away into separate buckets.
However, some users can
be classified as "pilers." Because of the robust search capabilities in
Outlook, many people will keep large amounts of email in their inbox or
in a single folder. To find the messages they need, they simply search
for them based on keywords. The managed folders approach does not work
well for these individuals, so Exchange Server 2010 introduces the
option of retention tags. With retention tags, individual messages can
be tagged with retention policies that enforce the records management
requirement.
1.1. Use Managed Folders
Managed folders
are created by administrators in the Exchange organization and applied
to mailboxes using a managed folder policy. Each managed folder has
managed content settings associated with it. The managed content
settings define what happens to the items in the managed folder when
they expire. The Managed Folder Assistant runs in the background on
Mailbox servers and applies managed folder policies to mailboxes on a
scheduled interval.
You need to complete three tasks to implement managed folders:
Create
managed folders. (You only need to do this if you want custom managed
folders. Managed default folders are created automatically.)
Create managed folder policies.
Apply managed folder policies to mailboxes.
1.1.1. Create Managed Folders
There are two types of managed
folders that you can work with: managed default folders and managed
custom folders. Managed default folders are the default folders inside a
user's mailbox, such as the Inbox folder or the Sent Items folder. You
can also create managed custom folders that you want to appear in user's
mailboxes. These folders appear under the folder called Managed Folders
at the root of the mailbox.
To create a new managed custom folder in the Exchange Management Console (EMC), use the following steps:
Open the EMC and browse to the Organization Configuration => Mailbox node in the Console tree.
In the Actions pane, click the New Managed Custom Folder task to launch the configuration wizard.
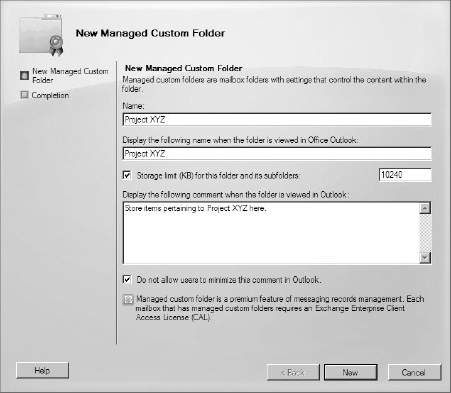
On
the New Managed Custom Folder screen, enter the name of the folder in
the Name field. The field below it can be used to define a different
name when the folder is viewed in Outlook. By default, this field is set
to the same value that you type in the Name field.
If
you want to apply a storage quota to the managed custom folder, click
the option Storage Limit (KB) For This Folder And Its Subfolders. In the
text box to the right, enter the limit of the folder in kilobytes. For
example, a 10 MB quota would be entered as 10240.
You
can also set a comment for this folder that the user sees when the
folder is opened. Enter this comment in the field Display The Following
Comment When The Folder Is Viewed In Outlook. If you check the box Do
Not Allow Users To Minimize This Comment In Outlook, then the comment is
always visible to the user.
After filling out the fields as shown in Figure 1, click the New button to create the folder.
At the Completion screen, click Finish.
The managed custom folder is created, but it will not yet show up in anyone's mailbox. You must perform these tasks first:
Apply this managed folder to a managed folder policy and apply the policy to a mailbox .
1.1.2. Control the Lifespan of Messages
Now that you have a managed
folder, you need to set managed content settings to determine what
happens to items in the folder. You can define how long items stay in
the folder before something is done to them and what action is taken
when the time period expires. You can also choose to forward a copy of
any message placed in the folder to another mailbox, which is also known
as journaling the item.
|
Although you can have
multiple managed content settings for each managed folder, you can have
only one setting for each type of item. For example, if you already have
managed content settings defined for Calendar items in the folder, you
can't create another set of managed content settings for Calendar items.
|
|
To configure managed content settings for a folder using the EMC, use the following steps:
Open the EMC and browse to the Organization Configuration => Mailbox node in the Console tree.
Select
either the Managed Default Folders tab (if you are defining content
settings on default mailbox folders) or the Managed Custom Folders tab
(if you are defining content settings for a folder that you created).
In the list of managed folders, select the folder and click the New Managed Content Settings task in the Actions pane.
In the New Managed Content Settings wizard, type a name for content settings, such as Delete After 1 Year.
From
the Message Type drop-down list, select the type of content that you
want this setting to apply to. For example, you can apply the setting to
specific items such as email only. Or you can apply the setting to
every item type by choosing All Mailbox Content.
Check
the Length Of Retention Period (Days) box and type the number of days
that you want the items to be retained before an action is taken on
them.
In
the Retention Period Starts box, you can choose when the retention
period starts. It can start either when the item is delivered or when it
is moved into the folder. For example, if you want to create a setting
to delete items after one year, you could set the retention period for
365 days.
In
the field Action To Take At The End Of The Retention Period, choose
what happens to the item when the period is over. If you choose to move
it to a managed folder, click the Browse button to select that folder.
After you have filled out these fields as shown in Figure 2, click Next to continue.

At
the Journaling screen, you can choose to forward copies of the message
to a mailbox when it's placed in the folder. Check the Forward Copies To
option and click the Browse button to select the mailbox. You can also
define a label for the message in the field Assign The Following Label
To The Copy Of The Message. Doing so can make the messages easier to
sort through. Click Next to continue.
These messages are forwarded when the Managed Folder Assistant runs and processes the managed items in the mailboxes.
In the Configuration Summary screen, click New to create the managed content settings for the folder.
At the Completion screen, click Finish to exit the wizard.
The settings for the managed folder are now configured and the folder is ready to be added to a managed folder policy.
1.1.3. Configure Managed Folder Policies
To apply managed folders to
users, you need to add the managed folders to a managed folder policy.
There are two parts to this process:
Configure the managed folder policy.
Assign the policy to one or more mailboxes.
You can have multiple
managed folder policies with multiple managed folders in each. You can
deploy different policies to different users, but each user can have
only one managed folder policy applied to them. To create and assign a
managed folder policy in the EMC, use the following steps:
Open the EMC and browse to the Organization Configuration => Mailbox node in the Console tree.
Select the New Managed Folder Mailbox Policy task in the Actions pane.
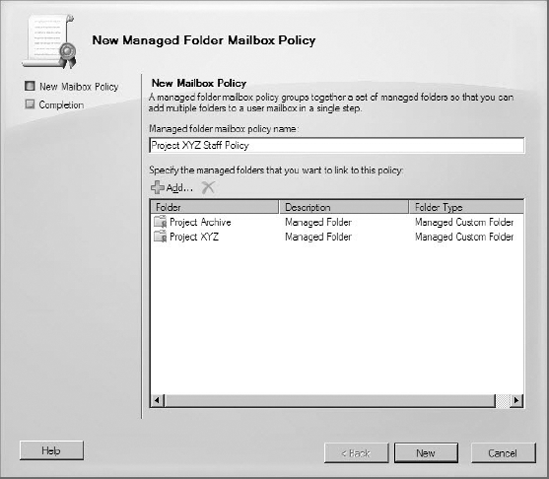
In the New Managed Folder Mailbox Policy wizard, enter a name for this policy in the field Managed Folder Mailbox Policy Name.
Click
the Add button to add a managed folder to this policy. The Select
Managed Folder dialog box will be displayed. Select either a managed
default folder or a managed custom folder and click OK.
After you have added all the managed folders that you want in this policy, as shown in Figure 3, click New to create the policy.
At the Completion screen, click Finish to close the wizard.
Back in the EMC, browse to the Recipient Configuration => Mailbox node in the Console tree.
From the list of mailboxes displayed in the Results pane, select one or more mailboxes that you want to apply the policy to.
Click the Properties option for the selected mailboxes in the Actions pane.
In the properties dialog box, select the Mailbox Settings tab.
Select the Messaging Records Management option in the list of mailbox settings and click the Properties button above the list.
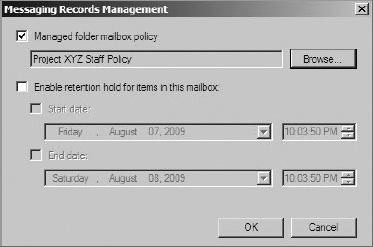
In
the Messaging Records Management dialog box, select the Managed Folder
Mailbox Policy check box. Click the Browse button to select the policy
that you just created. When you have added the policy, as shown in Figure 4, click OK to close the Messaging Records Management dialog box.
Click
the OK button to close the Properties dialog and make the changes to
the managed folder Mailbox Policy. You may receive a warning indicating
that some versions of Outlook will not support managed folders. If you
are sure that these mailboxes are using compatible versions of Outlook,
click Yes to continue.
The policy is now created and assigned to your users. This policy will be applied when the Managed Folder Assistant runs.
1.1.4. Modify the Managed Folder Processing Schedule
By default, the Managed
Folder Assistant runs every day from 1 a.m. to 9 a.m. During this time,
the settings defined in the managed folder mailbox policy for each
mailbox are enforced. The assistant runs once during this interval and
stops. If it doesn't finish processing before this interval is over, it
picks up where it left off at the next scheduled interval. You can
adjust this schedule. You can also use the Exchange Management Shell to
manually start the Managed Folder Assistant.
To adjust the Managed Folder Assistant schedule in the EMC, follow these steps:
Open the EMC and browse to the Server Configuration => Mailbox node in the Console tree.
In
the list of Mailbox servers, select the server that you want to modify
the Managed Folder Assistant's schedule for and click the Properties
option in the Actions pane.
In the server's properties dialog box, click the Messaging Records Management tab.
Click
the Customize button to create a custom schedule for the assistant to
run during. You must allot at least one 15-minute interval between the
time the assistant stops and starts again. Therefore, you cannot
schedule it to run 24 hours per day for an entire week.
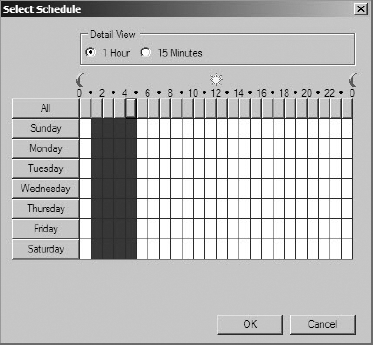
In
the Select Schedule dialog box, click the boxes that correspond to the
hours that you want the assistant to run. When the box is blue, that
means the assistant is allowed to run during that hour. You can see this
in Figure 5,
which shows a modified schedule, every day from 1 a.m. to 5 a.m. After
selecting the schedule, click OK to close the dialog box.
Back in the properties dialog box, click OK to close the dialog box and make the changes to the schedule.
You can manually launch the
Managed Folder Assistant and it will run even if it's not within a
scheduled time interval. You can do this by running the following two
commands in the EMS:
Restart-Service MSExchangeMailboxAssistants
Start-ManagedFolderAssistant
The managed folder settings
will be updated in your Outlook clients as soon as the mailboxes are
processed. For small organizations, this could happen quickly, but it
might take a while longer (potentially hours) for larger organizations
with thousands of mailboxes. When the process finishes, an event with ID
9018 (or ID 9022 if you manually launched the process) will be written
to the Application event log on the server. The event description will
say that the Managed Folder Assistant completed, and it tells you how
many mailboxes were processed.
1.2. Use Retention Tags
Retention tags are a new feature
in Exchange Server 2010 that offers more flexibility for users than
managed folders. With managed folders, users are required to file email
away into specific folders. However, with retention tags, a user can
apply retention settings directly to specific items. This eliminates the
need for users to change their email management habits to conform to
your organization's managed folders structure. Also, users can create
their own folders and apply retention tags to those folders, effectively
duplicating the same functionality as managed folders, but the process
is controlled by the users rather than the administrators.
Retention tags are similar
to managed folder content settings. You define the type of message the
tag applies to, the retention period, the action that you want to take
when the item expires, and the journaling options. Retention tags are
linked to retention policies, which are similar to managed folder
policies. A retention policy can be applied to mailboxes.
The following process is used for setting up retention tags for your users:
Create the retention tags.
Link the retention tags to retention policies.
Apply the retention policies to mailboxes.
1.2.1. Create Retention Tags
You can create a new
retention tag using the New-RetentionPolicyTag cmdlet in the EMS. You
will need to specify the name of the tag, the type of items that the tag
applies to, the age limit, and the action to take when the item
expires. You can also specify a journaling address so that the message
is forwarded to another mailbox when it's tagged. Some of the important
parameters are listed in Table 1.
Table 1. Parameters for Creating New Retention Tags
| Parameter | Description |
|---|
| Name | The name of the retention tag. |
| Type | The folder that the retention tag applies to—for example, Calendar, Inbox, SentItems. You can also specify a value of Personal to allow the user to use the tag for custom folders and single items. |
| MessageClass | The class of item that the retention tag applies to. For example, this could be E-mail or CalItems (for calendar items). |
| AgeLimitForRetention | The number of days that an item is retained for before an action is taken. |
| RetentionAction | The action to take when the message expires. The possible values are MoveToDeletedItems, MoveToFolder, DeleteAndAllowRecovery, PermanentlyDelete, MarkAsPastRetentionLimit, and MoveToArchive. |
| RetentionEnabled | Set to $true to enable retention. This must be enabled before the retention limit applies to the tagged items. |
| AddressForJournaling | The address for where a copy of the tagged items will be sent. |
| JournalingEnabled | Set to $true to enable journaling of the tagged items. |
Using these parameters, you
can create meaningful retention tags for your content. The following
example creates a tag that archives every message after 5 years (1,825
days):
New-RetentionPolicyTag "RPT-ArchiveAfter5Years" -Type All
-MessageClass E-Mail -AgeLimitForRetention 1825
-RetentionAction MoveToArchive -RetentionEnabled $True
1.2.2. Link Retention Tags to Retention Policies
Now that you have a retention tag created, you need to create a retention policy to link the tag to. You can use the New-RetentionPolicy
cmdlet in the EMS to create the new policy. You can link the retention
tags to the policy when you create it, or you can do it later. The
following example creates a new retention policy and applies the tag we
created previously:
New-RetentionPolicy "RP-FinancialTeam"
-RetentionPolicyTagLinks "RPT-ArchiveAfter5Years"
You can also link a retention tag to an existing policy using the Set-RetentionPolicy cmdlet. You will need to specify the RetentionPolicyTagLinks parameter and list all the tags that apply to the policy, separated by commas.
|
If you omit a retention tag that is already linked to the retention policy, the tag will be removed.
|
|
The following example illustrates how the retention tag is linked to an existing retention policy:
Set-RetentionPolicy "RP-FinancialTeam"
-RetentionPolicyTagLinks "RPT-ArchiveAfter5Years",
"RPT-Default"
1.2.3. Apply Retention Policies to Mailboxes
After the retention
policy is created and retention tags are linked to it, you can apply the
policy to mailboxes. To do this, use the Set-Mailbox cmdlet with the RetentionPolicy parameter:
Set-Mailbox "John Smith" -RetentionPolicy RP-FinancialTeam
You may receive a prompt
indicating that retention policies are only supported by certain Outlook
versions. If you are sure that the user using this mailbox meets this
requirement, press Y and then Enter to continue. The policy will be
applied on the next scheduled managed folder processing run.
1.3. Suspend Retention Policies on a Mailbox
If users are away for an
extended period of time, such as on vacation, it might be a good idea to
suspend any retention policies until they get back. If not, users might
not get an opportunity to review any messages that the retention policy
would cause to be deleted or moved. You can do this by placing a
mailbox on retention hold.
|
Be careful not to
confuse retention hold and litigation hold. In retention hold, the
messages can be deleted permanently and not returned in discovery
searches. But in litigation hold, everything is kept for as long as the
mailbox is in litigation hold. Retention hold just suspends the
retention policies so that items aren't deleted or moved while the user
is away.
|
|
To place a mailbox on retention hold using the EMC, follow these steps:
Open the EMC and browse to the Recipient Configuration => Mailbox node in the Console tree.
In the Results pane, select the mailbox that you want to place on retention hold.
In the Actions pane, click Properties for the mailbox that you have selected.
In the properties dialog box for the mailbox, select the Mailbox Settings tab.
In the list of mailbox settings, select Messaging Records Management and click the Properties button.
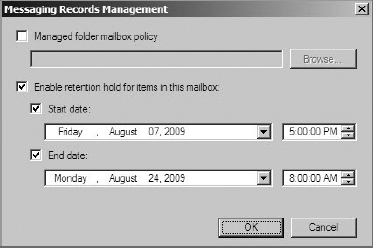
In
the Messaging Records Management dialog box, select the Enable
Retention Hold For Items In This Mailbox check box. If you know the time
period that the user will be away, you can set a start and end date for
the retention hold, as you can see in Figure 6.
When
the time expires, retention hold is automatically lifted from the
mailbox. Click OK to close the Messaging Records Management dialog box.
Click OK to close the properties dialog box and apply the retention hold.
To place a mailbox on retention hold in the EMS, you can use the Set-Mailbox cmdlet with the EnableRetentionHold parameter, as shown here:
Set-Mailbox "John Smith" -RetentionHoldEnabled $true
When the user returns to work, you can take the mailbox out of retention hold by setting the RetentionHoldEnabled parameter to $false.
1.4. Convert from Managed Folders to Retention Tags
Both managed folders
and retention tags exist in Exchange Server 2010. They both accomplish
the same goal. If your environment consists only of Outlook versions
that can support retention tags (such as Outlook 2010), you can solely
use retention tags for managing content instead of managed folders. You
can convert your existing managed folders into retention tags by using
an existing managed folder as a template.
To create a retention tag that uses a managed folder as a template, you can run the New-RetentionPolicyTag cmdlet and specify the ManagedFolderToUpgrade parameter. The following example creates a new retention tag that mirrors an existing managed folder:
New-RetentionPolicyTag "RPT-ProjectABC"
-ManagedFolderToUpgrade "Project ABC"