SharePoint 2010 introduces In
Place Records Management, a feature that allows you to declare any
document as a record—if it is located within a site collection that has
this feature activated. This eliminates the need to have to send every
document to the Records Center in order for them to be handled as a
record.
After enabling this
site collection feature, users can declare any document within the site
collection as a record. These records now have policies and restrictions
on them similar to those in the Records Center. The policies for these
records can be added at either the content type or the document library
containing the documents.
1. Implementing In Place Records at the Site Collection
To use In Place
Records Management, you need to activate the In Place Records Management
site collection feature. After doing so you can use the site collection
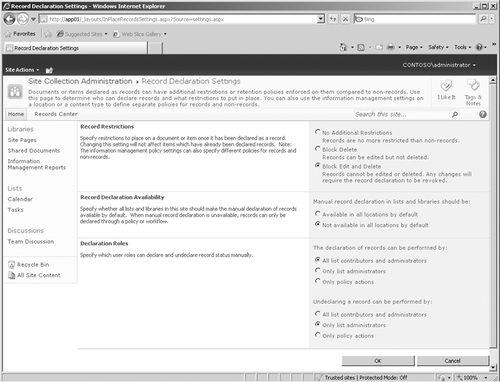
record declaration settings shown in Figure 1 to control how the records are managed in the site collection. This page is divided into the following three sections.
Within the Record Restrictions
section, you can specify restrictions on how a document or item is
handled after it has been declared a record. The three options available
are No Addition Restrictions, which will allow the records to be
handled in the same way as non-records; Block Delete, to prevent the
deletion of the records; or Block Delete And Edit, to prevent both the
deletion and editing of the records.
In the Record Declaration
Availability section, you can specify whether all lists and libraries
within the site collection can use manual declaration of records by
default, or you can choose to not make the manual declaration the
default behavior for all lists and libraries. When the second option is
selected, you can only declare records using a policy or workflow.
Within the Declaration
Roles section, you specify which user roles can declare or undeclare
records manually. There are three options for the declaration and three
options for the undeclaring of the records: All List Contributors And
Administrators, Only List Administrators, or Only Policy Actions.
2. Configuring In Place Records in a List or Library
After implementing In
Place Records at the site collection, you still have to manage which
lists and libraries use the In Place Records feature. This is done by
accessing the settings for the library or list, where you will now have a
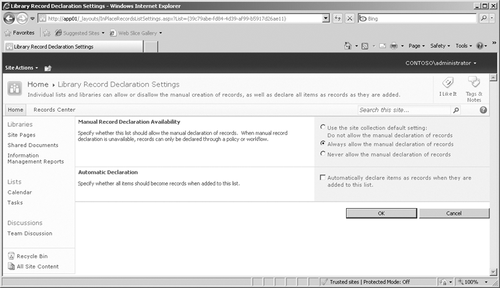
Record Declaration Settings option under Permissions And Management.
When you click this link, you will see the page shown in Figure 2.
By default, the library inherits the manual record declaration settings
from the site collection options. However, you can choose to override
those settings and select either the Always Allow The Manual Declaration
Of Records option or Never Allow The Manual Declaration Of Records
option. Optionally, you can override the need to manually declare
records in the list or library by selecting the Automatically Declare
Items As Records When They Are Added To This List check box. After
selecting this check box, the three options above the check box are no
longer available as choices.
2.1. Managing In Place Records in a List or Library
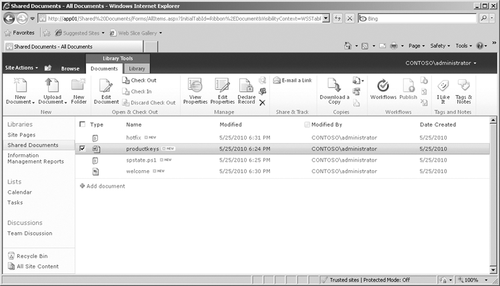
After you have enabled In
Place Records for a list or library, you will are able to choose any
item or document within that list or library and declare it as a record
using one of two methods. You can use the Declare Record icon on the
Ribbon as shown in Figure 3.
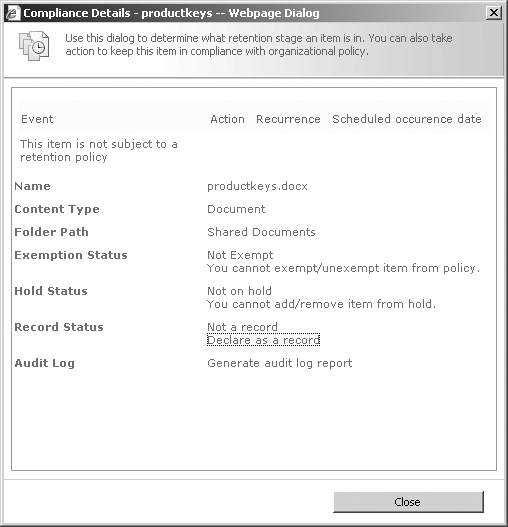
Another way you can declare
a record on an existing document is to hover over the document name and
click the drop-down arrow; then click Compliance Details to display the
dialog box shown in Figure 4. You can then click the Declare As A Record link within the Record Status section of the screen.
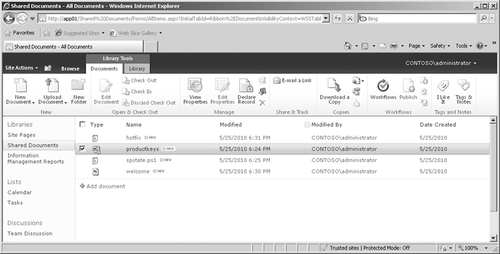
Regardless of the approach you take to implement an In
Place record, there is an easy way you can look at a document library
to determine if a document has been declared as a record. After
declaring a document as a record, the icon displayed under the Type
column within the library will have a little lock on the lower-right
side of the icon, as shown with the Productkeys document in Figure 5.
With the appropriate
permissions, you can also undeclare the record from within the
Compliance Details dialog box by clicking the Undeclare Record link.
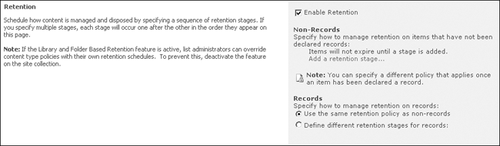
2.2. Managing Information Management Policies with In Place Records Activated
After activating the In Place Records site collection
feature, you will have a different experience when enabling
retention—you will see an additional option available that allows you to
specify how you want the retention policy to behave for records and
non-records, as shown in Figure 6.