Active Directory Rights Management Services (AD RMS)
is a Data Leak Prevention (DLP) technology that uses Digital Rights
Management (DRM) concepts in an attempt to prevent critical data from
easily being transferred outside of a company. AD RMS works by
encrypting documents, and then only allowing them to be unencrypted if
the client application agrees to the terms of the rights policy. For
example, the rights policy may dictate that the document cannot be
printed, that it can’t be saved in a different format, or that data from
it cannot be copied/pasted. It can also dictate that the document
expires after a certain period of time.
AD RMS is independent
from SharePoint, and runs as a service on a Windows Server 2008 or
Windows Server 2008 R2 server. Clients can encrypt files directly from
their Office clients, or via Outlook, with or without SharePoint. Where
the SharePoint integration comes into place, however, is in SharePoint’s
ability to define a rights policy on all documents within a document
library and have those rights policies enforced by an AD RMS server in
the domain.
Understanding Prerequisites and Limitations of AD RMS
It is important to
understand first what AD RMS can and can’t do in a SharePoint
environment. The following key facts are important:
AD RMS does not
encrypt files in storage. Instead, the AD RMS rights policies are
enforced only when the document is pulled out of the document library.
This allows SharePoint indexing to be able to index the documents. If
storage-level encryption is required, a technology such as SQL TDE.
You
can only establish one rights policy per document library and, once
established, those policies apply to all documents, both existing and
new documents in the library.
The
rights policies in SharePoint document libraries only define whether a
user can print or programmatically access data or not. Other rights
restrictions on documents actually depend on the SharePoint rights that a
user has to the document library. If they have full contributor rights,
they can do more with the content. If they simply have reader rights,
they are fully restricted in what they can do.
The
AD RMS fully qualified domain name (FQDN) cannot be changed for
existing content. Give considerable thought to what the FQDN will be and
enable SSL encryption immediately on RMS. If you choose a flat name
such as http://rmsserver for your URL, you will never be able to turn on
external access to RMS. Instead, consider choosing something like https://rms.companyabc.com from the beginning, even if you don’t intend on turning on external access.
Users
using rights-protected documents or document libraries must have
web-based access to the AD RMS FQDN to be able to open documents. If
SharePoint is published on the outside, for example, the users will need
to be able to access the FQDN of the AD RMS site. In the previous
example, this means being able to get to rms.companyabc.com. This means
that this must be published as a site if this type of functionality is
required.
After a
service connection point (SCP) is published in AD, all users will
immediately be able to use it. Consider waiting to publish the SCP until
the environment has been fully tested. You can test out AD RMS by
modifying the client registry to point to the AD RMS server instead of
using an SCP initially.
Add multiple AD RMS
servers for redundancy, and load balance them. This makes it even more
critical to use an FQDN that can point to multiple servers or a load
balanced VIP, such as rms.companyabc.com. You won’t be able to add a
second AD RMS server into a cluster until the SCP has been published.
Installing AD RMS
For environments that
don’t already have an AD RMS server in place (legacy Windows Server 2003
RMS will work as well), a new Windows Server 2008 R2 AD RMS environment
is required. Note that the RMS server requires a separate server from
the SharePoint farm servers, and will also require a database for the AD
RMS database. In many cases, the AD RMS database server will be the
same server as the SharePoint database server.
To install and configure
AD RMS on a server, first install Windows Server 2008 R2, (Standard,
Enterprise, or Datacenter will work) with the default installation
options and then add it to the domain. Log in as an account with local
admin access to the box and perform the following steps to install AD
RMS:
1. | On the RMS server, run the Add Roles Wizard from Server Manager.
|
2. | Click Next to start the wizard.
|
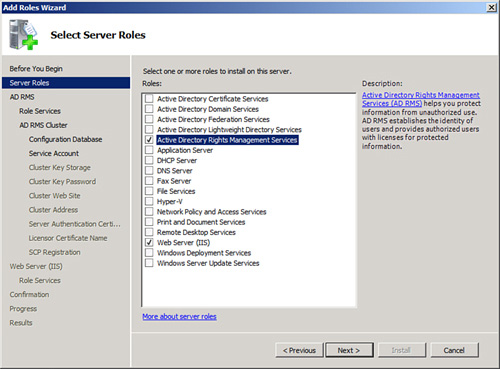
3. | Check the box for Active Directory Rights Management Services
|
4. | Choose to add the required role services when prompted.
|
5. | Ensure that AD RMS and Web Server are checked in the summary dialog box, shown in Figure 1, and choose Next to continue.
|
6. | Click Next at the AD RMS Welcome dialog box.
|
7. | Under Role Services, leave the default in place and click Next.
|
8. | From the RMS Cluster dialog box, choose to create a new RMS cluster and click Next to continue.
|
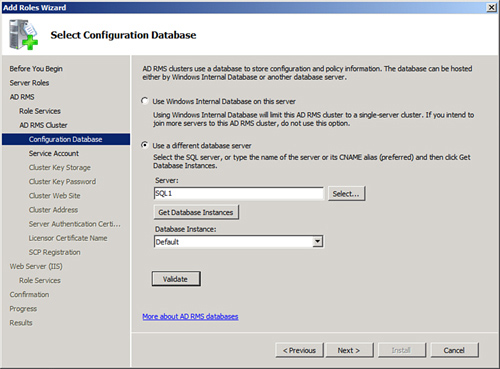
9. | From the Database dialog box, shown in Figure 2,
choose to either use a local Windows Internal DB on the server or use a
centralized SQL Server instance on another server. It is highly
recommended to choose a separate SQL server, such as the SharePoint
database server, for this.
|
10. | Specify
a domain user account in the subsequent dialog box that will be used
for AD RMS. This account should not have any special rights other than
domain user rights in the domain. You will need to create this account
in advance before proceeding. Click Next to continue.
|
11. | Under the Cluster Key Storage dialog box, choose the default AD managed key storage and click next to continue.
|
12. | Enter
a password for the cluster. Be sure to save this password; you’ll need
it to add additional RMS servers into the cluster in the future. Click
Next to continue.
|
13. | Use the default website and click Next to continue.
|
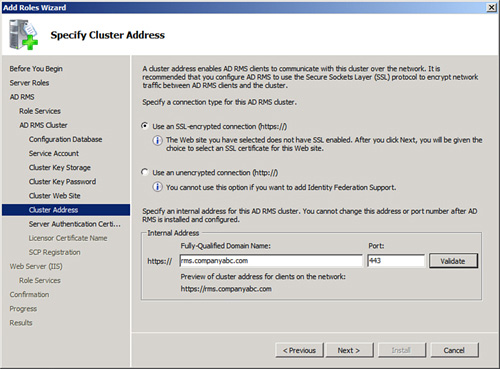
14. | Select whether to use an SSL-encrypted connection to RMS or an HTTP connection, such as what is shown in Figure 3.
It is highly recommended to use SSL now, because content will display
this name at all times. In addition, do not use a server name for the
FQDN. Use a name that can be transferred to a VIP or another server in
the future, such as rms.companyabc.com. Ideally, your RMS address will
then always be https://rms.companyabc.com. Click Next to continue.
|
15. | At
the subsequent dialog box, choose the SSL certificate that matches the
FQDN chosen (that is, rms.companyabc.com). If it is not created yet,
choose to install it later. This certificate must be installed for RMS
to work properly. It is not recommended to use a self-signed
certificate. Click Next to continue.
|
16. | Choose the name of the server licensor certificate (accept the default in most cases) and click Next to continue.
|
17. | Select
whether to register the SCP now or later. Typically, the SCP will be
registered immediately, but be sure to understand the implications of
this. Once registered, all Office clients in the domain will “see” the
RMS server and will be able to start encrypting content.
|
18. | Accept the default for the web role wizard, and then click Next.
|
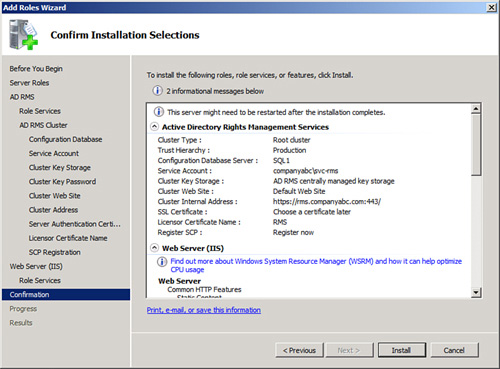
19. | Review the settings, such as those shown in Figure 4, and choose Install.
|
20. | Choose Close when the wizard completes.
|
Modifying the RMS Certification Pipeline
After an RMS server is
installed, a file on the RMS server will need to be modified to allow
the SharePoint server and a local RMS group to be able to access that
file. If this step is not performed, SharePoint won’t be able to make a
connection to the RMS server to be able protect document libraries. To
configure this security, perform the following steps while logged in as a
local administrator on the RMS server:
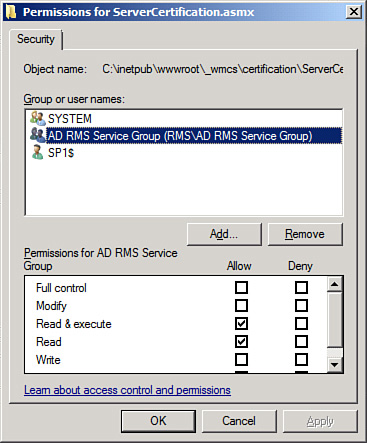
1. | On the RMS server, navigate to C:\Inetpub\wwwroot\_wmcs\Certification.
|
2. | Right-click the ServerCertification.asmx file and choose Properties, and then click the Security tab.
|
3. | Click Edit and then Add.
|
4. | Click Object Types, select Computers, and then click OK.
|
5. | Enter the name of all SharePoint web roles servers into the box and then click OK.
|
6. | Click Add.
|
7. | Select Object Types of Groups, and then click OK.
|
8. | Type RMSServer\AD RMS Service Group (where RMSServer is the name of your RMSServer), and then click OK.
|
9. | Review the security settings, which should be similar to what is shown in Figure 5.
|
10. | Click OK to close the security dialog box.
|
Enabling IRM Support in SharePoint Central Admin
After the
ServerCertification.asmx file has been modified on the RMS server,
switch to the SharePoint server to be able to turn on Information Rights
Management (IRM) support and integrate the SharePoint servers with the
AD RMS environment. To turn on this functionality, perform the following
tasks:
1. | From SharePoint Central Admin, navigate to the Security link in the navigation pane.
|
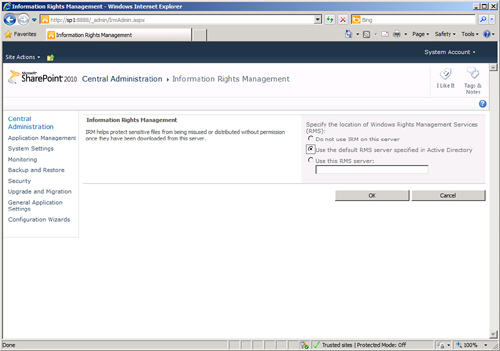
2. | Under Information Policy, click Configure Information Rights Management.
|
3. | If the SCP is published in AD, choose Use the Default RMS Server Specified in Active Directory, as shown in Figure 6, and then click OK.
|
Enabling IRM Support on an Individual Document Library
After enabled in SharePoint
Central Admin, IRM protection can be enabled on individual document
libraries within the farm by any site administrator who has full rights
to the document library. To enable IRM protection on an individual
document library, perform the following steps:
1. | Within a SharePoint site, select a document library.
|
2. | From the Ribbon, choose Library Tools, Library, and then click the button for Library Settings.
|
3. | Under Permissions and Management, choose Information Rights Management.
|
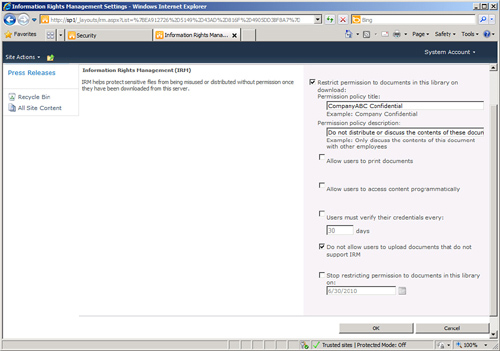
4. | Check the Restrict Permission to Documents in This Library on Download box, as shown in Figure 7.
Enter the remaining fields depending on how the policy will be applied,
whether there is expiration of policy, whether readers to the site can
print or access content programmatically, and so on. Click OK.
|
Once enabled, all current
documents and future documents in that document library will have the
rights protection policy chosen added to them as they are viewed or
modified from within the SharePoint Site. To turn off rights protection,
just go back into the document library settings and uncheck the box for
IRM. This will remove IRM protection for all documents within the
library.