To enable SQL Database mirroring for a SharePoint environment, follow the steps outlined in this section.
Exploring the High-Level Steps Involved with Setting Up a Database Mirror
The steps to set up a simple
mirror relationship between principal and mirror instance are relatively
straightforward. In essence, you just need to back up and restore the
databases to the mirror server and configure the server:
1. | Set the transaction level to FULL for all databases that will be mirrored (if not already set).
|
2. | Perform a full backup of the databases.
|
3. | Perform a logs backup of the databases.
|
4. | Restore the full backup onto the mirror server with the NO RECOVERY option.
|
5. | Restore the logs backup onto the mirror server with NO RECOVERY option.
|
6. | Configure security between principal and mirror using the wizard. If necessary, configure the witness server.
|
7. | Enable mirroring between databases.
|
Each step is explored in more detail in subsequent sections.
Backing Up the Databases to Be Mirrored
SQL mirroring works by
creating an exact copy of a database on a separate server and then
keeping that copy in sync with the original copy. To set up mirroring,
the secondary, mirror server subsequently requires a restore of the
original database to set up the initial mirror copy. That restore does
not have to be an exact copy of the database as it is today, but it
should be a relatively recent restore. After the mirror has been set up,
the database will automatically replicate any changes made to the
database since it has been backed up.
Both a full backup and a logs
backup will need to be performed. These can be performed directly from
the GUI, such as what is shown in Figure 1, or a TSQL script can be created, such as the example shown here:
BACKUP DATABASE WSS_CONTENT
        TO DISK = 'C:\Backup\WSS_Content.bak'
       WITH INIT
GO
BACKUP LOG WSS_CONTENT
       TO DISK = 'C:\Backup\WSS_Content_Log.bak'
       WITH INIT
GO
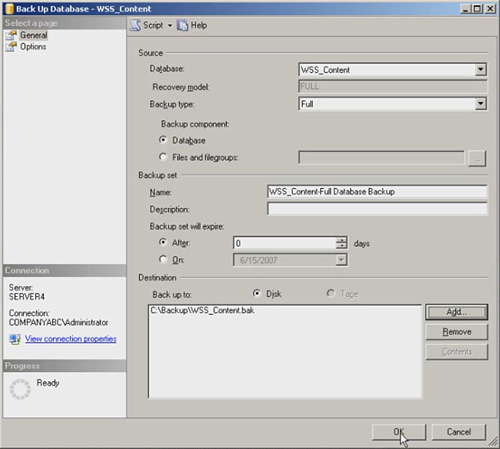
Replace WSS_Content with
the database to be backed up. Repeat for additional databases. After
being backed up, the databases will need to be moved, either across the
network or physically using tape or other medium.
Restoring the Databases onto the Mirror Server
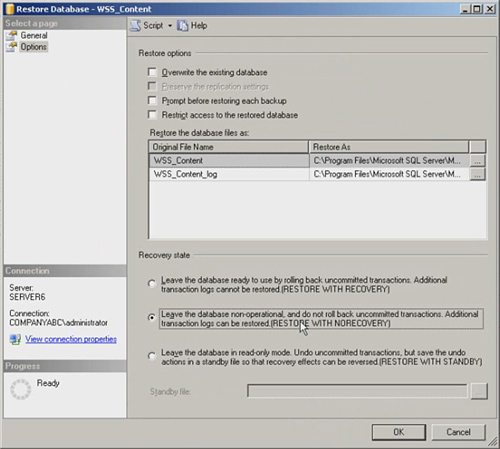
After the database backups
have been transferred to the mirror server, they should be restored onto
that SQL instance. What is critical is that both the full backup and
the logs backup must be restored with the NORECOVERY option chosen. If
this is not chosen during the restore process, the mirror won’t be able
to be created. If restoring using the GUI, choose the Restore with
NoRecovery radio button in the Options tab, and be sure to do it for
both database and logs restores, as shown in Figure 2.
You can also choose to use a TSQL script, similar to the following, to restore the databases:
RESTORE DATABASE WSS_CONTENT
        FROM DISK = 'C:\Restore\WSS_Content.bak'
        WITH NORECOVERY,
                REPLACE
GO
BACKUP LOG WSS_CONTENT
        FROM DISK = 'C:\Restore\WSS_Content_Log.bak'
        WITH NORECOVERY
GO
Replace the file location
and the database name to match your environment and repeat for
additional databases. After both the full backup and the logs backups
have been restored with NORECOVERY, you can configure the mirroring.
Configuring Security and Enabling Mirroring
There are two steps to the
mirroring process. The first is to set up a security relationship
between the principal server and the mirror server. The second step is
to actually configure the mirror itself.
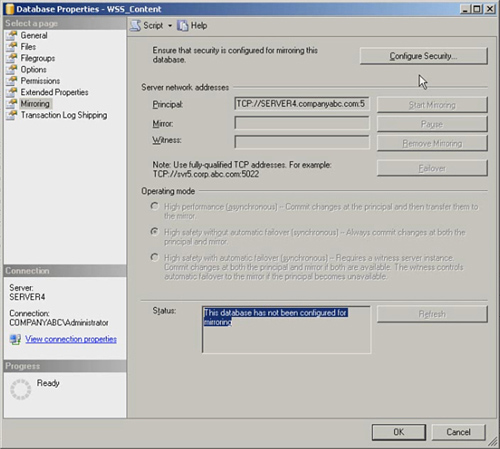
By right-clicking the
source database (on the principal SQL instance) and choosing properties,
and then selecting the Mirroring node in the navigation pane, you get
the dialog box shown in Figure 3.
Note that the mirroring options are grayed out. Click Configure
Security to set up the relationship between the principal instance and
the mirrored instance. This wizard also allows you to choose whether
there will be a witness server.
During the wizard, accept the
default port of 5022 (be sure this is open in the Windows Firewall) and
the default endpoint name of Mirroring. Ensure that service accounts are
the same on both sides, or specify the various service accounts. After
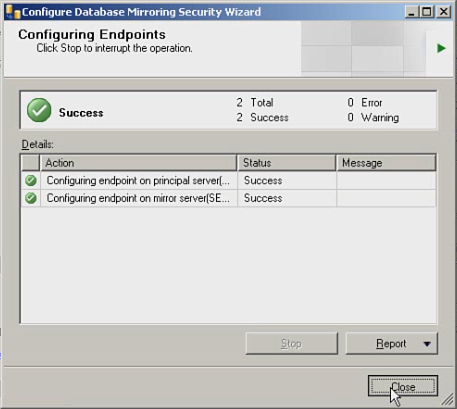
running the wizard, it should show a successful endpoint configuration on both principal and mirror, as shown in Figure 4.
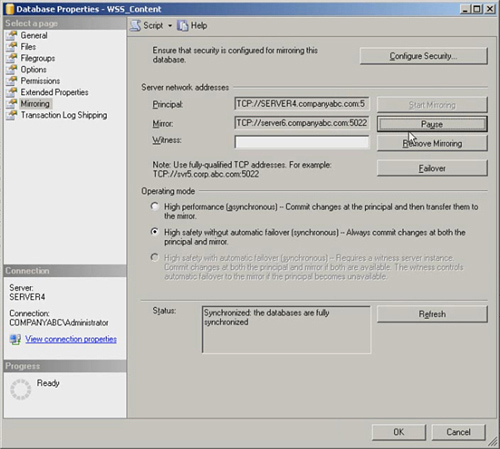
After the wizard runs, you
will have the option of immediately configuring mirroring or waiting and
turning on mirroring later. Once enabled, the dialog box should look
similar to what is shown in Figure 5
and the database should show up in the SQL Management Console with a
(Mirror, Synchronized) tag after the name of the database. Repeat this
process for each remaining databases.