IPsec,
mentioned briefly in previous sections, is essentially a mechanism for
establishing end-to-end encryption of all data packets sent between
computers. IPsec operates at Layer 3 of the OSI model and uses encrypted
packets for all traffic between members.
IPsec is often considered
to be one of the best ways to secure the traffic generated in an
environment and is useful for securing all SharePoint farm servers in
high-risk Internet access scenarios and also in private network
configurations for an enhanced layer of security. Without a technology
such as IPsec, communications between farm members can be intercepted
and their contents easily defined.
Reviewing the IPsec Principle
The basic principle of IPsec
is this: All traffic between clients, whether initiated by applications,
the operating system, services, and so on, is entirely encrypted by
IPsec, which then puts its own header on each packet and sends the
packets to the destination server to be decrypted. Because every piece
of data is encrypted, this prevents electronic eavesdropping, or
listening in on a network in an attempt to gain unauthorized access to
data.
Several functional IPsec
deployments are available, and some of the more promising ones are
actually built in to the network interface cards (NICs) of each
computer, performing encryption and decryption without the operating
system knowing what is going on. Aside from these alternatives, Windows
Server includes a robust IPsec implementation by default, which can be
configured to use a PKI certificate network or the built-in Kerberos
authentication provided by Active Directory on Windows Server.
Detailing Key IPsec Functionality
IPsec in Windows Server
provides for the following key functionality that, when combined,
provides for one of the most secure solutions available for
client/server encryption:
Data privacy—
All information sent from one SharePoint machine to another is
thoroughly encrypted by such algorithms as 3DES, which effectively
prevent the unauthorized viewing of sensitive data.
Data integrity—
The integrity of IPsec packets is enforced through ESP headers, which
verify that the information contained within an IPsec packet has not
been tampered with.
Antireplay capability—
IPsec prevents streams of captured packets from being re-sent, known as
a “replay” attack, blocking such methods of obtaining unauthorized
access to a system by mimicking a valid user’s response to server
requests.
Per-packet authenticity—
IPsec utilizes certificates or Kerberos authentication to ensure that
the sender of an IPsec packet is actually an authorized user.
NAT transversal—
The Windows Server implementation of IPsec now allows for IPsec to be
routed through current Network Address Translation (NAT)
implementations, a concept defined more thoroughly in the following
sections.
Diffie-Hellman 2048-bit key support—
Nearly unbreakable Diffie-Hellman 2048-bit key lengths are supported in
the Windows Server IPsec implementation, essentially ensuring that the
IPsec key cannot be cracked.
Setting Up the Monitoring Environment for IPsec Communications
IPsec is built in to all Windows
Server machines and is also available for client systems. It is a
straightforward process to install and configure IPsec between
SharePoint servers and should be considered as a way to further
implement additional security in a SharePoint environment.
Note
IPsec is highly recommended,
although there is a performance penalty. Assume an approximately 10
percent overhead to use IPsec on network communications. That said, it
is extremely easy to configure and highly useful for providing for
transport-level security of data between SharePoint farm servers.
Transport-level security from clients to web servers should always take
the form of Secure Sockets Layer (SSL) certificate encryption.
The procedure outlined in
the following sections illustrates the setup of a simple IPsec policy
between a SharePoint web role server and a SQL database server holding
SharePoint databases. In this example, the SharePoint server is SP1, and
the SQL DB server is SQL1. The OS on both servers is Windows Server
2008 R2.
To view the current
status of any IPsec policies, including the ones that will be created in
this procedure, the IPsec Security Monitor MMC snap-in on SP1 needs to
be opened. The MMC snap-in can be installed and configured by following
these steps:
1. | Choose Start, Run and type mmc into the Run dialog box. Click OK when complete.
|
2. | In MMC, choose File, Add/Remove Snap-in.
|
3. | Scroll down and select IP Security Policy Management and click Add.
|
4. | Select Local Computer and click OK.
|
5. | Scroll down and select IP Security Monitor; then click the Add button, followed by the OK button.
|
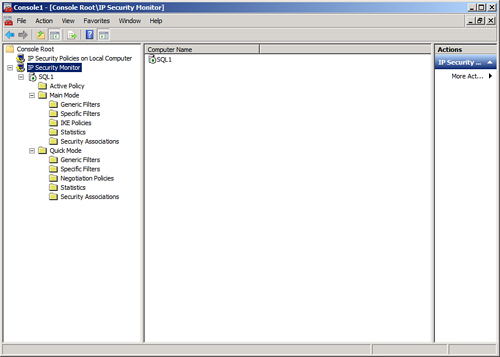
6. | Both the IP Security Policies and the IP Security Monitor MMC snap-in should now be visible, as shown in Figure 1. Click OK.
|
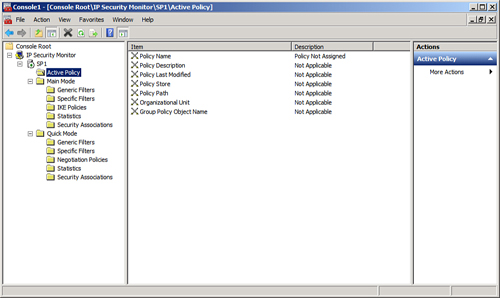
7. | In MMC, expand to Console Root\IP Security Monitor\SP1.
|
8. | Right-click SP1 and choose Properties.
|
9. | Change
the autorefresh setting from 45 seconds to 5 seconds or less. Click OK
when finished. You can then use the MMC IP Security Monitor console to
view IPsec data.
|
Establishing an IPsec Policy on the SharePoint Server
Default IPsec policies must be
enabled on any server in the SharePoint farm that will need to
communicate over IPsec. To enable a simple IPsec policy that uses Active
Directory Kerberos (as opposed to certificates-based IPsec), do the
following on each server:
1. | From the MMC Console setup in the previous step, right-click IP Security Policies, and then click Create IP Security Policy.
|
2. | Click Next at the Welcome Wizard.
|
3. | Give a name to the IP security policy, such as SharePoint IP Security Policy, and click Next to continue.
|
4. | Do not
check the box to activate the default response rule, but do click Next
to continue. The default response rule is only used for down-level
systems.
|
5. | Leave the Edit Properties check box marked and click the Finish button.
|
6. | In the Security Rules dialog box, click Add.
|
7. | Click Next to continue.
|
8. | At the Tunnel Endpoint dialog box, shown in Figure 2, choose that the rule does not specify a tunnel, and click Next to continue.
|
9. | From the Network Type dialog box, choose All Network Connections and click Next to continue.
|
10. | In the IP Filter List dialog box, click Add to add an IP filter.
|
11. | Give a name to the IP filter, and then click Add.
|
12. | Click Next at the Welcome Wizard.
|
13. | Leave the Mirrored check box intact and click Next to continue.
|
14. | For Source Address, leave the default at Any IP Address and click Next.
|
15. | For Destination Address, leave the default at Any IP Address and click Next.
|
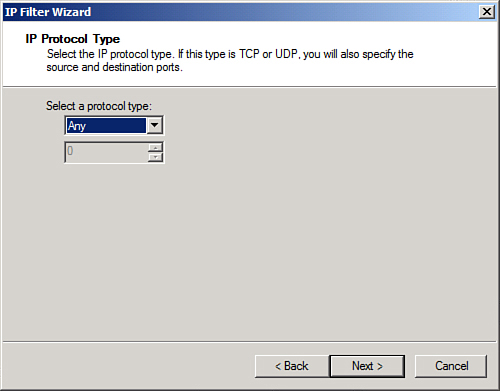
16. | For Protocol, leave the default at Any, shown in Figure 3, and click Next.
|
17. | Click Finish at the Completion Wizard for the IP filter.
|
18. | Tick the circle for the filter list just created, and then click Next to continue.
|
19. | Under Filter Action, click Add to create a filter action.
|
20. | At the Welcome Wizard, click Next to continue.
|
21. | Enter a name and description for the filter action and click Next.
|
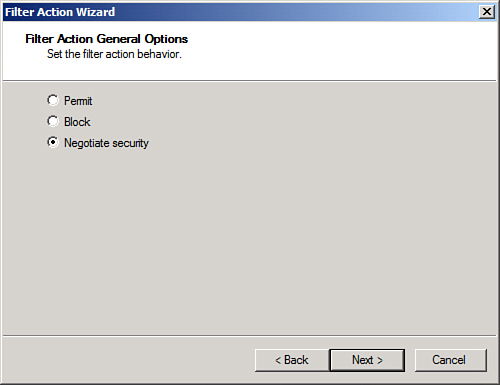
22. | Choose Negotiate Security, shown in Figure 4, and click Next to continue.
|
23. | Select
Do Not Allow Unsecured Communication and click Next to continue. Note
that if you have servers that do not support IPsec, you may have to
choose the less-secure option to allow unsecured communications in some
cases.
|
24. | In the IP Traffic Security dialog box, choose the security method of Integrity and Encryption and click Next to continue.
|
25. | Click Finish.
|
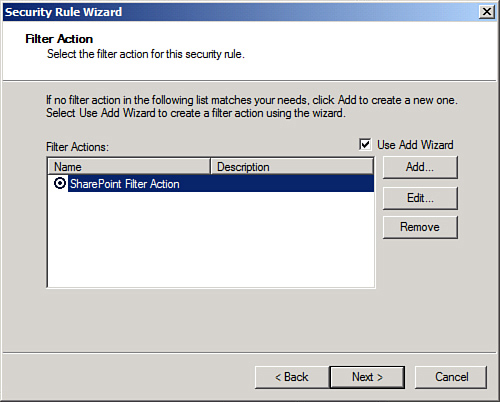
26. | Tick the circle for the filter action just created, as shown in Figure 5, and click Next to continue.
|
27. | Select Kerberos v5 authentication and click Next to continue.
|
28. | Click Finish to complete the wizard.
|
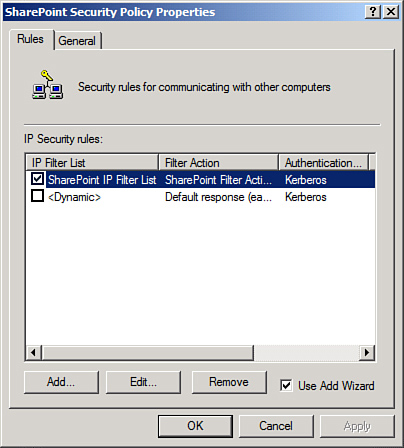
29. | The Security Policy Settings should look similar to what is shown in Figure 6. Click OK to close the dialog box.
|
30. | From
within the IP Security Policies MMC Snap-in, choose the SharePoint
security policy just created, right-click it, and choose Assign.
|
31. | Repeat on additional SharePoint servers.
|
Verifying IPsec Functionality in Event Viewer
After
the local IPsec policies are enabled on both SQL1 and SP1, IPsec
communications can take place. To test this, either ping the server from
the client desktop or perform other network tests, such as accessing
SP1’s SharePoint site.
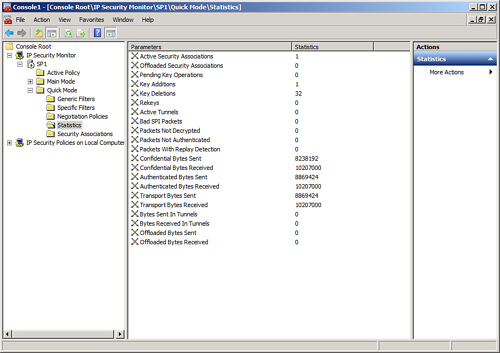
A quick look at the IP Security
Monitor that was established in MMC on SP1 shows that IPsec traffic has
been initialized and is logging itself. Traffic statistics, such as
those shown in Figure 7, should subsequently be shown. All communications between the SharePoint farm members are now highly encrypted and secured.
These default IPsec
policies are useful in establishing ad hoc IPsec between SharePoint
clients on a network but are limited in their scope. Enterprise-wide
IPsec policies can be accomplished through the use of group policies,
but proper planning of an enterprise IPsec implementation is necessary
to effectively secure an entire environment using custom IPsec policies.