Virtual Partition States
Before
diving into the process of booting the vPar monitor and the first vPar,
a discussion of the vPar states is in order. The states of a vPar are
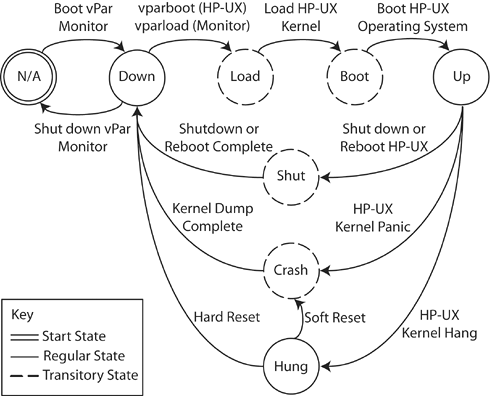
shown in Figure 2. These states are helpful in interpreting the output of the vparstatus command and managing vPars. Listing 4 shows the zoo24 vPar is in the N/A
state. In this case, the vPar monitor has not been booted, so the vPar
can't be in any other state. The following list describes all of the
vPar states and an explanation of when a vPar can be in each state.
N/A is the initial state for vPars when the vPar monitor is not running or an alternate database has been passed to the vparstatus
command. In both of these cases, the vPar is not running and cannot be
started without first booting the vPar monitor with the given vPar
database.
Down is the vPar state that occurs when the vPar monitor is running but the vPar has not been booted with the vparboot command from the HP-UX command line or the vparload command from the vPar monitor.
Load is the first state a vPar will transition to upon being booted with the vparboot or vparload
command. While in this state, the vPar's kernel is being loaded into
memory. After loading the kernel into memory, the vPar automatically
transitions to the boot state without user intervention. Therefore,
this state is labeled as a transitory state.
Boot
is the state a vPar goes through while booting the HP-UX operating
system. As with the load state, the boot state is transitory and the
vPar will transition to the up state without user interaction.
Up
is the state a vPar will occupy a majority of the time. This state is
where workloads are running and traditional HP-UX administration tasks,
such as configuring users and installing software, can be performed.
Shut is the state a vPar goes through when it has been shut down with the HP-UX shutdown or reboot
commands. This state is also transitory; the vPar will automatically
transition to the down state after the shutdown process is complete.
Crash
is a state administrators hope to never see. A vPar enters this state
when the HP-UX kernel panics. While in this transitory state, a kernel
dump is performed. When the kernel dump is complete, the vPar returns
to the down state.
Hung is another undesirable vPar state. In this state the vPar is not responding and most likely needs to be reset using the vparreset
command. Depending on the type of reset performed, the vPar will
transition either to the crash state (as a result of a soft reset) or
the down state (as a result of a hard reset).
Booting the First Virtual Partition
In
order to boot a vPar to the up state, the next step is booting the vPar
monitor. This is accomplished by booting the vPar monitor by
interacting with the firmware interfaces to specify the path of the
vPar monitor. Listing 5 shows an example of interacting with the Initial System Loader (ISL) to boot the vPar monitor at /stand/vpmon instead of the default HP-UX kernel.
Listing 5. Virtual Partition Monitor Boot Process
---- Main Menu -------------------------------------------------

     Command                           Description
     -------                           -----------
     BOot [PRI|HAA|ALT|<path>]         Boot from specified path
     PAth [PRI|HAA|ALT] [<path>]       Display or modify a path
     SEArch [ALL|<cell>|<path>]        Search for boot devices
     ScRoll [ON|OFF]                   Display or change scroll capability

     COnfiguration menu                Displays or sets boot
     INformation menu                  Displays hardware info
     SERvice menu                      Displays service commands

     DIsplay                           Redisplay the current menu
     HElp [<menu>|<command>]           Display help for menu
     REBOOT                            Restart Partition
     RECONFIGRESET                     Reset to allow Reconfig
----
Main Menu: Enter command or menu > bo

     Primary Boot Path:  6/0/6/0/0.2


 Do you wish to stop at the ISL prompt? (y/n) >> y

Initializing boot Device.


Boot IO Dependent Code (IODC) Revision 0


Boot Path Initialized.


HARD Booted.

ISL Revision A.00.43  Apr 12, 2000

ISL> hpux /stand/vpmon

Boot
: disk(6/0/6/0/0.2.0.0.0.0.0;0)/stand/vpmon
679936 + 190216 + 17306888 start 0x23000

Welcome to VPMON (type '?' for a list of commands)

MON>
|
When the vPar monitor is loaded without arguments as shown in Listing 5, it will not automatically boot any of the vPars. Instead the monitor stops at the vPar monitor prompt, MON>. From this prompt, several vPar specific commands are available. The most commonly used commands are vparload and reboot.
The vparload
command can be used in several ways. To boot all of the vPars that have
their auto attribute set (the default setting) simply specify the vparload –auto command. All vPars can be booted, regardless of their auto attribute by using the vparload –all option. Finally, specific vPars can be booted using the vparload –p <partition> option. This is the option used in Listing 6 to boot the zoo24 vPar. The output from the HP-UX boot process has been suppressed from the listing.
Listing 6. Loading First Virtual Partition
MON> vparload
Usage: vparload -auto | -all
       vparload -p <partition> [-o <boot opts>] [-b <kern path>]
               [-B <boot device>]
MON> vparload -p zoo24
[MON] Booting zoo24...
[MON] Console client set to zoo24
[MON] Console server set to zoo24

[zoo24]

[MON] zoo24 loaded

<normal HP-UX boot follows>
|
With the HP-UX boot process completes, the first vPar has been successfully booted and in the up state. The output of the vparstatus command executed from the HP-UX within the first vPar is shown in Listing 7. The vPar zoo24
is assigned one bound CPU, the minimum number of CPUs is one, and the
maximum number of CPUs is three. The vPar has 1024MB of memory.
Listing 7. Virtual Partition Status
# vparstatus -v -p zoo24
[Virtual Partition Details]
Name:         zoo24
State:        Up
Attributes:   Dynamic,Autoboot
Kernel Path:  /stand/vmunix
Boot Opts:

[CPU Details]
Min/Max:  1/3
Bound by User [Path]:
Bound by Monitor [Path]:  6.10
Unbound [Path]:

[IO Details]
   6.0.0
   6.0.6.0.0.2.0.0.0.0.0  BOOT
   6.0.6.0.0.4.0.0.0.0.0, ALTBOOT

[Memory Details]
Specified [Base  /Range]:
          (bytes) (MB)
Total Memory (MB):  1024
|
Before creating the second vPar, closely examine Listing 8. Notice that the ioscan output shows only the I/O devices under LBAs 6/0/0 and 6/0/6. There are 12 LBAs in the zoo6
nPartition, so the remaining 10 LBAs are hidden from view by the vPar
monitor. This illustrates the importance of capturing the ioscan output during the planning phase so it can be referred to during the creation of subsequent vPars.
Listing 8. Ioscan after Booting Virtual Partition
# ioscan -k
H/W Path       Class     Description
=======================================================
               root
6              cell
6/0            ioa       System Bus Adapter (804)
6/0/0          ba        Local PCI Bus Adapter (782)
6/0/0/0/0      tty       PCI Serial (103c1048)
6/0/0/1/0      lan       HP PCI 10/100Base-TX Core
6/0/6          ba        Local PCI Bus Adapter (782)
6/0/6/0/0      ext_bus   SCSI C896 Ultra2 Wide LVD
6/0/6/0/0.2    target
6/0/6/0/0.2.0  disk      HP 18.2GST318404LC
6/0/6/0/0.4    target
6/0/6/0/0.4.0  disk      HP 18.2GST318404LC
H/W Path       Class     Description
=======================================================
6/0/6/0/0.6    target
6/0/6/0/0.6.0  disk      HP 18.2GST318404LC
6/0/6/0/0.7    target
6/0/6/0/0.7.0  ctl       Initiator
6/0/6/0/1      ext_bus   SCSI C896 Ultra2 Wide LVD
6/0/6/0/1.7    target
6/0/6/0/1.7.0  ctl       Initiator
6/5            memory    Memory
6/10           processor Processor
6/11           processor Processor
6/12           processor Processor
6/13           processor Processor
64             tty       Virtual Console Client
65             tty       Virtual Console Server
|