1. Using the EMC to Assign a Mailbox
Let's start with a common task: assigning a mailbox
to an existing user. You may also hear this process referred to as
"mailbox-enabling" a user or simply creating a mailbox. In this
example, there is a user in the ithicos.local Active Directory whose
account is Bharat.Suneja. His unique location and distinguished name
are as follows:
ithicos.local/Corporate/Bharat Suneja
CN=Bharat Suneja,OU=Corporate,DC=ithicos,DC=local
To assign this user a mailbox, you must use either
the EMS or the EMC; remember that extensions for Active Directory Users
and Computers from Exchange 2000/2003 do not work for Exchange 2010.
|
We are usually only describing one way to launch a
wizard, such as the New Mailbox wizard. However, for most wizards and
tasks within the Exchange Management Console, there are three different
ways to launch the wizard. The New Mailbox wizard can be launched by
clicking New Mailbox in the Actions pane, by right-clicking on the
Mailboxes (or Recipient Configuration) container and choosing New
Mailbox, or by choosing New Mailbox from the Actions pull-down menu
(while the Mailbox or Recipient Configuration container is selected in
the EMC tree).
|
Launch the EMC and navigate to the Mailboxes
subcontainer of the Recipient Configuration work center. From here,
click the New Mailbox task in the Actions pane. This will launch the
New Mailbox wizard. The first screen in this wizard (shown in Figure 2)
introduces some entirely new concepts for administrators of previous
versions of Exchange. This screen asks you to define what type of
mailbox you are creating.
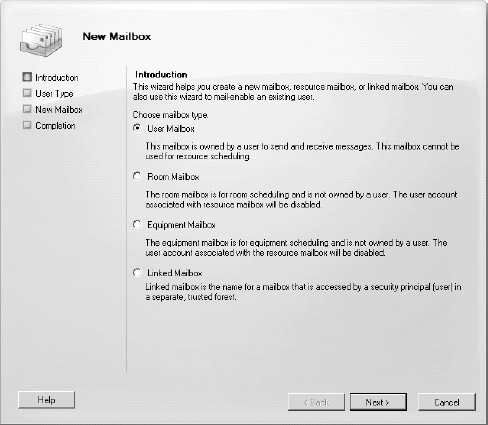
You have four possible choices for mailbox types (see Table 1). For all of them, there must be a user account in the same Active Directory in which the Exchange servers are located.
Table 1. The Four Types of Exchange 2010 Mailboxes
| Mailbox Type | Purpose |
|---|
| User mailbox | Assigns
a mailbox to an existing user account in the same Active Directory
forest in which the Exchange server is located. This is the most common
type of mailbox that most administrators will create. |
| Room mailbox | Creates a disabled user account and assigns a mailbox to that user. The ResourceType property of the mailbox is set to Room, the RecipientTypeDetails property is set to ConferenceRoomMailbox, and the IsResource property is set to True. |
| Equipment mailbox | Creates a disabled user account and assigns a mailbox to that user. The ResourceType property of that mailbox is set to Equipment, the RecipientTypeDetails property is set to EquipmentMailbox, and the IsResource property is set to True. |
| Linked mailbox | Creates
a disabled user account, assigns it a mailbox, and prompts the
administrator to provide a user account in a separate, trusted forest.
The account in the other forest is considered the owner of this mailbox
and has the Associated External Account permissions to the mailbox.
This is used in organizations that install Exchange in a resource
forest. If you are creating Linked mailboxes, the user account in your
forest must remain disabled. |
In this first example, you are creating a simple
mailbox-enabled user account, so you would choose the User Mailbox
radio button and then click the Next button.
On the next screen, you are asked whether you are creating a new user account or using an existing user account (Figure 3). Notice that you can create mailboxes for more than one user at a time.
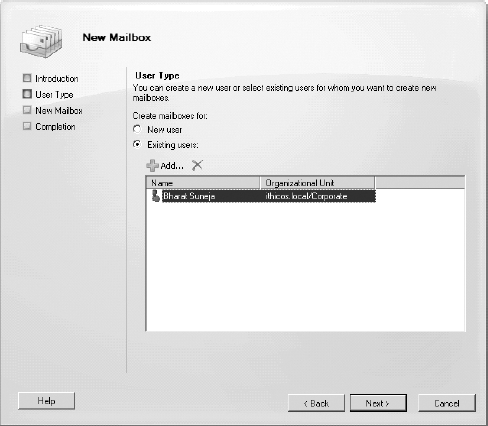
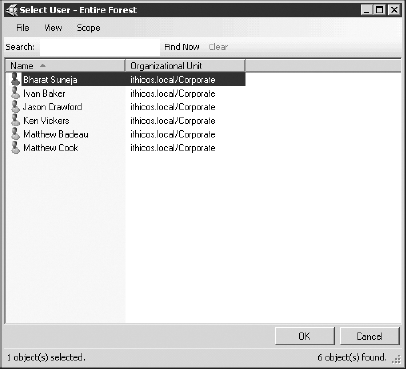
Since we are going to use an existing user account, when we click the Add button, we are presented with the Select User dialog (Figure 4).
Here, you can narrow down the scope of your search using the Search
option. Note that only user accounts that are enabled and that do not
already have a mailbox will show up in this list.
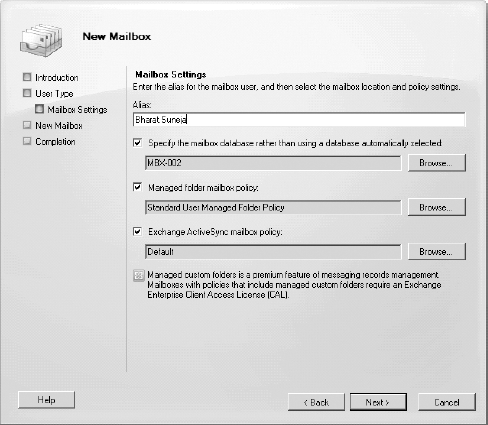
After you select from the Active Directory a user
that does not already have a mailbox assigned to it, the Mailbox
Settings page allows you to specify the user's Exchange alias, define
the mailbox database on which the mailbox will be hosted (or allow
Exchange to automatically select one for you), and specify the managed
folder and the ActiveSync policies. Much of the information requested
on the Mailbox Settings page (shown in Figure 5)
will look familiar to Exchange 2000/2003 administrators. Note that the
managed folder policy and the ActiveSync policy are optional; you can
always add them later. Note that if you assign a managed folder policy
to this mailbox you cannot assign an archive retention policy.
|
Exchange Server 2010's management tools include a
great new feature that will automatically assign a user to a mailbox
database. This is a great feature for organizations that have trouble
balancing mailboxes on mailbox databases; frequently a mailbox
administrator will always select the first mailbox database in the list.
Exchange 2010 has some load-balancing provisioning
logic built into mailbox moves and new mailbox creation. You don't need
to specify a database name when doing a mailbox creation or mailbox
move. The logic is as follows:
Gather all databases in the organization. Exclude any databases that are marked to be excluded for mailbox load. Exclude
any that are not in the same Active Directory site as the provisioning
server (such as those that reside where the cmdlet is running). Pick a database at random; check if it's "up" according to Active Manager. If yes, use it. If no, repeat step 4.
If you want to use the load-balancing logic, keep in
mind that specifying in the database name the mailbox type or profile
type won't be successful as mailboxes will be randomized eventually
across all databases. Microsoft has always recommended that you
equalize distribution of the mailbox population and not scope stores
with specific classes of users, so this feature helps you follow this
recommendation.
Given that, there are scenarios where you may have
defined specific databases on which you do not want automatic
distribution of mailboxes (such as when you're defining journaling
based on the database). You can exclude these databases from the
provisioning logic by changing the properties on the database via the Set-MailboxDatabase cmdlet. You have two options: IsExcludedFromProvisioning and IsSuspendedFromProvisioning.
The two options have the same net effect (causing
the database to be excluded from the load balancer algorithm), but one
is intended to be short term and the other long term. The scenario for
"off" (IsExcludedFromProvisioning) is used when you have a
mailbox database that you want to have off for provisioning always.
Let's say it's "full" or it's a special "VIP" database. The scenario
for "temporarily off" (IsSuspendedFromProvisioning) is used
when you are temporarily taking a server out of rotation for new
mailboxes. The reason why this distinction is interesting is that you
might wish to identify databases that are "off" from those that are
"temporarily off" if you are trying to manage the load balancing via
automation. If you're turning on and off load balancing to particular
databases, you want to make sure you're only doing this for the subset
of databases that you would not want to keep permanently excluded.
|
From the Mailbox Settings page, you specify the information shown in Table 2.
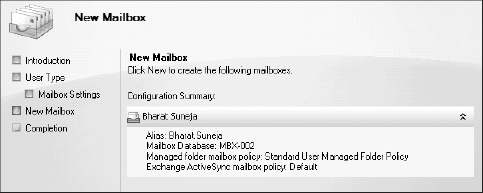
The next screen provides the configuration summary; part of the configuration summary wizard screen is shown in Figure 6. Here you can review the configuration of the mailbox you are creating or assigning.
When you are convinced that the parameters for the
mailbox you are creating are correct, click the New button on the New
Mailbox summary screen. The EMC then launches an EMS cmdlet that
enables the mailbox in the Active Directory. If you have selected a
managed folder mailbox policy, you will see a warning dialog that will
remind you that clients prior to Outlook 2007 will not have all the
features available and that clients older than Outlook 2003 SP2 are not
supported (Figure 7).
Table 2. Mailbox Settings Page Options
| Option | Description |
|---|
| Alias | The
alias is used to generate the default SMTP addresses as well as other
internal Exchange functions, such as the legacy Exchange distinguished
name. The alias defaults to be the same as the user account name, but
it can be changed if you need it to conform to another standard. |
| Mailbox Database | This browse list will consist of mailbox databases found in the organization. |
| Managed Folder Mailbox Policy | The
Managed Folder Mailbox Policy selection allows you to define which
managed folder policy affects this particular mailbox. Once this has
been assigned, the next time the messaging records management process
is run, the managed folders specified by this policy will be created. |
| Exchange ActiveSync Mailbox Policy | The Exchange ActiveSync mailbox policy defines the ActiveSync parameters for the user. |

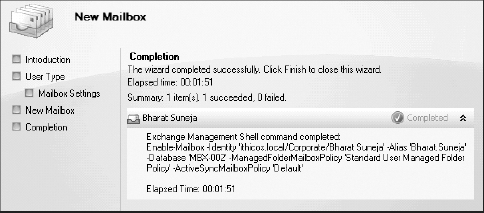
The last page of the wizard is the Completion page,
which tells you if the operation was successful or not and shows you
the EMS cmdlet and options that were used to perform the operation. Figure 8 shows part of the Completion page for the mailbox that was just created.
The Completion page also allows you to copy the
output of the screen to the paste buffer so that you can then paste
that output into a text editor. If you are just learning PowerShell and
the EMS, this makes it simple to learn what cmdlets do and how to use
them—which is helpful if you want to mailbox-enable user accounts using
the EMS.