2. Configuring a Send Connector
For Exchange 2010 to deliver outbound email, a send
connector must be created. The send connector is similar to the SMTP
connector found in Exchange 2003. When you define a send connector, you
specify what SMTP email address spaces that the connector will support,
if the connector will use a smart host or DNS to deliver mail, and
which servers will be used as a bridgehead (source) server.
Your organization's send connectors are not
associated with any single Hub Transport server, so they are an
organization-wide resource rather than a per-server resource (like the
receive connectors). Using the EMC, navigate to Organization
Configuration => Hub Transport and then click the Send Connectors properties page in the Results pane.
To create a new send connector, launch the New Send
Connector wizard from the Actions pane. On the Introduction page of the
wizard (shown in Figure 4), you must specify the name of the connector and its intended use.
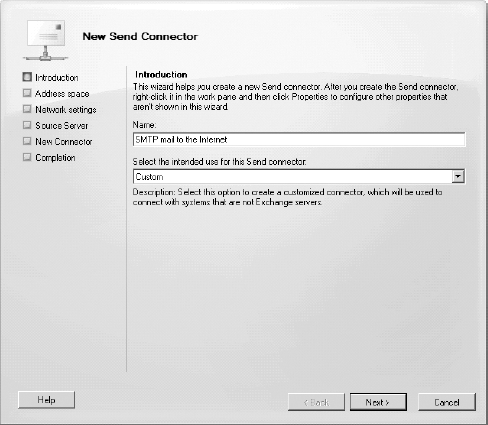
The intended use of the connector is merely an
option that helps you to quickly configure some specific settings of
the connector; you can change these settings later. We recommend using
the Custom option for most send connectors. Here are the options for
intended use:
Custom
Allows you the maximum flexibility when creating
a send connector that will be used for delivering email outside your
organization.
Internal
Configures a send connector that can be used to
deliver email to Exchange servers within your organization, such as
Exchange 2003 servers that use the SMTP connector's Connected Sites
option.
Internet
Configures a send connector that will use DNS to route email outside your organization.
Partner
Configures a send connector that will deliver
email to predefined partner organizations; this is part of the
configuration necessary for the domain security feature. The
connections sent using this type of connector are authenticated using
certificates and data is transferred via TLS. You must also define the
list of specific domains to be used by using the Set-TransportConfig cmdlet.
The next page of the New Send Connector wizard is the Address Space page (Figure 5).
Here, you define the address spaces you can reach through this
connector; for most organizations, the only address space you will have
is *, since the connector will be used to deliver mail to all external domains.
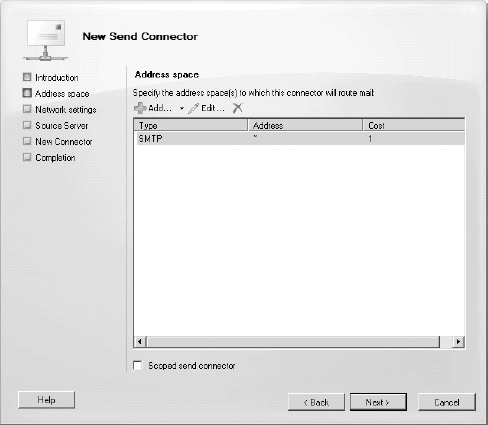
We have found the address spaces feature to be
useful in some organizations that need to route email for specific
domains through another path or directly to a specific host. In this
case, you might have a second send connector with a specific address
space and a smart host configured that will accept mail for that
specific address space.
If you have a connector that has an address space of * and a second connector that has an address space of partnerdomain.com, any email addressed to recipients at partnerdomain.com will always go through the second connector.
The next page of the wizard is the Network Settings page shown in Figure 6; this is where you configure how the Hub Transport server will deliver outbound mail:
Use Domain Name System (DNS) "MX" Records To Route Mail Automatically
When this option is selected, the Hub Transport
server will look up a remote domain's MX records, select a server for
remote delivery, and deliver the mail directly to the server that was
selected via DNS.
Route Mail Through The Following Smart Hosts
This option instructs the Hub Transport server
to send all mail (based on the address space for the connector) to the
host or hosts specified in the smart host list.
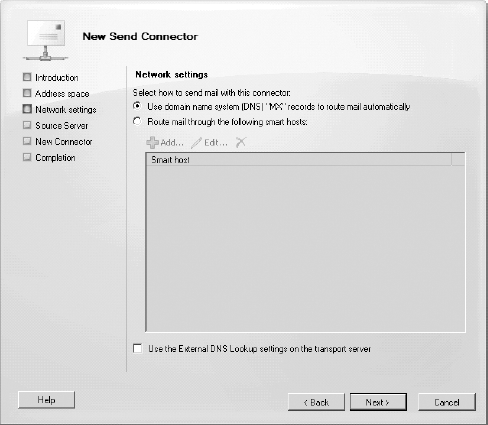
Use the Route Mail Through The Following Smart Hosts
option if you are planning to use a third-party message hygiene system
or a managed provider. Do not use this option if you will be
configuring an Edge Transport server or sending mail directly to the
Internet via the Hub Transport server.
If your internal DNS servers are not capable of
resolving external DNS names properly but you need the Hub Transport
server to deliver mail externally, click the Use The External DNS
Lookup Settings On The Transport Server check box. Before this will
work, however, you must also define valid (and reachable) DNS servers
on the External DNS Lookups properties page of the Hub Transport server.
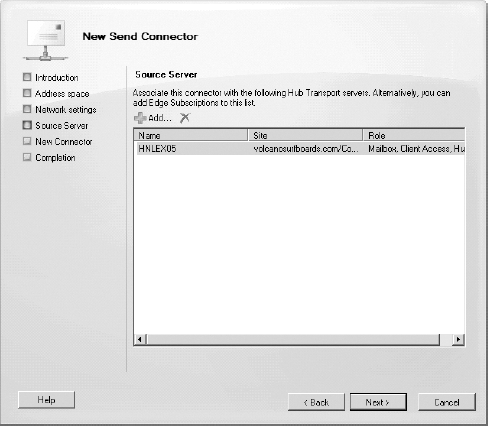
The next page of the wizard is the Source Server page (Figure 7).
Here, you designate the Hub Transport servers (or Edge Transport
servers) that will be used to deliver the outbound mail. In a large
environment, this may be only part of your Hub Transport servers.
When you have configured the send connector options
properly in the wizard, the New Connector page includes a New button.
Click this button to create the connector. Here's the EMS command that
created this connector:
New-SendConnector -Name 'SMTP mail to the Internet' -Usage 'Custom'
-AddressSpaces 'SMTP:*;1' -IsScopedConnector $false -DNSRoutingEnabled $true
-UseExternalDNSServersEnabled $false -SourceTransportServers 'HNLEX05'