4. Adding and Deleting Ports
Unless you want to engage in some fancy programming,
you're a bit limited on ports you can add to the Windows Firewall. For
example, you can't easily create a port that provides specific user
configuration information. The technique shown in the Add Port example
will create a private port using any of the supported protocols (the
example shows two, but many others are available). You can create ports
for a given scope or a specific address as needed. Even with the
limitations of this technique, it will answer most application needs.
The Add Port example begins with a Windows Forms application. You add two buttons: Add (btnAdd) to add the port and Delete (btnDelete) to remove the port. The application doesn't require any
special references or using statements. It does require that you add the following constants:
// Define Constants from the SDK
// Scope
const Int32 NET_FW_SCOPE_ALL = 0;
const Int32 NET_FW_SCOPE_LOCAL_SUBNET = 1;
const Int32 NET_FW_SCOPE_CUSTOM = 2;

// Protocol
const Int32 NET_FW_IP_PROTOCOL_TCP = 6;
const Int32 NET_FW_IP_PROTOCOL_UDP = 17;
Now that you have the basics in place, it's time to add the port. Listing 6 shows the code used to add a private port to the system.
Example 6. Adding a port to the Windows Firewall
private void btnAdd_Click(object sender, EventArgs e)
{
    // Create the firewall type.
    Type FWManagerType = Type.GetTypeFromProgID("HNetCfg.FwMgr");

    // Use the firewall type to create a firewall manager object.
    dynamic FWManager = Activator.CreateInstance(FWManagerType);

    // Obtain the firewall profile information.
    dynamic FWProfile = FWManager.LocalPolicy.CurrentProfile;

    // Create the port type.
    Type PortType = Type.GetTypeFromProgID("HNetCfg.FWOpenPort");

    // Define a new port instance.
    dynamic NewPort = Activator.CreateInstance(PortType);

    // Specify the port parameters.
    NewPort.Name = "MyPort";
    NewPort.Protocol = NET_FW_IP_PROTOCOL_TCP;
    NewPort.Port = 9999;

    // The port entry must also include either a scope or a
// remote address entry, but not both.
    //NewPort.Scope = NET_FW_SCOPE_LOCAL_SUBNET;
    NewPort.RemoteAddresses = "10.1.1.1/255.255.255.255";

    // Enable the port.
    NewPort.Enabled = true;

    try
    {
        // Try adding the port.
        FWProfile.GloballyOpenPorts.Add(NewPort);

        // Display a success message.
        MessageBox.Show("Port successfully added!");
    }
    catch (Exception err)
    {
        // Display an error message.
        MessageBox.Show("Couldn't add the port!\n" +
            err.Message);
    }
}
|
The code begins by creating the HNetCfg.FwMgr Type object and using it to create the Windows Firewall Manager object, FWManager. The code then gains access to the LocalPolicy.CurrentProfile property used to change the local policy (FWProfile). This part of the example is much like the other examples you've seen so far in the chapter.
This example creates another Type, HNetCfg.FWOpenPort, which is used to describe a Windows Firewall port. The code uses the PortType object to create a port object, NewPort, using the Activator.CreateInstance() method. At this point, the code begins defining the port characteristics. This port has a name of MyPort
and it uses the TCP protocol on Port 9999. You also need to assign
either a scope or a remote address, but not both. The example uses a
remote address, so it assigns a value to the RemoteAddresses property. Finally, the code sets NewPort.Enabled to true so that the port is active after the system adds it.
A lot of examples on the Internet show that the GloballyOpenPorts.Add() method returns an error value. This isn't the case when working in a managed application. Make sure you place your call in a try block as shown. The GloballyOpenPorts.Add() method accepts just one argument, the NewPort object you created.
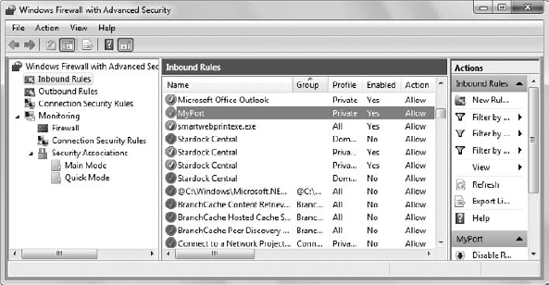
To see the port that the system has just added, you
need to open the Windows Firewall with Advanced Security window and
select the Inbound Rules folder. Figure 5 shows typical results for this example.
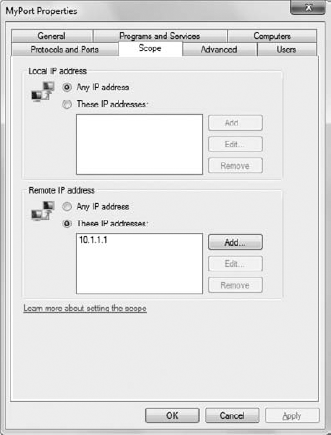
Double-click the entry to display the port's Properties dialog box shown in Figure 6.
The Properties dialog box displays everything you've configured for the
port. It also displays information that you can't change
programmatically using this technique, such as adding a port
description. It's helpful to review the various properties on the tabs
shown in Figure 6
to see if you need to change any options using some other method.
Normally this requires that you create a Group Policy Object (GPO) or
resort to some other means. Normally, you'll find the results of this technique
satisfactory, and the coding is straightforward.
Removing the port is easier than adding it. In this case, you supply the port and protocol to uniquely identify the port. Listing 7 shows the code used to delete a port.
Example 7. Removing a port from the Windows Firewall
private void btnDelete_Click(object sender, EventArgs e)
{
    // Create the firewall type.
    Type FWManagerType = Type.GetTypeFromProgID("HNetCfg.FwMgr");

    // Use the firewall type to create a firewall manager object.
    dynamic FWManager = Activator.CreateInstance(FWManagerType);

    // Obtain the firewall profile information.
    dynamic FWProfile = FWManager.LocalPolicy.CurrentProfile;

    try
    {

        // Delete the port based on the port name.
        FWProfile.GloballyOpenPorts.Remove(9999,NET_FW_IP_PROTOCOL_TCP);

        // Display a success message.
        MessageBox.Show("Port successfully deleted!");
    }
    catch (Exception err)
    {
        // Display an error message.
        MessageBox.Show("Couldn't delete the port!\n" +
            err.Message);
    }
}
|
In this case, you don't need to create a HNetCfg.FWOpenPort object. The code begins by accessing the profile, FWProfile, as normal. It then calls the GloballyOpenPorts.Remove()
method to remove the port. You must supply the port number and protocol
type as inputs. As with adding a port, make sure you place the removal
code within a try block to catch any errors.