One of the cornerstones of security using
.NET is to create a security policy. Of course, this could leave you with the impression that
Microsoft no longer supports security policies, but that's not the
case. No matter which version of the .NET Framework you use, policies
are essential and the actual names of the zones used for policies
haven't changed — even in the .NET Framework 4.
What has changed is the method used to implement
policies. One approach, the easiest of the techniques that Microsoft
provides, is called ClickOnce. You can simply configure the policy as
part of your application setup, and the application will take care of
configuring the system when the user installs the application. The
following sections describe the ClickOnce approach in more detail.
1. Configuring the ClickOnce Intranet Example
The ClickOnce Intranet example begins with a Windows Forms application. You add a Test button (btnTest) for some test code to the form.
After you add the button and its associated code, you need to configure
the application to use ClickOnce as described in the following steps:
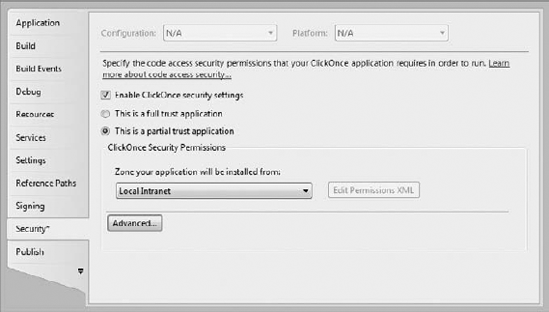
Right-click
the project entry in Solution Explorer and choose Properties from the
Context menu. You see the application's Properties window.
Check Enable ClickOnce Security Settings. Visual Studio enables some additional security settings in the window.
Choose the This is a Partial Trust Application option.
Choose Local Intranet from the drop-down list box. Your configuration should look like the one shown in Figure 1.
2. Debugging and Installing the ClickOnce Intranet Example
The default Visual Studio setup automatically
configures the debugger to run within the zone that you've designated.
Simply press F5 or click Start Debugging as usual. In this case, when
you click Test, you'll see an error message because the application is
running in the Intranet zone, but now go to the application's Debug
directory in Windows Explorer and run the application there. You'll
discover that the application can open the file as normal — as if the
application is running with full rights (and it is).
The ClickOnce technology configures the user's machine when the user installs the application. You'll see a ClickOnce Intranet.APPLICATION
file in the Debug folder. Double-click this file and you'll start the
installation process. First, you'll see a verification dialog box.
After the verification process is complete, you'll see the dialog box
shown in Figure 2.
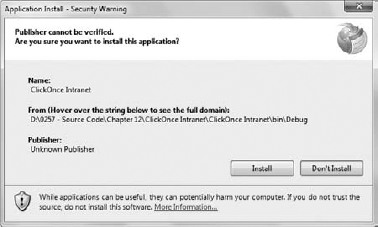
At this point, you can click Install. After a few
moments, the application is installed and automatically starts for you.
If you click Test now, you'll see the error message you had expected in
the first place. The ClickOnce technique provides just another way to
implement the security.
3. Configuring the ClickOnce Custom Example
The default ClickOnce setup provides a Local
Intranet and an Internet setting, but nothing else. You might find that
the list of rights granted your application is far from helpful. In
fact, the application may not run at all.This time, select
Custom from the list, rather than one of the preconfigured options.
Click Edit Permissions XML and you'll see another editor open where you
can add permissions to the <applicationRequestMinimum> element. Listing 1
shows the custom XML used for this example. Note that the class entries
must appear on one line, even though they appear on multiple lines in
the book.
Example 1. Creating a custom ClickOnce policy
<PermissionSet class="System.Security.PermissionSet"
                       version="1" ID="Custom" SameSite="site">
    <IPermission
        version="1"
        class="System.Security.Permissions.SecurityPermission, mscorlib,
           Version=4.0.0.0, Culture=neutral, PublicKeyToken=b77a5c561934e089"
        Flags="Assertion, Execution, BindingRedirects" />
    <IPermission
        version="1"
        class="System.Security.Permissions.UIPermission, mscorlib,
           Version=4.0.0.0, Culture=neutral, PublicKeyToken=b77a5c561934e089"
        Unrestricted="true" />
    <IPermission
        version="1"
        class="System.Security.Permissions.FileIOPermission, mscorlib,
           Version=4.0.0.0, Culture=neutral, PublicKeyToken=b77a5c561934e089"
        Unrestricted="true" />
</PermissionSet>
|
This set of permissions reflects the minimum
required to make the example run. The default Local Intranet actually
provides more rights than those shown here (open the ClickOnce Intranet.EXE.MANIFEST file found in the Debug folder to see these rights for yourself).
A typical <IPermission> element contains the version attribute, which is always set to 1, the class attribute, which contains the class information for the permission you want to provide, and the Unrestricted attribute, which is set to true
to allow the permission. Note the differing capitalization used for the
attributes. You must use the proper capitalization for ClickOnce to
work.
Notice that the System.Security.Permissions.SecurityPermission class doesn't use the Unrestricted attribute. Instead, it uses a Flags attribute. If you look at the documentation for this class, you'll find that Flags
is one of the properties it supports. The list of flags shows which
specific rights the user obtains. In many cases, it's possible to
provide specific permissions by using class properties in place of the Unrestricted attribute.
When you run the ClickOnce Custom example,
you'll find that the user can now access the file, just as if the
application were run locally. However, this version of the application
isn't running with full permissions. It has only the permissions shown
in Listing 1, so application access is controlled.