6. New Site System Server Wizard
Use the New Site System Wizard to enable
additional servers (or workstations in the case of branch distribution
points) for your site. Many site system roles can be offloaded from the ConfigMgr site. The
site server that you add will typically be a server operating system.
The current exception is for a branch distribution point, which is a
supported site role on any valid operating system higher than Windows
2000 SP 4.
To create a new site system, perform the following steps:
1. | Right-click Site Systems in the ConfigMgr console and select New -> Server.
|
2. | In
the new Site System Wizard, enter a name for the site server (usually
the server name) and enter an FQDN if possible, as shown in Figure 27.
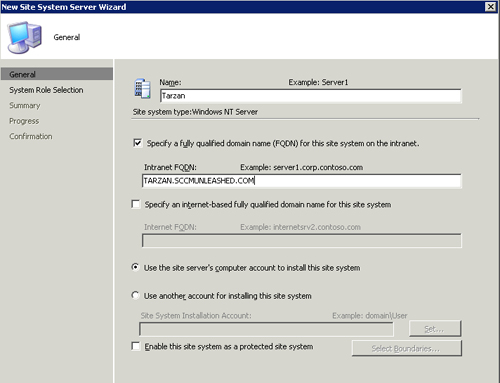
You can also specify an alternate account for installing the site
system, if the ConfigMgr Site computer account does not have
administrative rights on the new server.
|
3. | Click
Next in the wizard and then select any valid role for the new site
server. The role(s) selected in this page determines the remainder of
the configuration pages for the wizard. Each selected role will have its
own configuration page to complete the wizard. You may also choose not
to select any roles at this time, and just configure it as a site
system.
|
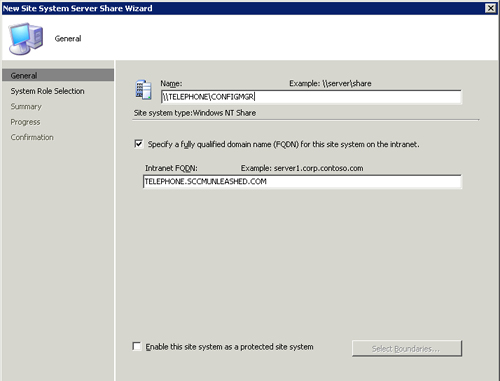
7. New Site System Server Share Wizard
Use the New Site System Server Share Wizard to
create a distribution point on a share on a server. Using this method
lets you control exactly where ConfigMgr places source files on the
drive. Also with a server share, no ConfigMgr components are installed
on the server—it’s simply a share clients connect to for obtaining
content. If you enable the server share for BITS, ConfigMgr will
automatically configure a website on the server. Virtual application
streaming is also available (for R2 sites), but multicast is not.
Create a share on the desired server and then
grant the site server’s computer account control of the share. This is
displayed in Figure 28.
8. Using Replicas and Offloading Site Roles
A
number of ConfigMgr activities can affect the performance of your site
server; these include the number of clients, the frequency of machine
policy polling intervals, the frequency of hardware and software
inventory, software updates, and so on.
You can offload site roles such as distribution points and the
management point in larger sites. This helps site server performance in
the following ways:
Offloading the distribution point
results in fewer connections to the site server, because all clients
connect to the DP to download and install software.
Offloading the management point means clients no longer need to connect directly to the site server.
You may also want to consider offloading other
site roles such as the reporting point, software update point, proxy
management point, device management point, and server locator point.
When you offload the management point to another
server, clients in your site will connect to that offloaded server to
forward inventory, query for machine and user policy, and perform other
MP functions. However, offloading the management point may not relieve
as much activity from the site server as you had hoped. Every time a
client queries the MP for policy, the management point queries the site
database to determine policy information for the client. (You can see
this traffic by running SQL Trace on the site server ConfigMgr database
and enabling verbose and debug logging for the management point logs.)
You may want to offload this often resource-intensive function by
creating a SQL database replica. In ConfigMgr 2007, you can use a
replica for the management point, proxy management point (PMP), device
management point (DMP—part of a management point), and server locator
point.
Using Database Replicas
SQL Server replication uses a publisher (this is the source database, typically your ConfigMgr primary site) and a subscriber
(the destination of data replica, a server with SQL Server installed).
Before setting up replication, ensure your primary site is configured
properly and is healthy. Next, install SQL Server on the Windows system
that will be the subscriber. You will also create a snapshot publication, which is
typically used to publish data when data changes are infrequent and
there is a small amount of data. This data is read-only on the replica,
and does not have to be synchronized back to the publisher. The next
sections discuss the process of creating a replica and offloading the
management point to the replica server.
Pre-Replication Setup Tasks
Before setting up replication, you must configure both the publisher and the subscriber. Perform the following steps:
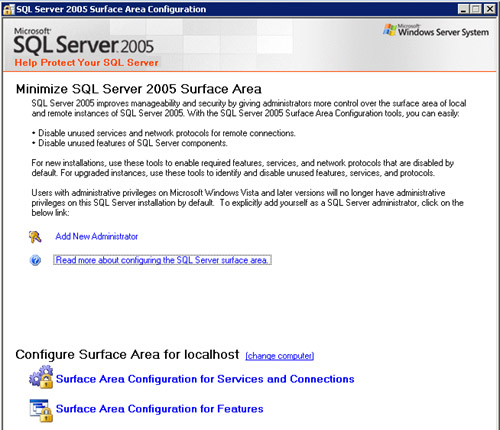
1. | Run
the SQL Server 2005 Surface Area Configuration Wizard (Start ->
Programs -> Microsoft SQL Server 2005 -> Configuration Tools ->
SQL Server Surface Area Configuration Wizard). This tool configures
required services and connections, and Common Language Runtime (CLR)
integration. Click the link near the bottom of the page for Surface Area
Configuration for Services and Connections, displayed in Figure 29.
|
2. | Expand
the Database Engine node and select Remote Connections. Select Local
and remote connections and then choose Using TCP/IP only. Click OK and
then select the link for Surface Area Configuration for Features, also
shown in Figure 29.
|
3. | Expand Database Engine and select CLR Integration. Check the box Enable CLR Integration, select OK, and then exit the utility.
|
4. | Modify
SQL Server so that data larger than the default size of 64KB will
replicate successfully. The length of some data to be replicated may be
longer than the default maximum. Open SQL Server Management Studio on
the publisher (site server database)
and open a new query. Be sure to select your ConfigMgr database as the
source database in the dropdown at the top. Execute the following
command:
EXEC sp_configure 'max text repl size', 2147483647
|
5. | Review
the Messages window for any reported issues. Next, run the following
command to commit the configuration changes to SQL Server:
RECONFIGURE WITH OVERRIDE
|
6. | Verify the command completed successfully.
|
7. | Use
SQL Server Management Studio to create a new database for the
subscriber. A logical name would be the site database name appended with
“_REP” at the end. This example uses SMS_BXL_REP to indicate the
database is a replica database from the ConfigMgr BXL primary site.
|
Replication Setup Tasks
Now it is time to perform the tasks to set up
replication. These consist of setting up the publisher and the
subscriber and creating a publication. Configuring the publisher
computer can be time consuming. Before performing these steps on a
production server, it is best to create your first replica on a test
site.
Perform the following steps to configure the publisher to publish the site database for replication:
1. | Create
a share on the publisher (the server with the ConfigMgr site database).
Grant the proper access for SQL Server to properly read and write to
that share. This example creates a directory named D:\SQLData\Repl with a
share named \\TUMBLEWEED\REPL.
|
2. | Launch
SQL Server Management Studio on the server containing the ConfigMgr
site database. Right-click Replication in the left node and then select
Configure Distribution to start the wizard.
|
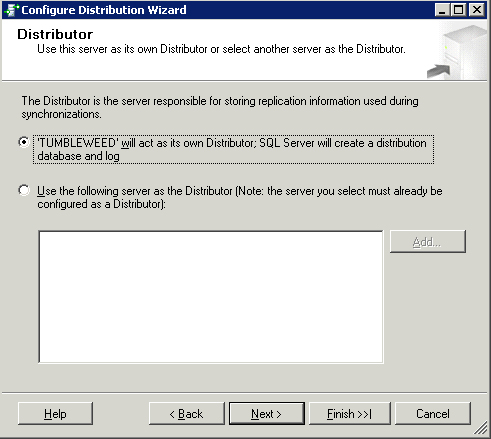
3. | After the Welcome page, select the default option ‘<servername>’ will act as its own Distributor, as displayed in Figure 30. Click Next, and SQL Server will create a distribution database and log.
|
4. | On the Snapshot Folder page, enter the UNC path to the share previously created. For this example, enter \\TUMBLEWEED\REPL.
|
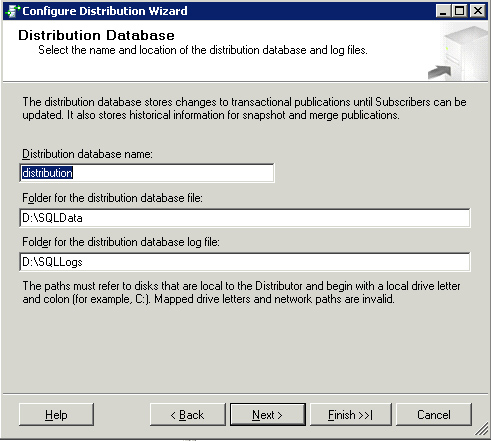
5. | On
the Distribution Database page, specify the name and location of the
database and database log file. Take the defaults as shown in Figure 31.
|
6. | On the Publishers page, select the SQL Server computer that hosts the ConfigMgr site database.
|
7. | On the Wizard Actions page, check the Configure Distribution box and then click Next. Verify the settings and then click Finish.
|
8. | Wait
several minutes for the Configure Distribution Wizard to finish
configuring the distributor and enabling the publisher. The wizard will
display “Success” or “Fail.” Close the wizard.
|
The
next task is to configure a new local publication of the required
ConfigMgr tables. Fortunately, only a small number of objects
(approximately 100) in the ConfigMgr database require replication.
Because each environment can vary, there is no exact rule regarding
size, but you can expect the size of a SQL replica database to be
approximately 80% to 90% smaller than the ConfigMgr site database.
Perform the following steps:
1. | On
the server running the ConfigMgr site database, launch SQL Server
Management Studio and then expand the Replication node. Right-click
Local Publications and then select New Publication to start the New
Publication Wizard.
|
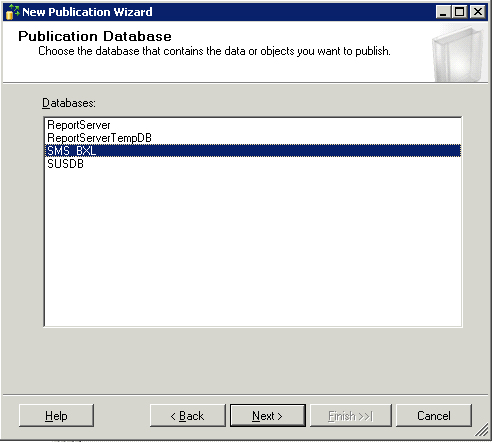
2. | After the Welcome page, select the ConfigMgr site database as the publication database, as shown in Figure 32.
|
3. | For
the publication type, select Transactional Publication. In a
transactional publication scenario, a replica database pulls an entire
snapshot the first time it connects, and then the publisher streams
transactions to the subscribers.
|
4. | The
next page of the New Publication Wizard is the Articles page, where you
select database tables and other objects (views, functions, stored
procedures, and so on) required for replication. This will be the most
time-consuming page of the entire replication process. Be sure to take
your time, and select all necessary objects.
|
|
The objects in the tables may change from one
service pack to the next (as an example, the ConfigMgr original release
requires 48 tables, whereas ConfigMgr SP 1 requires 49 tables for
replication), so perform the following procedures each time you upgrade
or install a new ConfigMgr site:
1. | In
SQL Server Management Studio, open a new Query Window and select the
ConfigMgr database as the current database. Execute one of the following
commands, depending on the role of your replica:
If your replica is for a management point, execute this command: Select ObjectName from ReplicatedObjects where SiteSystemType = 'MP' If the replica is for a server locator point, execute Select ObjectName from ReplicatedObjects where SiteSystemType = 'SLP'
Information contained in the MP query is inclusive of the
information for the SLP query, so if you are creating one replica for
both the MP and SLP, run the first command only.
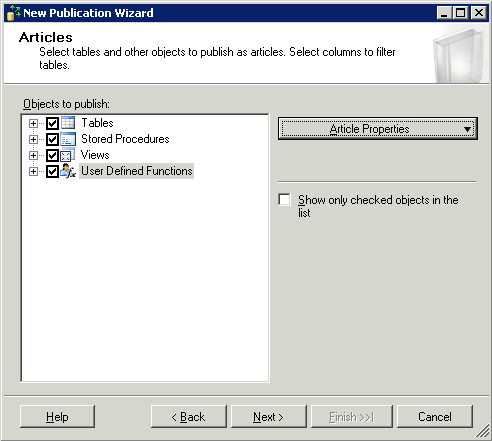
| 2. | Copy
the results into your favorite spreadsheet program for easy reference.
At this point, you will need to browse through tables, views, stored
procedures, and functions in the wizard to select all required objects.
Functions generally start with fn, views generally start with v_, and stored procedures generally start with sp, MP, or DMP. Just about everything else is a table.
| 3. | Click Next to continue. Figure 33 shows the Articles page of the New Publication Wizard.
| 4. | Review the information on the Article Issues page and click Next to continue.
| 5. | Click Next on the Filter Table Rows page, because no filters are required.
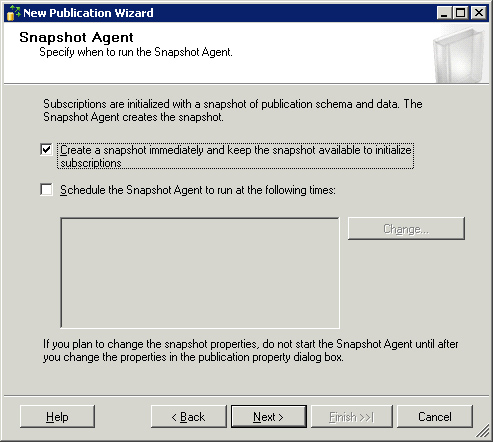
| 6. | On the Snapshot Agent page, displayed in Figure 34, check the box Create a snapshot immediately and keep the snapshot available to initialize subscriptions.
| 7. | On
the Agent Security page, click the Security Settings button and enter a
valid Windows account, or select the option to run the agent under the
SQL Server Agent service account.
| 8. | On the Wizard Actions page, select the option Create the publication and then click Next. Enter a publication name (BXL_Publisher
in this example) and click Finish. The Creating Publication dialog box
may appear for several minutes while creating the snapshot. Verify
“Success” in the dialog box and then close the wizard.
|
|
You
have successfully created the publisher. A single publisher can provide
replication for many subscribers. As an example, you could have five
secondary sites with proxy management points, all using a SQL replica of
the primary site database.
With the publisher created, it is time to configure the subscriber. Perform the following steps:
1. | On
the server intended to host the subscriber, launch SQL Server
Management Studio, expand the Replication node, right-click Local
Subscriptions, and then select New Subscriptions.
|
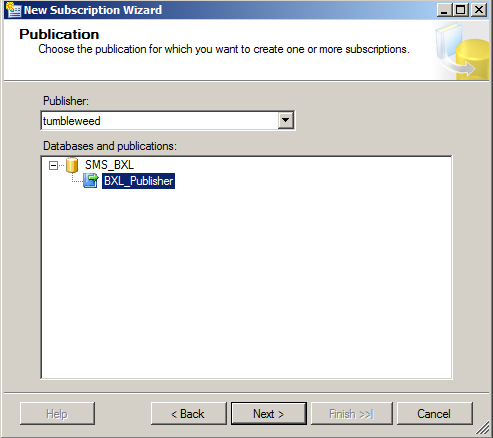
2. | After
the Welcome page, enter the name of the SQL Server running the
publisher you previously created and select that publisher, as displayed
in Figure 35.
|
3. | On the Distribution Agent Location page, leave the default of Run each agent as its Subscriber (pull subscriptions). Click next.
|
4. | On the Subscribers page, select the replica database name (SMS_BXL_REP).
|
5. | On
the Distribution Agent Security page, click the ellipsis (...) either
to configure a process account or to configure the agent to run under
the SQL Server Agent service account.
|
6. | On
the Synchronization Schedule page, configure the agent to run on a
schedule. Click the dropdown box and select Define Schedule.
|
7. | On the New Job Schedule page, configure the job to run every 15 minutes.
|
8. | On the Initialize Subscriptions page, configure the initialization to occur immediately.
|
9. | On the Wizard Actions tab, check the box Create the subscriptions. Click Next.
|
10. | Review the Summary page and then select Finish to start the subscription process.
|
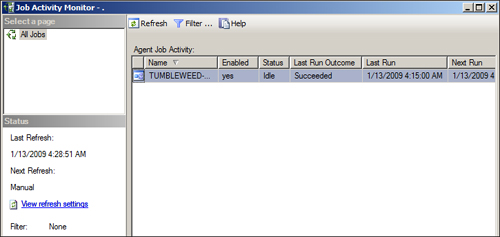
The replication will complete within several
minutes. To monitor status, expand the SQL Server Agent, right-click Job
Activity Monitor, and then select View Job Activity. If the Job
Activity displays an error for the replication job, you can view the
logging for that job by expanding SQL Server Agent -> Jobs,
right-clicking the job in question, and selecting View History to
display the Job Activity Monitor, as displayed in Figure 36.
Post-Replication Setup Tasks
SQL replication is now configured. Several
post-replication setup configuration tasks are necessary to allow
ConfigMgr site systems to use the replica. Perform the following steps:
1. | Start
by creating database roles. Three roles are required, with proper
permission granted to those roles. Using SQL Server Management Studio,
execute the following statement on the site replica (subscriber)
database:
CREATE ROLE [smsdbrole_MP] AUTHORIZATION [dbo]
CREATE ROLE [smsdbrole_DMP] AUTHORIZATION [dbo]
CREATE ROLE [smsdbrole_SLP] AUTHORIZATION [dbo]
|
2. | After successfully creating the roles, grant each role proper access to the replica. The following SQL statements (listed at http://technet.microsoft.com/en-us/library/bb633288.aspx)
are specific to ConfigMgr 2007 SP 1. Execute these statements on the
site replica (subscriber) database (you can also find these statements
in the article referenced in the previous sentence, which will make it
easy to copy/paste):
GRANT SELECT ON Sites TO [smsdbrole_SLP]
GRANT SELECT ON SysResList TO [smsdbrole_SLP]
GRANT SELECT ON RoamingBoundaryIPSubnet TO [smsdbrole_SLP]
GRANT SELECT ON RoamingBoundaryIPv6Prefix TO [smsdbrole_SLP]
GRANT SELECT ON RoamingBoundaryIPRange TO [smsdbrole_SLP]
GRANT SELECT ON RoamingBoundaryADSite TO [smsdbrole_SLP]
GRANT EXECUTE ON MP_GetAllInventoryClasses TO [smsdbrole_MP]
GRANT EXECUTE ON MP_GetClientIDFromMacAddress TO [smsdbrole_MP]
GRANT EXECUTE ON MP_GetClientIDFromSmbiosID TO [smsdbrole_MP]
GRANT EXECUTE ON MP_GetInventoryClassProperties TO [smsdbrole_MP]
GRANT EXECUTE ON MP_GetSiteInfoFromADSite TO [smsdbrole_MP]
GRANT EXECUTE ON MP_GetSiteInfoFromIPAddress TO [smsdbrole_MP]
GRANT EXECUTE ON MP_GetSiteInfoFromIPv6Prefix TO [smsdbrole_MP]
GRANT EXECUTE ON MP_GetSiteInfoUnified TO [smsdbrole_MP]
GRANT EXECUTE ON MP_GetContentDPInfoProtected TO [smsdbrole_MP]
GRANT EXECUTE ON MP_GetContentDPInfoUnprotected TO [smsdbrole_MP]
GRANT EXECUTE ON MP_GetProtectedSMPSites TO [smsdbrole_MP]
GRANT EXECUTE ON MP_GetUnprotectedSMPSites TO [smsdbrole_MP]
GRANT EXECUTE ON MP_GetStateMigClientInfo TO [smsdbrole_MP]
GRANT EXECUTE ON MP_GetStateMigAssocInfo TO [smsdbrole_MP]
GRANT EXECUTE ON MP_GetMigrationInfoForRestoreClient TO [smsdbrole_MP]
GRANT EXECUTE ON MP_GetMigrationInfoUsersForRestoreClient TO [smsdbrole_MP]
GRANT EXECUTE ON MP_GetSelectiveDownloadMap TO [smsdbrole_MP]
GRANT EXECUTE ON MP_GetPeerDPList TO [smsdbrole_MP]
GRANT EXECUTE ON MP_GetWSUSServerLocations TO [smsdbrole_MP]
GRANT EXECUTE ON MP_GetPendingPackagesForBranchDP TO [smsdbrole_MP]
GRANT EXECUTE ON MP_GetPolicyBody TO [smsdbrole_MP]
GRANT EXECUTE ON MP_GetPolicyBodyAfterAuthorization TO [smsdbrole_MP]
GRANT EXECUTE ON MP_IsPolicyBodyAuthorized TO [smsdbrole_MP]
GRANT EXECUTE ON MP_IsClientRegistered TO [smsdbrole_MP]
GRANT EXECUTE ON sp_GetPublicKeyForSMSID TO [smsdbrole_MP]
GRANT EXECUTE ON MP_GetEncryptionCertificateForSMSID TO [smsdbrole_MP]
GRANT EXECUTE ON MP_GetProvisioningModePolicyAssignments TO [smsdbrole_MP]
GRANT EXECUTE ON MP_GetMachinePolicyAssignments TO [smsdbrole_MP]
GRANT EXECUTE ON MP_GetUserAndUserGroupPolicyAssignments TO [smsdbrole_MP]
GRANT EXECUTE ON MP_GetListOfMPsInSite TO [smsdbrole_MP]
GRANT EXECUTE ON MP_GetHINVLastUpdateTime TO [smsdbrole_MP]
GRANT EXECUTE ON MP_GetLocalSitesFromAssignedSite TO [smsdbrole_MP]
GRANT EXECUTE ON MP_GetMPSitesFromAssignedSite TO [smsdbrole_MP]
GRANT EXECUTE ON MP_GetMPListForSite TO [smsdbrole_MP]
GRANT EXECUTE ON MP_GetSdmPackageBody TO [smsdbrole_MP]
GRANT EXECUTE ON MP_MatchDrivers TO [smsdbrole_MP]
GRANT EXECUTE ON sp_GetPublicKeySMSUID TO [smsdbrole_MP]
GRANT EXECUTE ON DMP_GetMachinePolicies TO [smsdbrole_DMP]
GRANT EXECUTE ON DMP_GetPackageVersion TO [smsdbrole_DMP]
GRANT EXECUTE ON DMP_GetSettings TO [smsdbrole_DMP]
GRANT EXECUTE ON DMP_GetSoftwareDistBody TO [smsdbrole_DMP]
GRANT EXECUTE ON DMP_GetSoftwareDistIDs TO [smsdbrole_DMP]
GRANT EXECUTE ON DMP_GetHinvTranslations TO [smsdbrole_DMP]
GRANT EXECUTE ON DMP_GetDiscoveryTranslations TO [smsdbrole_DMP]
Note that these SQL statements were updated for SP 1, and the
SQL statements may need to be updated at a future date. Review http://technet.microsoft.com/en-us/library/bb633288.aspx for current information.
|
3. | Now
it is time to grant the appropriate rights for the site systems to
access the site database replica. Use the Local System account or create
connection accounts. This example uses the Local System account.
Execute the following SQL statement against the subscriber server:
CREATE USER [SCCMUNLEASHED\Telephone$] FOR LOGIN
[SCCMUNLEASHED\Telephone$] WITH DEFAULT_SCHEMA=[dbo]
In this case, SCCMUNLEASHED is the domain name and Telephone$ is the name of the computer account.
|
4. | Add the roles for the MP, DMP, and SLP by executing the following SQL statements:
EXEC sp_addrolemember 'smsdbrole_MP' , '<sccmunleashed\telephone$>'
EXEC sp_addrolemember 'smsdbrole_DMP' , '<sccmunleashed\telephone$>'
EXEC sp_addrolemember 'smsdbrole_SLP' , '<sccmunleashed\telephone$>'
|
Congratulations! You have configured your SQL
database replica for use by ConfigMgr. For additional information on
configuring SQL Server site database replication, refer to http://technet.microsoft.com/en-us/library/bb693697.aspx.
Disabling SQL Replication
When planning to upgrade a site to a new
ConfigMgr service pack (or upgrading to a newer version of ConfigMgr),
you must first disable SQL Server replication. Perform the following
steps:
1. | To
disable replication from the publisher, open SQL Server Management
Studio, right-click Replication, and then select Disable Publishing and
Distribution. Follow the wizard, and select the option in Figure 37 to disable publishing. Click Finish to disable replication from the publisher.
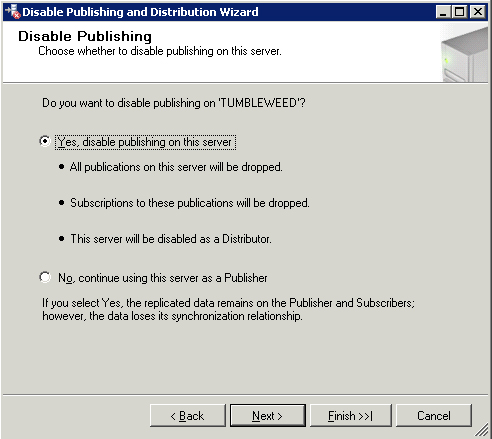
Caution: Disabling Publishing Drops All Publications and Subscriptions Associated with That Distributor
Note the information in the Disable Publishing page in Figure 37.
This process will drop all publications and subscriptions as well as
disable the distributor. If your ConfigMgr site shares a database with
another application, verify that the only replication used on this
server is for ConfigMgr before you disable replication.
|
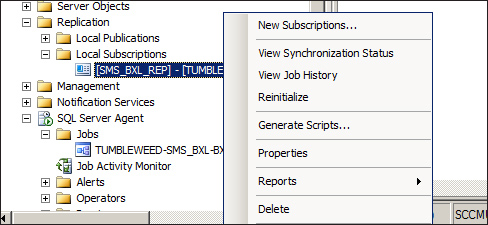
2. | To
delete local subscriptions from the subscriber, open SQL Server
Management Studio, expand Replication, and select Local Subscriptions.
Right-click the subscription to your site database (see Figure 38) and select Delete. Click Yes to confirm subscription deletion.
|
3. | After performing the required ConfigMgr upgrades or service pack installations, review the steps earlier in the “Replication Setup Tasks” section to re-create your replica.
|
Offloading the Management Point
If you have a very busy site with a very large
number of systems assigned to it, you will want to consider both
offloading the MP and using a SQL replica to alleviate some of the
stress on your primary site. If you offload the MP without creating a
replica, each time a client polls for new policy, the offloaded MP
queries the primary site database. Configuring the MP to use a database
replica results in that traffic no longer going to the primary site
database, thereby relieving stress on the primary site.
After creating a database replica on a new
server (the subscriber), perform the following steps to install your
management point to this new server and use the database replica. For
this example, the new server (Telephone) has the replica configured, and
is not currently used by ConfigMgr for any roles.
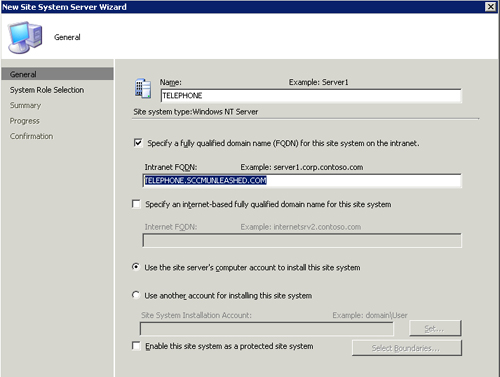
1. | In
the ConfigMgr console, expand Site Management -> Site Database ->
Site Systems. Right-click Site Systems and then select New ->
Server. Enter a valid name and the intranet FQDN, as shown in Figure 39. Also, grant the proper rights for the site server
to install the site system. To use the site server’s computer account
to install this site system, add the site server’s computer account to
the local Administrators group of the new server.
|
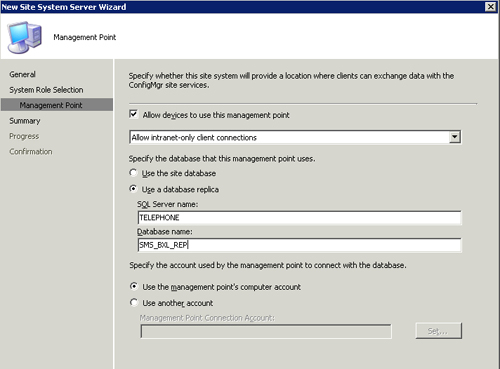
2. | Click
Next in the New Site System Server Wizard, select Management Point for
the role to install on the new site server, and click Next. The
Management Point configuration page is shown in Figure 40.
|
3. | Click
Next and then Finish, thus completing the wizard. Review the Site
Status messages as well as the \SMS\Logs directory on the new site
system server. MPSetup.log provides additional information about the MP
installation on the new server.
|
9. Configuring Site Boundaries
You documented the desired site boundaries for your ConfigMgr site. To
add a site boundary, navigate to the desired site in the ConfigMgr
console and then expand Site Settings -> Boundaries. Right-click
Boundaries and then select New Site Boundary. Enter and select the
correct properties for the site, as shown in Figure 41, and then click OK to set the boundary.
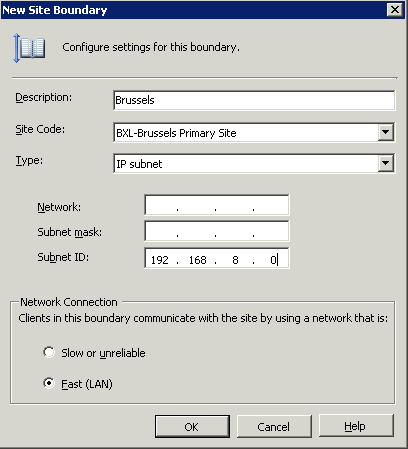
You have the option to select an IP subnet, Active Directory site, IPv6 prefix, or IP address range for the site boundary.
Note: About Protected Boundaries
You
have the ability to “protect” boundaries on distribution points and
state migration points. By creating protected boundaries, you allow only
client systems within those boundaries to access the content. A common
scenario for this would be a distribution point located across the WAN
for your primary site. You may install a distribution point at a remote
office so that systems in the office can obtain content locally. To
prevent systems from the main office from obtaining content from that
remote DP, add protected boundaries to the DP to “protect” it from WAN
traffic.
To protect a distribution point,
configure a valid site boundary on the site server for the remote
office. Depending on your environment, this could be an IP subnet,
Active Directory site, or any other validated site boundary. Next, in
the ConfigMgr console, navigate to the server name under Site Systems,
right-click the ConfigMgr site system role, and select Properties, as
shown earlier in Figure 22.
Check the box Enable this site system as a protected site system.
Finally, click the Select Boundaries button to select the desired
boundaries.