5. Installing Site Systems
Site systems “make the world go ‘round” in the
ConfigMgr world. As with most site configuration, almost all of these
settings are configured once and typically do not require later
modification. Each ConfigMgr site contains a site server and one or more
site systems. Site systems are components of ConfigMgr, a number of
which you may or may not desire to use. Although some components are
required, most are optional, depending on the specific configuration. In
smaller sites, all site systems (also called site roles) may be installed on a single server. Based on the options selected during site installation,
ConfigMgr installs the following site systems automatically:
Component server—
This site system does not have configurable options. Any site server
running a site system requiring the ConfigMgr 2007 service will have the
component server listed as a site system. Distribution point—
A distribution point is used to stage source installation files, driver
package files, operating system images, and software updates for client
use. By default, this is a standard distribution point, meaning that
when clients request a location for content (installation files),
ConfigMgr forwards a Universal Naming Convention (UNC) path to allow the
client to access the data via service message blocks (SMBs). If
you want to use Download and Execute for installation packages, you
must enable the check box to allow clients to transfer content using
BITS, HTTP, and HTTPS. This is often referred to as a BITS-enabled DP.
When this check box is enabled, the client will access content from the
distribution point using HTTP and use BITS to “trickle” the
installation files to the local system. You also can create a branch distribution point for a new site. Branch distribution points are described later in this section. Use
the Group Membership section at the bottom of the Distribution Point
Properties dialog box to create distribution point groups. This
capability allows you to group DPs easily and becomes very helpful when
sending content to distribution points.
As an example, you can make a DP group of all your DPs in Europe, and
then any time you need to send content to the Europe DPs, simply select
the group rather than the tedious process of selecting each DP manually. The
Multicast tab appears when ConfigMgr 2007 R2 is installed, and it’s
only used during Operating System Deployment (OSD). From this tab, you
may specify the User Datagram Protocol (UDP) ports to use, the transfer
rate, and the maximum clients. You can also enable scheduled multicast.
With scheduled multicast, you can configure the start delay from the
time the first system requests content, as well as specify the minimum
session size. When scheduled multicast is enabled, the multicast begins
either when the Start Delay time is exceeded or the number of session
requests to the DP is larger than the minimum session size, whichever
comes first. Multicast requires distribution points that are BITS
enabled. For additional information, check Microsoft’s documentation
discussing multicast configurations for OSD at http://technet.microsoft.com/en-us/library/cc431383.aspx. The
Virtual Applications tab also appears with ConfigMgr 2007 R2 installed.
Enable this option to configure application streaming to target
computers. You must BITS-enable the distribution point to enable virtual
application streaming. Management point—
If you will be assigning clients to this site, the MP role must be
enabled. The management point is the primary connection point between
clients and the ConfigMgr site. Depending on how many systems will use
this MP, you may want to consider offloading the MP role from the site
server. Each primary site has one active MP, which clients use to obtain
policy, forward inventory, and the other client communication
requirements. If you plan to manage mobile devices from this site,
enable the check box to allow devices to use this management point. The
MP can be configured to use a database replica. If the SQL database on
your primary site is very busy all the time, you may consider
configuring a SQL database replica and configuring the MP to use the
replica for content information. By default, the MP computer account is
configured to connect to the database. You may need to grant rights to
allow this communication. Alternatively, you can specify an MP
connection account to establish this communication if desired. Site server— This is a standard role added during every site server installation. No configuration is required. Site system—
A site system can be a server or share that supports the site. The site
system may perform more than one role. It is highly recommended that
you specify the FQDN for intranet clients (the FQDN must be specified
for Internet-based clients). If you have multiple
domains and do not use a fully replicated WINS or have a disjointed
namespace, you may see errors in client logs where the client is unable
to obtain content for a distribution. One of the first places to look to
resolve this issue is whether you have specified an intranet FQDN. When
the site is in native mode, the FQDN specified in the server
certificate subject name must match the intranet FQDN specified in the
Site System Properties page, as displayed in Figure 22.
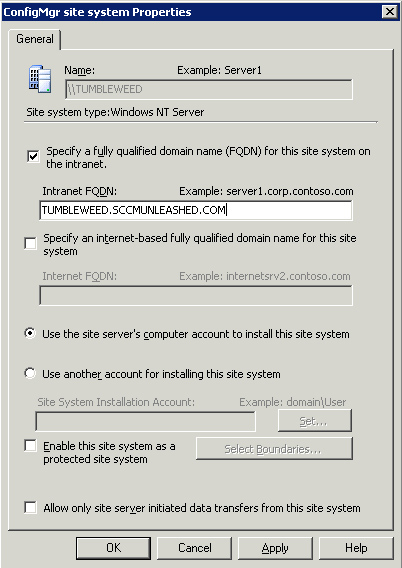
By default, the site server’s
computer account is used to install the site system, although you can
specify a different account on this page if desired. You
can also specify the option Enable this site system as a protected site
system. By checking this box, you then select the boundaries that can
use this site system. For example, you may have a DP on a remote WAN,
and you want to ensure that only systems in that remote site have the
ability to access content from the DP, enable the protected site system,
and select the boundaries to protect. Protected systems are used for
DPs and state migration points. The final check
box, Allow only site server initiated data transfers from this site
system, can be used for systems that are configured for site system
roles that are supported across forests. Checking this box forces the
ConfigMgr site to use the Site System
Installation account to connect to the remote site system. Even if a
trust exists, the Site System Installation account will be used. Site database server—
This site system displays the SQL Server name and the SQL database name
used by this ConfigMgr site. No configuration is required for the site
database server.
As this discussion shows, Configuration Manager
automatically configures many site systems, even when using a custom
configuration for the ConfigMgr installation. Let’s look at the other
site roles and using additional servers for site roles.
Use the Site Role Wizard to add more roles to an
existing site system. Right-click the server name and then select New
Roles to initiate the Site Role Wizard. The first step in the wizard
allows you to configure the same options visible in Figure 8.22,
which shows the Site System Properties dialog box. Verify the settings
for this site and then click Next in the wizard to select additional
roles. The rest of this section describes each of the remaining roles
you can configure from the Site Role Wizard:
Fallback status point—
Configure a fallback status point (FSP) before you begin to deploy
clients. The FSP helps you verify successful client installation,
identify client installation failures, and provide a method for clients
to report when they are not able to contact a management point. The FSP
also helps identify communication problems with clients in native mode. You
can configure how many state messages to forward to your ConfigMgr site
each throttle interval, thus preventing the FSP from overwhelming your
ConfigMgr site. If your site is configured in native mode and you have
specified an Internet FQDN, you can configure the FSP to allow
intranet-only connections or both intranet and Internet connections. You
may need to perform additional configurations to ensure that your
clients use the FSP. The section “How to Assign the Fallback Status
Point to Client Computers” in the ConfigMgr integrated help file
provides additional information. PXE service point—
Use a PXE service point to leverage the Preboot Execution Environment
(PXE) for ConfigMgr Operating System Deployment. When you enable the PXE
service point, you receive notification that ConfigMgr will open UDP
ports 67, 68, 69, and 4011 on the site system so it can respond to PXE
requests. If you have ConfigMgr 2007 R2 installed,
you also have the option to enable Unknown Computer Support. This
allows you to deploy imaged systems not currently managed by ConfigMgr. Caution: Unknown Computer Support and the PXE Service Point
Use
extreme caution when using Unknown Computer Support and the PXE service
point. When Unknown Computer Support is enabled, any unknown computers
that boot to PXE will attempt to run mandatory task sequences. If you
have mandatory task sequence advertisements for OSD, you may encounter
unexpected results on a new (unknown) system, or an unhealthy ConfigMgr
client. Automatically deploying an image to an unknown computer (which
happens to be a critical web server for your company) may cause you to
quickly dust off your resume. On the lighter side, it may also help you
standardize on Windows! To prevent an unintentional operating system
deployment to one or multiple systems, create a text file that contains
the Media Access Control (MAC) addresses (one per line in the text file)
for the systems to exclude and then store it on each PXE service point.
Separate the MAC address elements with colons (for example,
ab:cd:01:23:45:67). Also, in the Registry on each PXE service point, add
a string value named MACIgnoreListFile at
HKEY_LOCAL_MACHINE\Software\Microsoft\SMS\PXE and point it to the full
path to the text file. See http://technet.microsoft.com/en-us/library/cc431378.aspx for more information.
You can also enable the option
Require a password for computers that boot to PXE, which allows you to
restrict PXE OS deployment to users who know the password (this
typically is your service desk and on-site support teams). One
final important step for configuring PXE is that you must either create
a self-signed certificate or import a certificate. If your site is
configured for native mode, you must import a certificate from a trusted
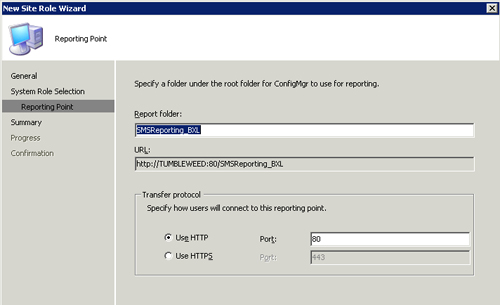
root Certificate Authority. Reporting point— Create a reporting point to view reports and dashboards for your site. Many ConfigMgr administrators also refer to this as web reporting.
ConfigMgr contains over 300 built-in web reports. If you install
ConfigMgr R2, you will have nearly 400 built-in web reports. You can
also create additional web reports as required. You must install IIS
prior to installing the reporting point. Review Figure 23 for reporting point configuration. The information shown is the default settings. Because the site code in Figure 8.23
is BXL, the report folder is SMSReporting_BXL by default. The report
folder name will be part of the URL used to access the web reporting
site.
Two types of rights are required for access to view web reports: Add
users and user groups to the local SMS Reporting Users security group
on the server to grant them access to the Web Reporting site. Grant the users or user groups class rights to view all web reports, or instance rights on specific reports, as needed.
Reporting services point—
With ConfigMgr 2007 R2, you can optionally install a reporting services
point as well. Install SQL Reporting Services (SRS) before attempting
to configure a reporting services point. Note: Multiple Instances of SQL Reporting Services May Cause Issues
If multiple instances of SRS exist on the
same site, you may encounter unexpected results when installing a
reporting services point. During installation, ConfigMgr queries WMI on
the server for all instances of SQL Reporting Services, and it always installs the reporting services point on the first instance returned.
Asset Intelligence synchronization point—
If you have Microsoft Software Assurance (SA), you can create an Asset
Intelligence synchronization point to download Asset Intelligence
catalog information and upload custom software title catalog information
(if desired). To configure the synchronization point, you must obtain a
certificate from Microsoft and import it during configuration. You can
also specify a proxy server and proxy server account if your network
requires proxy authentication. By default, the synchronization schedule
runs every 7 days.
Out of Band service point—
If you have systems with Intel Active Management Technology (AMT),
enable the Out of Band service point to improve control of Wake On LAN
and other remote management needs. AMT is a technology used in vPro;
systems with vPro installed can be managed using the Out of Band (OOB)
service point. OOB in this instance refers to systems that are connected
on the LAN, but not running Windows (or you don’t have access remotely
to Windows on the system). Using vPro, you can remotely connect to these
systems, even while the system is powered off, provided all
configurations are completed in advance. As displayed in Figure 8.24,
you can configure the properties of the Out of Band service point role
to increase or reduce the network and CPU utilization of the site due to
the OOB service point. As an example, when you create and enable Wake
On LAN for an advertisement, the OOB service point will wake all
targeted vPro-enabled systems using the settings specified in Figure 24. Review the ConfigMgr help file for additional information regarding each property in Figure 8.24.

Server locator point—
Create a server locator point (SLP) for clients to complete site
assignment and find management points when they cannot find that
information in Active Directory. You have workgroup clients or clients from another Active Directory forest. You have not extended Active Directory. You have extended Active Directory, but have not configured all ConfigMgr sites to publish information to Active Directory.
You do not need to install an SLP if all sites are configured for Internet-based client management (IBCM). Configure
IIS on the site system before installing the SLP. When installing the
SLP, you can choose to use the site database or a database replica. You
can also specify a server locator point connection account if you
require a different account than the SLP computer account. See the “Using Replicas and Offloading Site Roles” section for information on creating a database replica. |
You can specify the server locator point for clients using one of the following methods:
Manually publish the server locator
point in WINS so that clients can automatically locate it. Client
computers search WINS for the server locator point if the client.msi
installation property SMSDIRECTORYLOOKUP=NOWINS has not been specified. Assign the server locator point to clients during client installation, using the client.msi property SMSSLP=<server locator point name> on the CCMSetup command line. If
the SLP needs to be added manually to WINS, such as when Computer
Browsing in the domain is disabled, perform the following steps:
1. | Open a command prompt (Select Start -> Run, and then type cmd).
| 2. | At the command prompt, type netsh and then press Enter.
| 3. | Type wins and press Enter.
| 4. | Type server and then press Enter.
To manage a remote WINS server, type server <\\<servername> or XXX.XXX.XXX.XXX>, specifying the NetBIOS name or IP address.
| 5. | Type the appropriate command on a single line, as in the following example:
add name Name=SMS_SLP endchar=1A  rectype=0
ip={<server locator point IP address>} |
Perform the following steps to validate the SLP was added to WINS successfully:
1. | Open a command prompt.
| 2. | At the command prompt, type netsh and then press Enter.
| 3. | Type wins and then press Enter.
| 4. | Type server and then press Enter.
To manage a remote WINS server, type server <\\servername> or XXX.XXX.XXX.XXX>, specifying the NetBIOS name or IP address.
| 5. | Type the appropriate command, as in the following example:
show name Name=SMS_SLP endchar=1A |
|
Software update point— Create
a software update point (SUP) to use the Software Updates feature of
ConfigMgr. Configure IIS and install WSUS 3.0 SP 1 prior to adding this
role. Your first SUP (usually installed on your central site)
synchronizes with Microsoft Update over the Internet to obtain patch
detection and download information. If you have multiple sites in your
hierarchy, all child site SUPs will synchronize with the parent SUP. All
primary sites must have an active SUP. Clients also connect to the
active SUP (for its assigned site) to perform updates scanning to
determine patch applicability. When creating the
SUP role, specify the proxy server name and configure an SUP proxy
server account if needed. You can configure this for both the central
site to access Microsoft Update and for child sites to access SUP on
their parent site. Also, be sure to enable the new SUP as the active
SUP, so that clients can use it. You must configure the SUP component after installing the SUP role. State migration point— Create a state migration point (SMP) to store user state migration data during reimaging or hardware replacement. Figure 25
shows configuring an SMP. You can see the directory D:\UserData is
specified on the local drive of the ConfigMgr site. The Max Clients
setting indicates the maximum number of clients that can be saved to the
folder at any given time. Minimum Free Space prevents additional
migration data from writing to the disk, if the drive falls below
minimum free space.
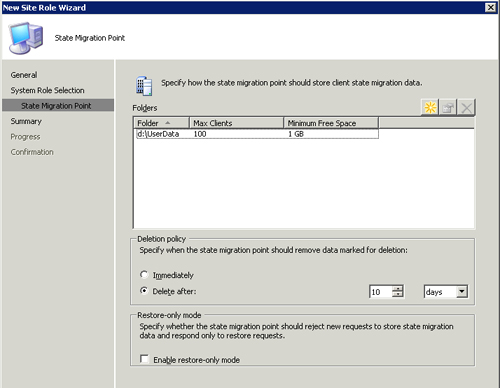
Also in Figure 25,
you can see the deletion policy is configured as 10 days, so that once
the data has been successfully restored (and marked for deletion), the
data is automatically removed after 10 days. If you check the box Enable
restore-only mode, all requests for user state store will be refused
for this SMP, although the SMP will remain operational for restore
operations. System Health Validator point—
Install a System Health Validator point if you will use ConfigMgr for
Network Access Protection (NAP). Installing the role is very easy
because there are no settings to configure! However, you must install
this site system role on Windows Server 2008 configured with the Network
Policy Server (NPS) role. Branch distribution point—
Create a branch distribution point (BDP) on a branch office computer to
allow clients in that office to access content locally. Think of a
small office with 10 computers—you may not want to install a dedicated
server and primary or secondary ConfigMgr site. When you install a
branch distribution point, systems in the branch office will still
traverse the WAN for management point traffic (ConfigMgr machine policy,
submitting inventory, and so on), which is nominal traffic. The branch
distribution point allows systems to install software and software
updates from a local distribution point, thus removing WAN traffic for
those installations without incurring the overhead of another site at
the remote location. You can install a branch distribution point on
Windows XP, Windows Vista, Windows Server 2003, Windows Server 2008, and
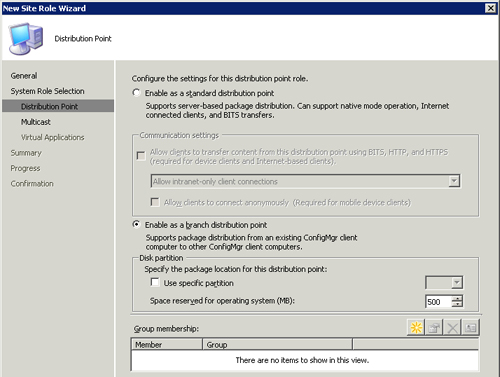
newer Windows operating systems. Create a new site system
on a new server or workstation and then select Distribution Point as
the role. (In order to create a branch distribution point, the target
system must be a healthy ConfigMgr client.) Configure the next page of the wizard as shown in Figure 26 to create a branch distribution point. The example in Figure 8.26
allows ConfigMgr to determine which partition to use on the site
system. If the site system has multiple partitions, you can specify a
specific partition if desired. You can also reserve space on the drive
for the operating system, to prevent ConfigMgr from using the entire
drive. Figure 26
shows reserved space configured as 500MB. For additional information
about configuring multicast and enabling virtual application streaming,
review the bullet at the beginning of this section regarding
distribution points.
Branch distribution points use
BITS to download content from a standard BITS-enabled distribution
point. If the standard BITS-enabled DP is configured with protected
boundaries, the boundaries of the BDP must be included or else the BDP
will not be able to download content from the standard DP. Another
important consideration is that when a client accesses a BDP for
content, the content is only accessed via SMB (not BITS).
Note: Comparing Distribution Points to Branch Distribution Points
After reviewing the information for both
distribution points and branch distribution points, you may wonder which
is best for you. And as almost all things technical, it depends. Consider BDPs for small-office scenarios. Here are a few points to consider:
The BDP depends on the ConfigMgr client to be installed and properly configured. The BDP must be a member of the domain, and not a Windows 2000 system. BDPs are not supported on Internet-based clients. BDPs do not support multicast for OSD. If
a BDP is installed on a workstation operating system (for example,
Windows XP or Vista), it is limited to 10 concurrent client connections.
Microsoft provides information about standard and branch distribution points at http://technet.microsoft.com/en-us/library/bb680853.aspx. Another helpful document is at http://technet.microsoft.com/en-us/library/bb932184.aspx.
Now that you know how to configure each
site role, it’s important to know that you can offload site roles to
reduce the load on your primary site server. For many environments,
offloading roles may not be required. However, if you notice one role is
using a large amount of bandwidth, or CPU cycles, consider offloading
it by creating a new site system, as described in the next section.
|