Creating a UI with controls
involves more than dragging and dropping. To get the most from controls,
you need to know how to position them on your form. This section covers
some common tools for putting controls exactly where you want them.
1. Formatting controls
Even the simplest Windows Form can have dozens of
controls. Developers often want to align controls in a way that's
visually appealing to users. Although you can work with each control
individually — drag, drop, resize, and align — using the Visual Studio
Format menu is much easier. After selecting two or more controls, use
the Format menu to perform the following actions:
Align: Position controls into alignment with one another.
Make Same Size: Make controls the same width or height.
Horizontal Spacing: Set the side-by-side spacing between controls.
Vertical Spacing: Set the spacing above and below controls in a row.
Center in Form: Position a control or group of controls in the center of the Windows Form.
Order: Set controls to appear in front of other controls.
Lock Controls: Lock the position of a single control or group of controls so that the position can't be changed.
Visual Studio displays a Layout toolbar with many of
the common formatting commands. To display the Layout toolbar if it's
not already open, follow these steps:
Choose View Toolbars.
A submenu displays a list of all Visual Studio toolbars, and check marks indicate all visible toolbars.
Select the Layout option.
The Layout toolbar appears, as shown in Figure 1. You can use this toolbar to access common formatting commands.

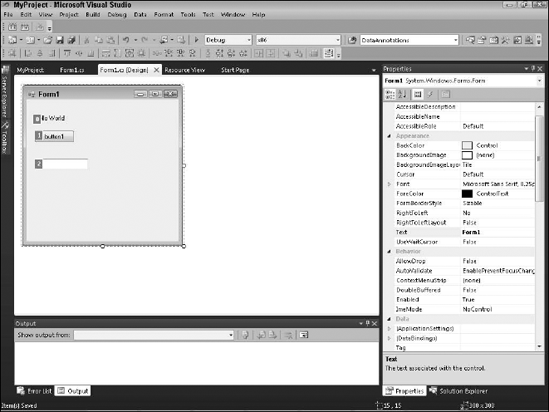
Here's how to create a form with aligned labels and buttons for accepting user input:
Draw three labels on the form and Stack the labels vertically.
Try not to align them.
Draw three text buttons on the form — again, without aligning them.
Hold down the Shift key and then click the three buttons to select them.
You have three options for selecting formatting controls:
Shift+click: Format all controls to conform with the first control selected.
Ctrl+click: Format all controls to conform with the last control selected.
Click and drag: Click the form and then drag a selection rectangle around all the controls you want to select.
Click the Make Same Size icon on the Layout toolbar.
The buttons are made the same size.
Click the Align Lefts icon on the Layout toolbar.
Align Lefts is the second icon on the toolbar. The buttons are aligned to the left.
Position
the mouse pointer over the right side of the buttons. When the pointer
turns to an arrow, drag your mouse to the right and left.
The buttons widen and narrow with the mouse movement.
Click the form to deselect the buttons.
Hold down the Shift key while you select the three label controls.
Choose FormatAlignRights.
The labels are aligned to the right.
Position
the pointer over the labels until it turns into a four-way arrow and
drag the labels to the left to create space between the labels and
buttons.
|
You can use the arrow keys on your keyboard to move the labels around on the form.
|
|
2. Seeing the snaplines
When you add a control to a form, Visual Studio provides visual cues, or snaplines,
for positioning the control. Snaplines recommend the best position for
the controls in accordance with spacing recommendations set in the
official Microsoft UI guidelines. The snaplines appear while you drag
controls around the form to let you know when the controls are at
appropriate positions.
|
To see snaplines in action, follow these steps:
|
|
Drag a button control from the Visual Studio toolbox to the form design surface and don't release the button.
Move the mouse pointer to the lower-right corner of the form.
As you approach the corner, blue snaplines appear, as shown in Figure 2.
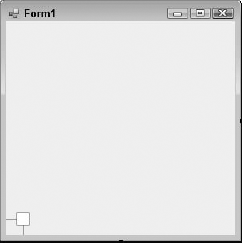
Drop the button on the form.
Drag a text box control to the form and don't release the text box.
Position the text box above the button and, when the snapline appears between the text box and the button, release the text box.
Snaplines are visible any time you move controls on
the design surface. The space between the button control and the edge of
the form is the sum of the button's margin property and the form's
padding property. Margins define the exterior space between controls,
and padding designates space between a control's interior border and its
contents. You can set these properties yourself or use snaplines to do
it for you.
3. Locking controls
|
Getting the layout just right on a form can be a
chore. You can keep your controls positioned where you want them by
locking them in place. You have two options for locking controls:
|
|
To lock all your controls and the form itself, choose Lock Controls from the Format menu.
To lock an individual control, set the control's Locked property to True.
4. Setting the tab order
Nothing's worse than when you press the Tab key in a
Windows application, and the cursor jumps to an unexpected field. The
tab order determines the order in which the Tab button moves from field
to field on your form. To set the tab order, follow these steps:
|
Good tab order is essential to creating an
application that provides a high-quality user experience and one that is
easy for everyone to use. This article at http://msdn.microsoft.com/library/cb35a5fw.aspx describes how to create an accessible application.
|
|
Choose View=>Tab Order.
The controls on the page display numbers representing their tab order.
Click to select the controls in sequential order to set the tab order, as shown in Figure 3.
Repeat Step 1 to take the form out of tab-order selection mode.
To designate that a control shouldn't be tabbed to, set the control's TabStop property to False. Controls with the TabStop property set to False are skipped when the user presses Tab. Controls that aren't visible or enabled are also skipped when the user presses Tab.
To set a control as invisible or disabled, set the control's Visible and Enabled properties to False.
|
You can set a control's tab order by using the TabIndex property.
|
|
5. Access a control's tasks with smart tags
Some of the controls you add to your form can walk
you through simple task wizards by using smart tags. Smart tag-enabled
controls have a little arrow in the upper-right corner of the control.
When you click the arrow, a list of common tasks associated with the
control appears. To see a smart tag-enabled control in action
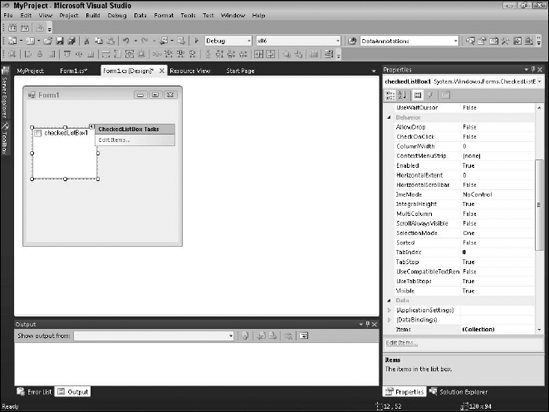
Drag and drop a CheckedListBox control onto the forms designer.
Click the smart tag arrow to display a list of common tasks, as shown in Figure 4.
In the CheckedListBox Tasks window, click Edit Items.
From the String Collection Editor that appears, you can add items to the CheckedListBox control.
The smart tags display a
subset of tasks for the control. Use the control's Properties window to
see all the tasks and properties available for the control.