Storage Pool Configuration Options
Once you have configured at least one
storage pool, there are a few new options that present themselves. All
of these are available from the main Storage Spaces control panel view,
and all but the first three are found within the Storage pool area:
- Create a storage space:
Every storage pool will contain at least one storage space. But once
you have a storage pool, you can keep adding additional spaces as
needed. To do so, click the link titled Create a storage space. You’ll
see the same interface discussed in the previous section, and your
options will be limited only by the available storage types attached to
the PC.
- Add drives: If
you’ve already created a pool and would like to add one or more drives
to that pool, you do so through the Add drives link. Drives added in
this fashion will automatically be made available to any spaces within
the pool.
- Rename pool: By
default, a storage pool is silently given the imaginative name Storage
pool by Windows. You can change this with the Rename pool link though,
to be fair, this isn’t something you’ll need to deal with unless you’re
creating multiple pools for some reason. That’s a fairly advanced
configuration and, in our opinion, pretty crazy for even an advanced PC
user.
- Create a new pool and storage space: This
link on the left side of the Storage Spaces window will allow you to
create other storage pools, and their contained spaces, assuming you
have the additional disk capacity to support such a thing. Honestly, a
single storage pool with multiple spaces is probably complex enough for
most people. But if you have the urge to really overthink things, go
nuts.
Storage Space Configuration Options
You can also configure various options related to a storage space. These include:
- Change:
You can change various aspects of a storage space after it’s created
using this link. These include three key storage space options: Its
name, its drive letter, and its maximum storage space size.
Any data stored on a space is deleted when the space is deleted. So be sure to back up anything important before continuing.
- Delete: You
can delete a storage space as well. This will remove the space only;
the containing pool is retained along with any attached storage.
NOTE that this option will not appear when there is only one drive in a space.
- Remove (drive): If you have two or more disks being used
for a storage space, you will see a Remove link next to each. If you
click this, the drive is removed from the pool and the space, is
formatted, and will reappear in File Explorer with a new drive letter.
If you remove the last drive associated with a pool, that pool will be
removed as well.
A More Resilient Space: Two Disks, Two-Way Mirroring
While a single-disk storage space has
some value, the inability to add resiliency at a later date seriously
hampers that kind of configuration. As far as we’re concerned, the real
value of Storage Spaces begins when you have two or more disks you can
use in a mirrored setup. This configuration will automatically
replicate data between two disks, providing you with some measure of
protection in the event of a hard disk failure.
Consider the screen shown in Figure 7.
Here in the Storage Spaces interface, you can see that the PC has two
additional 3 TB drives that it can use as the basis for a storage pool
and one or more contained storage spaces.
To get started, select both of the disks and then
click Create pool. As before, the storage pool is created and you are
shown the screen in Figure 8,
where you select options related to the first contained storage space.
This time, you can select a two-way mirror for some hardware
resiliency. In fact, that resiliency type is selected by default.
Figure 8: Now you can choose a two-way mirror.
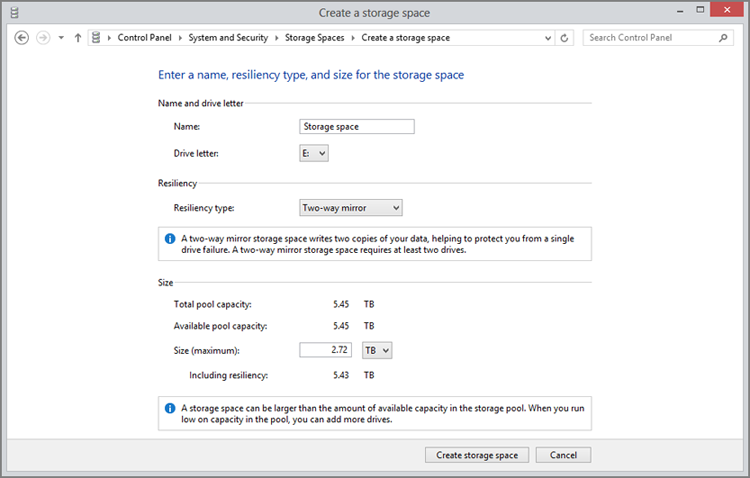
Note that by default, Storage Spaces selects 2.72
TB (or roughly 3 TB) for the maximum size of the space, even though the
total pool capacity is twice that. That’s because that’s the natural
size of the mirrored disks: the combined size halved, so that each bit
of data will be equally replicated across both physical disks. You can
of course increase the logical size now and add physical storage later
if and when it’s needed. In fact, you can basically make it as big as
you want. (You can also increase or otherwise change the space’s
maximum size later if needed.)
Everything about the space is normal from an Explorer perspective. You can even protect it with BitLocker if you want.
Click the Create storage space button to
initialize the space. A new Explorer window opens, too, displaying this
new space. But as you can see from the Explorer view that opens, it
appears as a normal 3 TB disk to the system, even though under the hood
it is using about 6 TB of actual physical storage spread across two
disks. Mirroring reduces the available storage, but offers better
resiliency. That’s the trade-off.
Back in the Storage Spaces control panel, you can
see that once again the new pool has been created, along with a single
space. But this time the space includes two hard disks, as you can see
when you expand the Physical drives view as shown in Figure 9.
Under the hood, of course, a mirrored storage
space is far more powerful than a single drive. Anything stored within
is being replicated across the two physical disks, automatically. You
could add more spaces to the pool, rename the pool or its contained
spaces, and perform other management tasks. In fact, if you return to
the Storage Spaces control panel, you’ll see a number of details about
the pool and space you’ve created.