2. AppLocker cmdlets
This section will cover the AppLocker cmdlets that
can be used to manage AppLocker policies in Windows Server 2008 R2.
AppLocker is a new Windows 7 and Windows Server 2008 R2 feature that
helps the administrator control how users can access and use files. Before you do
anything with any AppLocker cmdlets, even use the get-help cmdlet on
them, you must import the AppLocker module. You need to be running
Windows 7 or Windows Server 2008 R2 to be able to import the AppLocker
module.
The steps needed to import the module are as follows:
1. | Startup PowerShell
|
2. | Type Import-Module AppLocker
|
After the cmdlet has finished running, you can check
to see if it worked by calling the get-help cmdlet on the AppLocker
cmdlets, since if the import is not performed, PowerShell will not be
able to find help on them. TypeGet-Help *AppLocker* and hit enter. You should now see a list of the five AppLocker cmdlets (see Figure 10).

If this did not work and you get an error, then make
sure you are running Windows 7 or Windows Server 2008 R2. In addition,
you need to make sure you have administrator rights and scripting
enabled.
The five AppLocker commands that should appear on your screen are described in Table 7.
Table 7. Windows AppLocker cmdlets
| cmdlet Name | Description |
|---|
| New-AppLockerPolicy | This cmdlet creates a new AppLocker policy. It can be created with default values or specific values determined during creation |
| Get-AppLockerFileInformation | This cmdlet gets the AppLockerFile information for the specified targets |
| Get-AppLockerPolicy | This cmdlet gets the specified AppLockerPolicy from the local computer or a specific GPO |
| Set-AppLockerPolicy | This cmdlet sets the AppLockerPolicy for a desired target Group Policy Object |
| Test-AppLockerPolicy | This cmdlet tests a target against a specific AppLocker policy to determine what execution rights it has |
These cmdlets are very straightforward in their use
on a basic level but allow some very interesting complexities and
applications as well.
As the name implies, the
Get-AppLockerFileInformation cmdlet allows you to get the AppLocker
file information from a list of files or an event log. For example, you
could get all the AppLocker information for all the executable files
and scripts in a specific directory. You could also be more specific
and get the AppLocker information for a specific script or executable
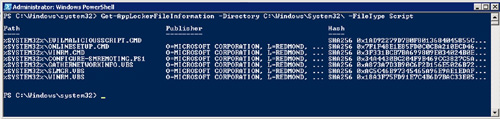
by simply typing Get-AppLockerFileInformation filename. You will get multiple files for your example. Type Get-AppLockerFileInformation –Directory C:\Windows\System32\ -FileType script and hit enter,
and you will see how the AppLocker File information is returned. The
cmdlet you used is asking for the AppLocker File information for all
the scripts in the Windows\System32\ directory. In the output, you can
see the file and some of its information, which can include the file
path, the publisher, and the file hash (see Figure 11).
This information might not seem very useful to you,
but it is important when you use the rest of the cmdlets that require
AppLocker File information. For some of them, you will need to pipe on
the AppLocker File information, like the New-AppLockerPolicy cmdlet.
The New-AppLockerPolicy cmdlet is used to create new
AppLocker rules for a group or user. It requires a list of file
information to automatically generate these new rules for you. Let us
say you have a directory where you do not want any new .exe files to
have the ability to execute, except for the ones that are already
there. That way, any new files that are added later can be checked for
safety before they are allowed to run. In this example, you will create
a new AppLocker Policy to only allow the existing script files in the
Windows\System32\ directory to be allowed to run. You will need to use
the Get-FileInformation cmdlet to get all the script files currently
there and then pass them to the New-AppLockerPolicy cmdlet via the “|”
or pipe.
The cmdlet you type is get-AppLockerFileInformation –Directory C:\Windows\System32\ -FileType script | New-AppLockerPolicy –User Everyone XML > ScriptRestrictionPolicy.XML.
This first gets all the AppLocker file information for all the scripts
in the specified directory, it then uses this to create a new AppLocker
Policy file for all the users and writes the policy to the
ScriptRestrictionPolicy.XML as you specified.
It
will use a default rule type of publisher and then hash, since you did
not specify one of your own. If you were to open the newly created
ScriptRestrictionPolicy.XML in a text editor, you would be able to see
that it contains xml entries for all the files that were returned by
the get AppLockerFileInformation –Directory C:\Windows\System32\
-FileType script cmdlet (see Figure 12).
If you were to push this policy, only then those scripts would have
permission to run by default and others would not be allowed unless you
added them to the policy. You could have just as easily created a
policy that would allow none to run, except for a specific file as well
by simply removing the –Directory and –FileType flags like this Get-AppLockerFileInformation fileToAllow | New-AppLockerPolicy –User Everyone XML > YourNewPolicyName.XML.

The next cmdlet, Test-AppLockerPolicy cmdlet is a
very useful straightforward tool. It lets the administrator check the
AppLocker Policy in a few different ways. You can check if users in a
group are allowed to run an application, you can check if a list of
applications can be run by a group of users and you can check to see
which files a specific user is not allowed to execute. You are going to
use the Test-AppLockerPolicy cmdlet to see how the policies you created
earlier would impact the existing files and new files before you push
the AppLocker Policies. You can test the ScriptRestrictionPolicy you
created before that was supposed to create a policy for the existing
scripts. You pick one of the scripts to test with the
Test-AppLockerPolicy cmdlet (see Figure 12). You pick the first one, WINRM.CMD, and type Test-AppLockerPolicy –XMLPolicy.\ ScriptRestrictionPolicy.XML –Path C:\Windows\System32\WINRM.CMD to see if the policy will allow it like it is supposed to, and you see that it does (see Figure 13).

You now check to see that the policy is also
restricting new scripts as it is supposed to by creating a new file and
calling it “EvilMaliciousScript.CMD.” You then test it to see if it can
be run by typing Test-AppLockerPolicy – XMLPolicy.\ScriptRestrictionPolicy.XML –Path C:\Windows\System32\EvilMaliciousScript.CMD and hitting enter.
The result shows you that your policy is working. It is restricting it
because it is not the one specified in your XML policy file (see Figure 14).

Now that you understand how to test AppLocker
policies, you move on to another helpful cmdlet called the
Get-AppLockerPolicy cmdlet. This cmdlet gets the AppLocker policy from
either a specific GPO or from the effective AppLocker policy on the
computer. To get the effective AppLockerPolicy on your local computer,
you simply type Get AppLockerPolicy –Effective and hit enter. In this way, you can also get a local or domain AppLockerPolicy with their corresponding flags of – local or –domain
or even specify a specific GPO to get the policy from using the
Lightweight Directory Access Protocol (LDAP) path of the GPO and the –ldap
flag. Get-AppLockerPolicy can either return an AppLockerPolicy object
or an XML-formatted string. So, if you wanted to write the local policy
to an XML file, you simply add another flag to the command like this Get-AppLockerPolicy –Local –XML > Local.XML. This will then write the AppLockerPolicy to the file you specified Local.XML.
The final piece in the puzzle is the
Set-AppLockerPolicy cmdlet. The Set AppLockerPolicy lets the
administrator set an AppLockerPolicy for a specific Group Policy Object
(GPO). You either need to furnish an LDAP path or it will default to
the local GPO. So, once you have an AppLockerPolicy that you have
tested and are sure you want to push, you can use the Set-AppLockerPolicy
cmdlet to do so. So, assuming you were ready to set the local
AppLockerPolicy to the ScriptRestrictionPolicy.XML AppLocker Policy you
created earlier with the New-AppLockerPolicy cmdlet, you would simply
type Set-AppLockerPolicy –XMLPolicy C:\Windows\ System32\ScriptRestrictionPolicy.XML and be done with it. One flag of interest is the –Merge
flag. If the Merge flag is included, then the new AppLocker Policy you
are setting is merged with the old one. If the –Merge flag is not
there, then the old AppLockerPolicy is replaced with the new one you
are setting. Going back to your ScriptRestrictionPolicy, you could
create new AppLocker policies for any new scripts you wanted to allow
to run and then use Set-AppLockerPolicy cmdlet with the –Merge flag to
add them to the existing local AppLockerPolicy.