3.3. Adding Multi-Touch Interface Functionality
The example application presents a typical business
situation in that you'll use a similar process for any application you
create. In many cases, you'll create the application first, test it,
and then add a Multi-Touch Interface to it. The following sections
describe a process you could use for new Windows Forms applications or
updates to existing applications.
3.3.1. Creating the Business Logic
The code begins with a pair of event handlers for btnTest and btnQuit. The example uses very simple code for these event handlers to keep the focus on the Multi-Touch Interface functionality. Listing 1 shows the event handler code.
Example 1. Creating some simple button event handlers
private void btnQuit_Click(object sender, EventArgs e)
{
    // End the program.
    Close();
}

private void btnTest_Click(object sender, EventArgs e)
{
    // Display a message box.
    MessageBox.Show("This is a message box!");
}
|
As you can see, btnQuit_Click() closes the form (ending the application) and btnTest_Click()
displays a simple message box. A production application would provide
far more functionality, but these simple examples work fine for this
example.
3.3.2. Initializing the Multi-Touch Platform
The focus of the Multi-Touch Platform is the TouchHandler object. You need to create a global TouchHandler object, ThisTouch, to receive user touch events, as shown here:
private TouchHandler ThisTouch;
The example focuses on down touches. When the user
touches the screen, the touch device generates a down-touch event. When
the user lifts the finger, the touch device generates an up-touch
event. There are a number of other gestures you can monitor as well,
but for this example, all you really need to know about are down
touches. Most business applications will need to detect the touch
device and then create event handlers for the touch device as needed. Listing 2 shows a typical implementation of such logic.
Example 2. Performing TouchHandler initialization
public frmMain()
{
    // Perform the standard initialization.
    InitializeComponent();

    // Check for a touch device.
    if (TouchHandler.DigitizerCapabilities.IsMultiTouchReady)
    {
        // Create the touch handler object.
        ThisTouch = Factory.CreateHandler<TouchHandler>(this.Handle);

        // Add a touch event handler.
        ThisTouch.TouchDown +=
            new EventHandler<TouchEventArgs>(ThisTouch_TouchDown);
    }
    else
    {
        // Tell the user there is no touch device available.
        MessageBox.Show("No touch device is available.");
    }
}
|
The TouchHandler.DigitizerCapabilities
property provides access to a number of values that help you discover
the touch device capabilities. All that you really need to know to
start is whether the touch device even exists. The IsMultiTouchReady property provides this information to you.
Once you know that the touch device exists, you can create the TouchHandler, ThisTouch.
You don't use a standard constructor to perform this task. The code
shows the proper technique of relying on a Factory to perform the task
using the CreateHandler<TouchHandler> template. You must provide a handle to the appropriate window, which is going to be this.Handle in most cases for the current window.
3.3.3. Handling Multi-Touch Events
Now that you have a local instance of the TouchHandler, you can use it to add event handlers. The example uses the TouchDown event to track events when the user presses the button on-screen. As with most event handlers, you type +=,
press Tab once to create the event handler definition, and press Tab a
second time to create the event handler method. The event handler
method, ThisTouch_TouchDown(), appears in Listing 3.
Example 3. Handling touch events
void ThisTouch_TouchDown(object sender, TouchEventArgs e)
{
    // Convert the X and Y locations to a client window coordinate.
    Int32 XCoord = e.Location.X - this.ClientRectangle.Location.X;
    Int32 YCoord = e.Location.Y - this.ClientRectangle.Location.Y;

    // Check the location against btnTest.
    if ((XCoord >= btnTest.Location.X) &&
        (XCoord <= btnTest.Location.X + btnTest.Size.Width) &&
        (YCoord >= btnTest.Location.Y) &&
        (YCoord <= btnTest.Location.Y + btnTest.Size.Height))

        // Call the btnTest Click event.
        btnTest_Click(sender, null);

    // Check the location against btnQuit.
    if ((XCoord >= btnQuit.Location.X) &&
        (XCoord <= btnQuit.Location.X + btnQuit.Size.Width) &&
        (YCoord >= btnQuit.Location.Y) &&
        (YCoord <= btnQuit.Location.Y + btnQuit.Size.Height))

        // Call the btnQuit Click event.
        btnQuit_Click(sender, null);
}
|
The ThisTouch_TouchDown() method looks a
little odd at first, but you need to consider how a touch device works.
The user presses somewhere on the screen, which generates a touch
event. Your code receives the event and calls ThisTouch_TouchDown(). The TouchEventArgs, e,
contains a number of arguments, including the location of the press.
However, the location information is in screen coordinates, not local
client window coordinates. As a consequence, the code can't determine
whether the user clicked btnTest or btnQuit without first converting the location to a client-based coordinate.
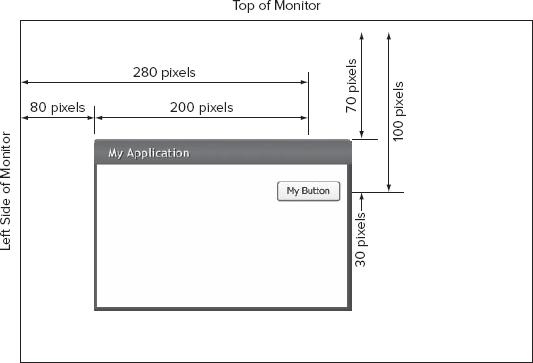
Let's pursue this a little more. For the sake of
argument, the Multi-Touch client window's upper-left coordinate is
currently at 80 pixels to the right of the display edge and 70 pixels
from the top of the display, as shown in Figure 2.
The user presses at a position of 280 pixels from the right of the
display edge and 100 pixels from the top of the display. The actual
client window coordinates then are 280 - 80 or 200 pixels from the
right edge of the client window (XCoord) and 100 - 70 or 30 pixels from the top edge of the client window (YCoord).
|
It's essential that you use the this.ClientRectangle.Location property when determining the window's current location on-screen because this.Location points to the location of the entire window. The this.ClientRectangle.Location
property takes the window border and title bar into account when making
position calculations. If you find that the user presses are falling
outside the expected range, check for this potential problem in your
code.
|
|
For this example, btnTest is located 197
pixels from the right edge of the client window and 23 pixels from the
top edge of the client window. The button also has a width of 75 and a
height of 23. So, let's take a look at the logic for the next section
of code. The XCoord equals 200 and YCoord equals 30, so we have the following logic:
200 >= 197
200 <= 197 + 75
30 >= 23
30 <= 23 + 23
In short, all the statements are true. Therefore, the code calls btnTest_Click() and passes the current sender to it. The btnTest_Click() event handler doesn't use any of the event arguments, so the code sends null
to it. The result is that the user sees the message box on-screen, just
as if the user had pressed Alt+T or clicked Test. The code for btnQuit works precisely the same way as the code for btnTest.