Once you have chosen the operating system
(Server 2008 R2, we hope) for your deployment server, ensured that you
have met the hardware requirements, downloaded and installed the WAIK
and its associated components (if needed), and downloaded MDT 2010
Update 1 from Microsoft, you're ready to install MDT. Installation of
MDT couldn't be simpler. The installation is wizard driven and should
take no more than 5 minutes. Follow these steps to install MDT:
Double-click MicrosoftDeploymentToolkit2010_x86.msi or MicrosoftDeploymentToolkit2010_x64.msi (depending on your architecture). Click Install to see the "Welcome to the Microsoft Deployment Toolkit 2010 (5.1.1642.01) Setup Wizard" page, and click Next. Accept
the End-User License Agreement by putting a check mark in the "We
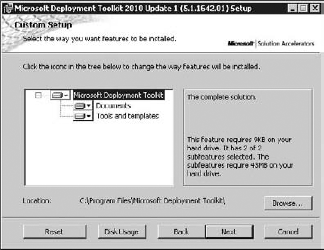
accept the terms in the License Agreement" box, and click Next. On the Custom Setup page, accept the default installation location, C:\Program Files\Microsoft Deployment Toolkit\, as shown in Figure 1. You can also determine the amount of hard drive space required to install MDT by clicking the Disk Usage button shown in Figure 1.
The Disk Usage button displays the Disk Space Requirements page, which
lists your hard drives, the amount of space available on each, and the
amount of space needed to install MDT. The Disk Space Requirements page
shows that only 75 MB is required for the installation. We recommend
storing your deployment shares on a drive separate from the OS and
ensuring that you have plenty of hard drive space; you may be surprised
at how much this install will consume.
When you have configured your location and ensured that you have enough hard drive space, click Next and then click Install. As
the installation completes, you will see the "Completing the Microsoft
Deployment Toolkit 2010 (5.1.1642.01) Setup Wizard" page. Click Finish
to complete the installation of MDT 2010 Update 1.
1. Meeting the Deployment Workbench
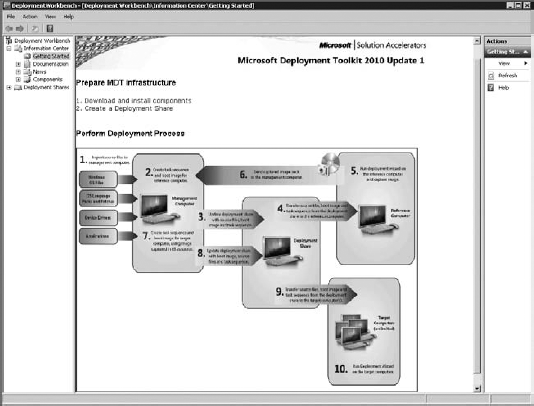
The Deployment Workbench (Figure 2)
is the tool you'll use to work with MDT. The Deployment Workbench
allows you to import operating systems, applications, drivers, and
packages to create reference images or to deploy reference images or
default images. After you have installed MDT, you'll find the
Deployment Workbench in Start => All Programs => Microsoft Deployment Toolkit.
In this section, we will explain what all the
different parts in the workbench really mean and what they are used
for. We'll also introduce you to some of MDT's wizards, like the New
Deployment Share Wizard, the Import Operating System Wizard, the New
Task Sequence Wizard, and the Update Deployment Share Wizard. In Figure 2
you can see that we have highlighted the Getting Started topic under
Information Center. The process flow you see is what's considered to be
a best practice and it is simple.
Import source files to management computer.
Set up MDT, then add the operating system(s) you will deploy together
with patches, language packs, device drivers, and applications. Create task sequence and boot image for reference computer. A reference image is what you get when you install the OS along with patches, language packs, and some applications.
Update deployment share with source files, boot images, and task sequence.
Updating the deployment share will also create the boot image needed to
install Windows on the reference machine (this can be a virtual
machine—in fact we recommend that you create reference images on
virtual machines). Transfer source files, boot images, and task sequence from the deployment share to the reference computer.
Boot the reference machine. You can use WDS and PXE boot, or you can
use the ISO file to boot from (or create an ISO and boot from that). Run the deployment wizard on the reference computer and capture the image. Install the reference computer using the wizard and, once again, we suggest that you use a virtual machine. Send captured image back to the management computer.
If you select Capture And Sysprep, once you've installed the OS with
your applications and patches, the task sequence will, in the end, run
Sysprep and capture the image and store it in the location you selected
in the wizard. Create task sequence and boot image for target computer, using image captured in number 5 as source.
Create a new task sequence, this time for deployment to real machines.
Before you can create the task sequence, you need to import the
captured image as a custom image. You might also create a new
deployment share to separate your lab, test, and reference image
content from the production deployment. You don't have to, but we
recommend that you do. Update deployment share with boot image, source files, and task sequence.
If you have a separate deployment share or the production deployment
share is located on another computer, you need to update it so it will
receive your new custom image and your new task sequence. Transfer source files, boot images, and task sequence from the deployment share to the reference computer.
Boot the real machine using PXE (if that has been set up), or boot on
the ISO image/media to deploy your real machine that should go into
production. Run Deployment Wizard on the target computers. Deploy the machine using the deployment wizard; this time you should select the new task sequence, the one for production use.
2. Exploring the Active Parts of the Deployment Workbench
Now that we have covered the Getting Started node, let's explore the remaining ones.
The Documentation node gives you direct
links to Quick Start guides to assist in planning your deployment,
choosing light-touch versus zero-touch deployment scenarios and
troubleshooting guides. These all point to MDT's help file (Microsoft Deployment Toolkit Documentation Library.chm). The
News node contains links to common documents on Microsoft's TechNet
site, like "Windows Optimized Desktop Scenarios" and "Streamline
Migration to Windows Vista and Windows 7." The
Components node shows which tools are available for download, such as
WAIK 2.0, MAP, and ACT 5.6, among others. You can also find out what
has been downloaded but not yet installed and what has been downloaded
and installed. Since the WAIK toolkit is needed, it will also show up
as required if it hasn't been installed, and you can download and
install it from here. As mentioned earlier, we recommend that you
download and install the WAIK toolkit from the Components node. From
here, the download will be faster, since it's just going to download
the parts from the kit that are needed.
|