2.2.6. Getting Updates
The final option in the middle section of the ICT Wizard is
to go online and download updates right now. Just click Download And Install
Updates. The Windows Update dialog box shown in
Figure 22 opens.

If updates are available, they’ll be displayed and you
can choose to install them immediately. The default is to connect
to Windows Server Update Services (WSUS) running on the main SBS
server. Install the updates, and get the reboot out of the
way.
2.3. Customizing the Server
The final section of the ICT Wizard is used to add roles and features to the server, enable remote
access, and configure Windows Firewall. We can finally get down to
actually setting the server up to do some real work. All the rest
has just been getting ready.
Roles are a new way that
Windows Server 2008 R2 groups similar functionality together for
installation and configuration. A role is a specific set of
functionality that the server needs for a particular set of uses.
Roles can also have role services, which are subsets of the
functionality in the role and can be installed only as part of the
role.
Features can be installed on any server, without being
specific to a particular function of how the server will be used. We
think that at least one feature, the Windows Server Backup Features
(including the command-line tools), should be installed on every
server that isn’t backed up by some other tool, so we’ll cover that
installation here.
The other two settings in this last section of the ICT Wizard
are enabling Remote Desktop and configuring Windows Firewall.
2.3.1. Adding the Windows Server Backup Features
Windows Server Backup is the new backup utility introduced
in Windows Server 2008 and significantly enhanced in Windows
Server 2008 R2. It includes a graphical user interface (GUI) by
default, but also has command-line tools (including Windows
PowerShell cmdlets) available. Whenever you add the Windows Server
Backup features, you should include the command-line tools to
ensure that you can script backups.
You can’t back up your new server until you install the
Windows Server Backup features. To add the features from the ICT
Wizard, follow these steps:
Click Add Features in the Initial Configuration Tasks
Wizard to open the Add Features Wizard, shown in Figure 23.
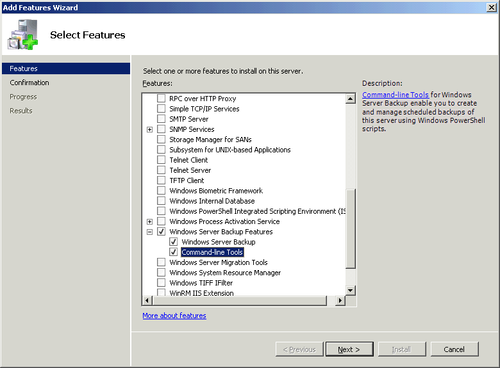
Scroll down to near the bottom of the Features list, and
select Windows Server Backup Features, including all
subfeatures, as shown in Figure 23.
Click Next to open the confirmation page. You’ll see a
list of features that are going to be installed and a warning
that this might require a reboot. Don’t worry, the server will
not reboot as long as this is the only feature you’re
installing.
Click Install to begin the actual installation. When the
installation completes, you’ll see the Installation Results
page. Any problems will be highlighted here, or it will simply
report that the installation was successful. Click Close to
exit the Add Features Wizard.
2.3.2. Remote Desktop
Next on the ICT Wizard list is a link to enable Remote
Desktop. Remote Desktop allows administrators to connect directly
to the server without having to sit down at the console in the
server room. Windows Server 2008 R2 introduces version 7 of the
Remote Desktop Protocol (RDP). The Remote Desktop Client version 7
is included in Windows 7 and Windows Server 2008 R2, and version 7
clients for Windows XP SP3 and Windows Vista SP1 and SP2 are
downloadable from Microsoft Knowledge Base Article 969084 at
http://support.microsoft.com/kb/969084.
Version 7 of RDP includes many improvements over earlier
versions, including 32-bit color, server authentication, Windows
Media Player redirection, Aero glass support, and Remote-Apps
support. For remote administration of a server, the most important
improvement is server authentication, which ensures that you are
actually connecting to the computer you think you are.
At this point, with a freshly installed Windows Server,
you’ll see that Remote Desktop has been automatically enabled. But
it won’t last. After you move the server to the correct
organizational unit (OU), it will lose that Group Policy setting
and you’ll need to redo it. So the best thing to do is first move
the server to the correct OU now, using the following
steps:
On the Windows SBS 2011 server, log in with an account
that is in the Network Administrator role.
Open the Active Directory Users And Computers console by
typing dsa.msc in the Search field of the Start menu.
Navigate to the MyBusiness, Computers, SBSComputers OU
as shown in Figure 24.
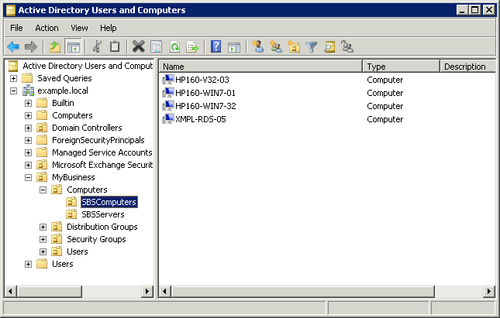
Click the server you just added to the domain (xmpl-rds-05
in our case), and drag the server to the SBSServers OU.
You’ll get a warning about moving objects in Active
Directory Domain Services, as shown in Figure 25. In this
case, you can ignore the warning, so click Yes.

Close Active Directory Users And Computers, and log in
to the server you just moved. Use an account in the Network
Administrator role.
Open a command window (Cmd.exe), using Run As
Administrator, and run
gpupdate/force.
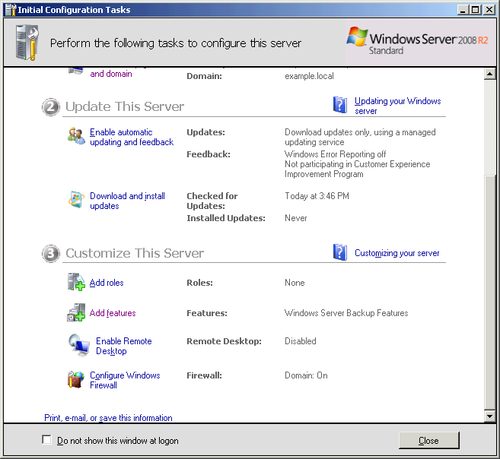
The ICT Wizard will now show that the Remote Desktop is disabled, as shown in Figure 26.
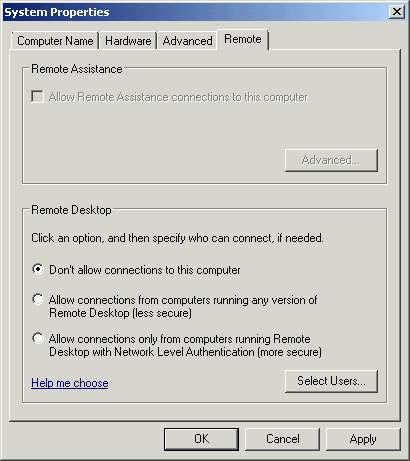
Click Enable Remote Desktop to open the System Properties
dialog box shown in Figure 27. Select
Allow Connections From Computers Running Any Version Of Remote
Desktop (Less Secure), and click OK to return to the ICT
Wizard.
Select the Do Not Show This Window At Logon check box,
and then click Close to close the ICT Wizard. (You can always
get it back by running
oobe.exe.)
Finally, there’s one more little bit of customization we
do on every server. When you closed the ICT Wizard, the
Server Manager console opened, as shown in Figure 28.
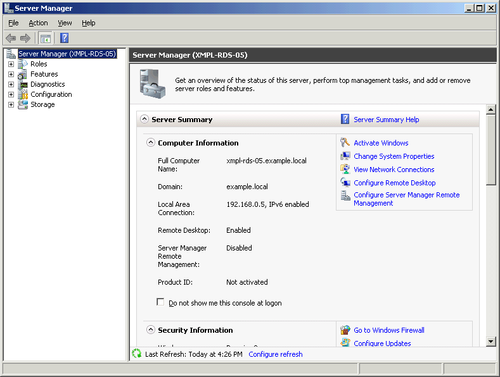
In the Server Summary section, click Configure Server
Manager Remote Management to open the dialog box shown
in Figure 29.
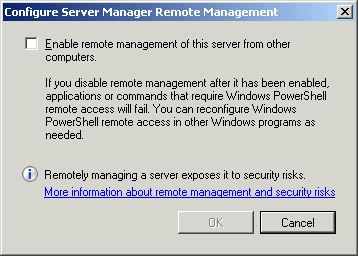
Select the Enable Remote Management Of This Server From
Other Computers check box, and click OK to return to the
Server Manager console.
2. 3.3. Configure Windows Firewall
By default, Windows Firewall is enabled on all new servers.
This is a very different version of Windows Firewall than the one
that came with the first release of Windows Server 2003. The new Windows Firewall is
location-aware, with different rules for Domain traffic, Private
Network traffic, and Public Network traffic. And it’s
bidirectional, controlling both incoming and outgoing
traffic.
As you change the roles and features enabled on the server,
Windows Firewall will be automatically configured to work
optimally within your SBS network. Some settings are directly
controlled by SBS Group Policy, and others are configured
automatically by the Windows Server 2008 R2 role and feature
wizards.