2.2. Initial Configuration
After the SBS Premium second server installation completes,
there are still quite a few tasks to perform. The basic requirements
haven’t changed—they’ve just been shifted to after, instead of
during, the install. At minimum, you’ll need to perform the
following tasks on a fresh server installation:
Assign the initial Administrator account password.
Install any hardware drivers required.
Set the time zone.
Configure the networking.
Assign a name to the server.
Join the server to the SBS domain.
Configure automatic updates and automatic feedback
settings.
Check for updates and install them.
The first of those tasks, assigning the Administrator account
password, is required before you can log on for the first time, so
we’ve already covered that.
There are additional tasks on the Initial Configuration Tasks
(ICT) Wizard that you probably want to perform as part
of your initial setup:
Activate Windows.
Add server roles.
Add server features.
Enable Remote Desktop.
Configure Windows Firewall.
Exactly which roles and features you’ll need to install
varies depending on what the server will be used for. We’ll
cover the basics of adding a feature here, by adding the Windows
Backup feature.
2.2.1. Install Hardware Drivers
There’s a missing piece in the ICT Wizard—no direct way to
add hardware drivers for any hardware on the server that
isn’t recognized. Microsoft makes every effort to get as many
drivers as possible on the installation DVD, but the reality is
that new hardware will continue to be released, and the drivers
are limited to what was available when Windows Server 2008 R2
shipped. So some hardware might require drivers that aren’t on the
DVD. If these are drivers for hard disk controllers, you always
have the option of adding them during the installation, but for
other hardware you need to wait until Windows Server 2008 R2 is
installed.
After the installation completes and you’ve logged on, you
can install additional drivers as required. We think it’s a good
idea to do this as the first step before configuring any settings in the ICT. This is
especially important if your network card isn’t recognized,
because you’ll need connectivity to the SBS network to complete
the rest of the ICT.
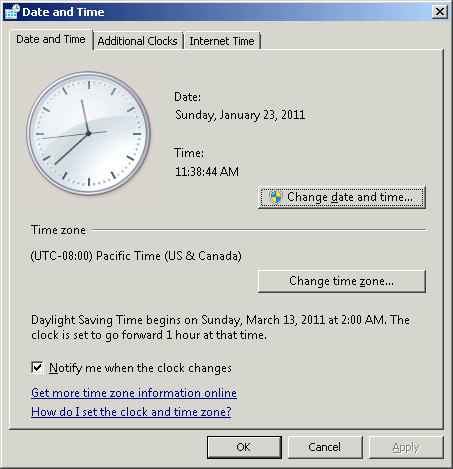
2.2.2. Setting the Time Zone
During the initial installation, Windows will pick a time
zone (probably not the one you’re in unless you live on the west
coast of North America) and will also set the current date and
time based on your computer’s BIOS. To set the date and time, as
well as the current time zone, click the link on the ICT Wizard to
open the Date And Time dialog box shown in Figure 10. After you’ve set your
server’s clock and time zone, click Apply and then click OK to
return to the ICT Wizard.
|
Windows Server 2008 R2 lets you configure two additional
clocks as part of the Date And Time dialog box. If you configure
additional clocks, the times in those time zones will be visible
when you pause the mouse cursor on the clock.
If you regularly work with folks in another time zone, you eventually get used to the time
difference and don’t need additional clocks on your server. And,
after all, you shouldn’t be sitting at the server console in
most cases anyway. But we still find it handy, and because we
work with folks in Europe and Australia fairly often, we turn on
two additional clocks: one set to Greenwich Mean Time (GMT), and
the other set to GMT+10 hours, for Sydney, Australia. This
ensures that when we call at a totally unreasonable hour, we
have absolutely no excuse.
|
2.2.3. Configuring Networking
Next on the list is configuring your networking. By default,
your new server has enabled both IPv4 and IPv6, and with the DHCP
server running on the main SBS 2011 server, you should have
automatically assigned IP addresses. For servers, we highly
recommend that at least the IPv4 address be a fixed address. In
most scenarios, the IPv6 address can be a stateless
autoconfiguration address.
Note:
If no DHCP server is available, the server will have a
link-local address—an autoconfiguration IP address that is
unique on the network but won’t be forwarded by routers to
another network. These IP addresses begin with 169.254. If your
second server has an IP address in this range, check for
problems with the physical network connecting the second server
to the SBS server, or for problems with the DHCP Server service
on the main SBS 2011 server.
To configure the networking and set a fixed IP address for
the server, follow these steps:
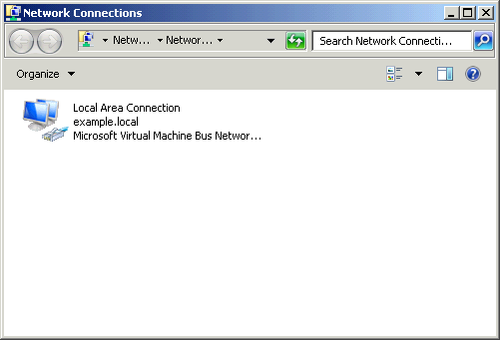
Click Configure Networking in the Initial Configuration
Tasks window to open the Network Connections Control Panel
application shown in Figure 11.
Right-click the connection you want to configure and
select Properties from the shortcut menu to open the Local
Area Connection Properties dialog box, shown in Figure 12.
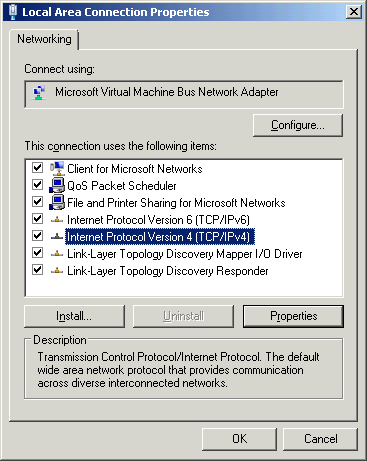
Select Internet Protocol Version 4 (TCP/IPv4), and click
Properties.
Select Use The Following IP Address, as shown in Figure 13.
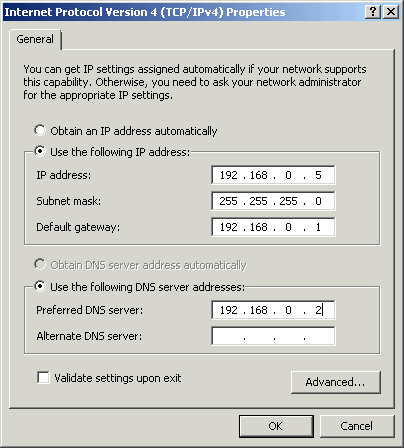
Enter an IP address, a subnet mask, and a default
gateway appropriate to your network. This should be in the
range excluded from the SBS 2011 DHCP server range.
Note:
By default, the SBS server will be at 192.168.nnn.2,
where nnn is the subnet used by your
Internet router. On our network this is 0, so we’ve assigned
192.168.0.5 as the IP address for our second server. Your subnet will likely be
different.
Specify the Preferred DNS Server for your network. This
will be the IP address of the primary SBS 2011 server.
Click OK to close the Internet Protocol Version 4
(TCP/IP) Properties dialog box, and then click Close to
complete the configuration of the connection.
Close the Network Connections window by clicking in the
upper right corner of the window to return to the ICT Wizard
page.