The ldifde
command works on line-delimited, or line-separated values within files.
You can use it to import or export data into or out of Active Directory
(AD). You execute these commands on a domain controller (while logged
on with an account with administrative permissions).
Tip
The L in ldifde
represents the Lightweight Directory Access Protocol, and dif
represents data interchange format. The last two letters (de) represent
directory exchange.
The following table shows some common switches used with ldifde.
| ldifde Switch | Comments |
|---|
| -i | Import mode. If not included, the default mode is export. |
| -k | Ignores
errors. Enables the operation to continue even if there are errors. The
lines with errors are not processed, but other lines are as long as
they aren’t dependent on the line that had an error. If omitted, the
operation stops at the first error and none of the lines are processed. |
| -f filename | Filename. Identifies the name of the file to use for the import or export operation. |
| -b user domain password | Specifies
the username, domain, and password of the account to run the operation.
If not specified, the command runs under the context of the currently
logged-on user. If the user has appropriate permissions, this switch is
not needed. |
| -j path | Specifies the path for a log file.
Note
This is not the actual filename but instead just the path. The error log is named ldif.err and can be opened with Notepad.
|
| -v | Enable verbose mode. This provides the most words in the output and is useful when troubleshooting problems with the command. |
Use the following command to export all the accounts from the domain into a file named export.txt:
Tip
You can learn a lot about the different attributes used with ldifde by browsing through the export.txt file created from this command.
When importing accounts, you need a file that
includes the accounts in a line-delimited format. Each line identifies
specific attributes of an account, and the formatting of this file is
critical. The following table shows some of the elements you can add to
the file.
| Input File Attributes | Comments |
|---|
| # comments | You can add comments with a hash mark. The ldifde command ignores comments. |
| dn: dn | The distinguished name (dn) attribute identifies the account name and location using a distinguished name. |
changetype: {add | modify |
delete}
| This identifies whether you’ll be adding, modifying, or deleting accounts. |
objectclass: {user | computer
| organizationalunit}
| You can create users, computers, organizational units, and more by identifying them in the objectclass attribute. |
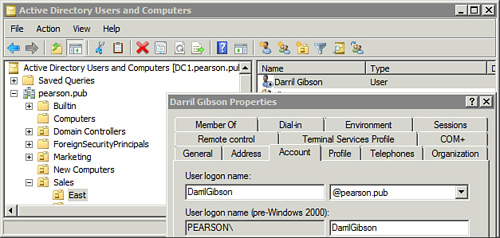
| samaccountname: name | The SAM account name shows the account in the legacy (pre-Windows 2000) name format. Figure 1 shows the SAM account name for a user in the text box to the right of the text box labeled PEARSON\.
Note
The SAM account name is sometimes listed as domain-name\account-name; however, you need only the account name for the ldifde file.
|
| userprincipalname: upn | The user principal name (upn) looks like an email address. It’s created by combining the user logon name with a suffix that identifies the domain. In Figure 1, the UPN is [email protected]. |
| displayname: name | This is the name listed in the General tab of the account properties in the Display Name text box. In Figure 1, it is Darril Gibson (with a space) in the Sales\East OU.
Note
This is not the name displayed in the Active Directory Users and
Computers (ADUC) console. That name is derived from the common name
(CN) attribute in the DN.
|
| givenname: firstname | The first name is identified as given name. |
| sn: lastname | The last name is identified as sn. |
useraccountcontrol: {512 |
514}
| You can specify that the account is enabled (512) or disabled (514) with the useraccountcontrol attribute.
Tip If
you don’t specify the password, or if the password doesn’t meet the
complexity requirements, the command will fail unless you use 514 to disable the user.
|
As an example, you can use the following data in a file named ldou.txt:
#create an OU
dn: ou=test,dc=pearson,dc=pub
changetype: add
objectclass: organizationalunit
You can then use the following command to create the Organizational Unit (OU) in the domain:
ldifde -i -f lduser.txt -v -j c:\de
The command specifies that it is an import (-i), from the file named ldou.txt (-f lduser.txt), with a verbose output (-v), and sends error to a log file in the c:\de folder (-j c:\de).
You can delete the OU by using the following data in a file named lddel.txt. Notice that the only difference is that the changetype is delete instead of add, and you don’t need to specify the objectclass.
#create an OU
dn: ou=test,dc=pearson,dc=pub
changetype: delete
The following command deletes the OU:
ldifde -i -f lddel.txt -v -j c:\de
As another example, you can use the following data in a file named lduser.txt to create a user:
#Create a user
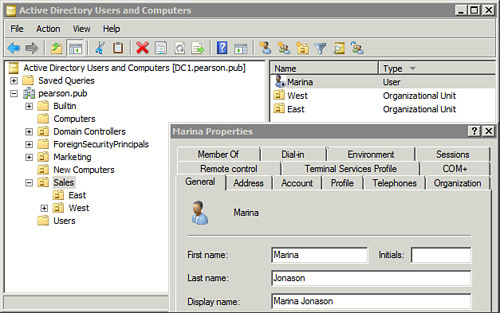
dn: cn=Marina,ou=sales,dc=pearson, dc=pub
changetype: add
objectclass: user
samaccountname: Marina
userprincipalname: [email protected]
displayname: Marina Jonason
givenname: Marina
sn: Jonason
useraccountcontrol: 514
You can then execute the following command to add the user to the domain:
ldifde -i -f lduser.txt -v -j c:\de
The command specifies that it is an import, from the
file named lduser.txt, with a verbose output, and logs errors to a file
in the c:\de folder.
Figure 2 shows the account created in ADUC.