Some of the most frequently used tools to
manage your system can be accessed from the System Tools folder in the
Start menu. To open the System Tools folder, click Start, All Programs,
Accessories, System Tools.
Character Map
Character
Map is a utility program that lets you examine every character in a
given font and choose and easily insert into your documents special
characters, such as trademark (™ and ®) and copyright symbols (©),
currency symbols (such as ¥) and accented letters, nonalphabetic
symbols (such as fractions, ¾), DOS line-drawing characters (+), items
from specialized fonts such as Symbol and Wingdings, or the common
arrow symbols (←, →, ↑, and ↓). Some fonts include characters not
mapped to the keyboard. Character Map lets you choose them, too, from
its graphical display. The Program Map displays Unicode, DOS, and
Windows fonts’ characters.
By clicking the
Advanced View check box, you can also choose the character set,
rearrange the items in a font (such as grouping all currency types
together) to eliminate hunting, and search for a given character.
Character
Map works through the Windows Clipboard. You simply choose a character
you want to use and click Copy, and it moves onto the Clipboard. Switch
to your destination application (typically, a word processing file),
position the cursor, and choose Paste.
Using Character Map
To run Character Map, follow these steps:
1. | Choose Start, All Programs, Accessories, System Tools, Character Map.
|
2. | Choose the font you want to work with from the Font list.
|
3. | By
default, the Character Set is Unicode. This means all the characters
necessary for most of the world’s languages are displayed. To narrow
down the selection, click the Advanced View check box and choose a
language from the Character Set drop-down list.
|
4. | To
examine an individual character, click a character box, and hold down
the mouse button to magnify it. You can accomplish the same thing with
the keyboard by moving to the character using the arrow keys.
|
5. | Double-click
a character to select it, transferring it to the Characters to Copy
box. Alternatively, after you’ve highlighted a character, you can click
the Select button or press Alt+S to place it in the Characters to Copy
box. You can keep adding characters to the Characters to Copy box if
you want to paste several into your document at once.
|
6. | Click the Copy button to place everything from the Characters to Copy box onto the Windows Clipboard.
|
7. | Switch
to your destination application, and use the Paste command (typically
on the application’s Edit menu) to insert the characters into your
document. In some cases, you might then have to select the inserted
characters and format them in the correct font, or the characters won’t
appear as you expected. You can, of course, change the size and style
as you want.
|
Tip
If
you know the Unicode number of the item to which you want to jump, type
it into the Go to Unicode field. The display scrolls as necessary, and
the desired character is then highlighted, ready for copying. |
Choosing from a Unicode Subrange
A
useful feature of Character Map lets you choose a Unicode subrange.
Unicode was designed intelligently with characters grouped in sets. You
can choose a subset of a font’s characters to help you locate a
specific symbol. To check out this feature, open the Group By drop-down
list and choose Unicode Subrange. When you choose this option, a box
like the one shown in Figure 1 pops up.
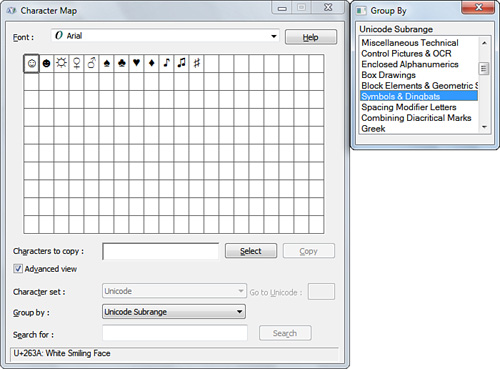
Click
the subgroup that you think will contain the character you’re looking
for. Good examples are currency or arrows. Make sure to open the Group
By list again and choose All when you want to see all the characters
again.
Entering Alternative Characters from the Keyboard
At the bottom right side of the Character Map dialog box is a line that reads Keystroke.
For
nonkeyboard keys (typically, in English, anything past the ~
character), clicking a character reveals a code on this line—for
example, Alt+1060. This line tells you the code you can enter from the
keyboard to quickly pop this character into a document. Of course, you
must be using the font in question. For example, say you want to enter
the registered trademark symbol (®) into a Windows application
document. Note that with a standard text font such as Arial or Times
New Roman selected in Character Map, the program lists the keystrokes
for this symbol as Alt+0174. Here’s how to enter the character from the
keyboard:
1. | Press Num Lock to turn on the numeric keypad on your keyboard. (The Num Lock light should be on.)
|
2. | Press and hold down Alt, and type the 0, 1, 7, and 4
keys individually, in succession, on the number pad. (You must use the
number pad keys, not the standard number keys. On a laptop, you must
activate the number pad using whatever special function key arrangement
your laptop uses.) When you release the Alt key, the registered
trademark symbol should appear in the document.
|
Tip
Not
all programs accept input this way. If this approach doesn’t work with
a program, you’ll have to resort to the standard means of putting
characters into the Clipboard explained previously. |
Are characters pasted from the Character Map appearing in the wrong font? When
you paste a character from Character Map, the application you are
pasting the character into might not recognize that the character is
coming from a different font. In such cases, the character is mapped to
the equivalent character in the current font. For example, if you
copied the Pencil (0×21) character from the Wingdings OpenType font but
pasted it into a program that uses the Nyala font by default, such as
Windows 7 Paint, the character would change into the equivalent
character in the other font (in Nyala’s case, an exclamation mark). To
fix this problem, select the characters you pasted from Character Map
and select the correct font in the Font menu of the destination program. |
|
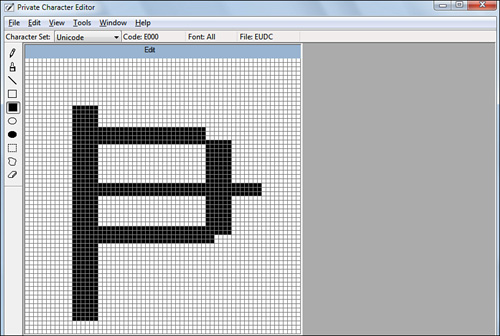
Private Character Editor
If you can’t find a character, the new Private Character Editor (see Figure 2) enables you to create one, assign it to selected or all fonts, and access it through Character Map.
System Information
System
Information is a simple but elegant tool. Opening this tool displays
detailed information about your system, its hardware resources,
components, and software environment. It brings together information
that’s normally scattered across the main System dialog box, the Device
Manager, and a myriad of other places.
To
start System Information, launch it from the Tools tab of System
Configuration, or enter msinfo32 in the Start button’s Search menu.
Use
System Information to help you determine the best configuration for a
legacy device, track down software problems, or determine the
components in an unfamiliar system.
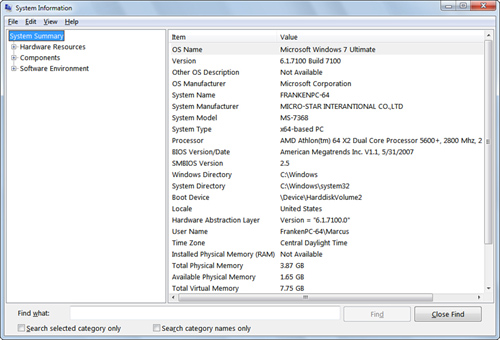
The
top level, labeled System Summary, shows you basic information about
your computer, OS revision number, CPU, RAM, virtual memory, page file
size, BIOS revision, and so on (see Figure 3).
Three nodes appear in the left pane of System Information:
Hardware Resources—
Displays hardware-specific settings, such as DMA, IRQs, I/O addresses,
and memory addresses. The Conflicts/Sharing node identifies devices
that are sharing resources or are in conflict. The Forced Hardware node
indicates devices that are manually configured to share settings. This
information can help you identify problems with a device.
Components—
Provides a truly powerful view of all the major devices in your system.
Open any subfolder and click an item. In a few seconds, information
pertaining to the item is displayed, such as drive IDs, modem settings,
and video display settings. In some cases, you can also see driver
details. Check the folder called Problem Devices to see a list of all
devices not loading or initializing properly.
Tip
Ever
wonder why some darned program starts up when you boot, even though
it’s not in your Start Menu’s Startup folder? It’s probably hiding
somewhere else. To find it, open System Information, travel down the
path from System Summary, Software Environment, Startup Programs, and
take a look. I found Adobe Photo Downloader, iTunes Helper, and Picasa
Media Detector there (to name just three). To disable unwanted programs
from running at startup, see the documentation for the programs, or use
the MSConfig System Configuration Utility’s Startup tab to disable or
enable startup items. Before you disable a startup program, though,
make sure you really don’t need it. To learn more about startup
programs, see the database of startup programs at www.pacs-portal.co.uk/. |
Software Environment—
Acts like a super Task Manager. It displays details of 12 categories of
software settings. You can see the system drivers, certified drivers,
environmental variables, print jobs, network connections, running
tasks, loaded modules, services, program groups, startup programs, OLE
registration, and Windows error reporting.