4. Working with Permissions
A site’s permissions specify what a user or group
can access on the site and what actions a user or group can perform on
the site’s content and other items that are part of the site (such as
users and even permissions themselves). As a site administrator, you
can alter permissions in two ways: You can change the permission level
assigned to a user or group, and you can create custom permission
levels. The next two sections provide the details.
Changing the Permission Level of a User or Group
Here are the steps to follow to change the current permission level that has been assigned to one or more users or groups:
1. | Log on to the top-level SharePoint as an administrator.
|
2. | If you want to work with a group in a subsite, navigate to that subsite.
|
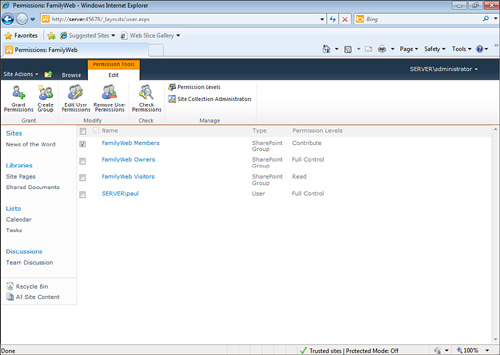
3. | Select
Site Actions, Site Permissions. SharePoint displays the site’s
Permission Tools page, which lists the defined groups as well as any
user who has been assigned a specific permission level (such as Full
Control or Design) instead of a group permission level; see Figure 5.
|
4. | Activate
the check box beside each group or user you want to work with.
SharePoint displays the Edit Permissions page for the group or user.
|
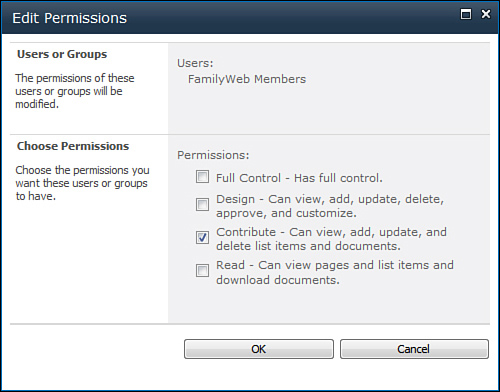
5. | In
the Ribbon, click Edit User Permissions. SharePoint displays the Edit
Permissions dialog box for the group or user, as shown in Figure 6.
|
6. | Activate the check box beside each permission level you want to apply to the group or user.
|
7. | Click OK.
|
Creating a Custom Permission Level
SharePoint’s predefined permission levels—Full
Control, Design, Contribute, and Read—should satisfy most of your
needs. However, if none of these levels gives you exactly the
permissions you want, you can create your own level. The following
steps show you how it’s done:
Note
SharePoint actually defines a fifth permission level
called Limited Access. This level is used to give users permission to
view specific lists, libraries, and other content.
1. | Log on to the top-level SharePoint site as an administrator.
|
2. | If you want to work with permissions in a subsite, navigate to that subsite.
|
3. | Select Site Actions, Site Permissions to display the Permission Tools page.
|
4. | In the Ribbon, click Permission Levels to open the Permission Levels page.
|
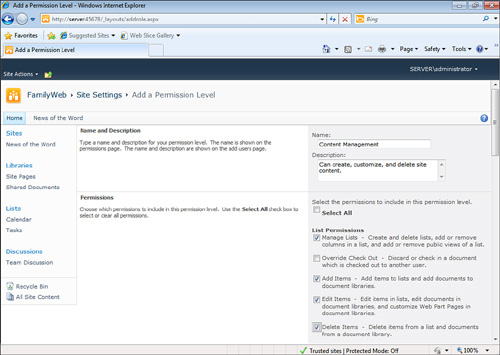
5. | Click Add a Permission Level.
|
6. | Type a name and description for the new permission level.
|
7. | Activate the check box beside each type of permission you want to apply to this level, as shown in Figure 7.
|
8. | Click Create.
|
5. Deleting a Site
If you have a site that you no longer use, you
should delete it to save disk space and, in the case of subsites,
reduce clutter on the top link bar and Quick Launch. Follow these steps:
1. | Log on to the top-level SharePoint site as an administrator.
|
2. | If you want to delete a subsite, navigate to that subsite.
|
3. | Select Site Actions, Site Settings.
|
4. | Under Site Actions, click the Delete This Site link.
|
5. | In the Delete This Site page, click Delete. SharePoint asks you to confirm.
|
6. | Click OK. SharePoint deletes the site. |