2. Working with Users
Unlike a typical website where any user can browse
anything on the site, a SharePoint site is restricted to just those
Windows Home Server users who have been granted access to the site. So,
it’s important not only that you grant access to the appropriate users
but that you apply the appropriate permissions to those users. You learned earlier how to add users to a top-level SharePoint site. You use the same technique to add users to a subsite, except that you navigate to the subsite before adding the users.
However, SharePoint has user-related features behind
basic site access. You can record user information such as the person’s
real name, picture, and email address. You can use the email address to
send a message to a user, and more. The next few sections take you
through some of these features.
Editing User Information
When you add a user to a SharePoint site, the only
bit of information you supply is the user’s account name. However,
SharePoint can record quite a bit more data for each user, as the
following steps show:
1. | Log on to the top-level SharePoint as an administrator.
|
2. | If you want to work with a user in a subsite, navigate to that subsite.
|
3. | Select Site Actions, Site Settings.
|
4. | Click the People and Groups link.
|
5. | In the Quick Launch Groups header, click the group that contains the user.
|
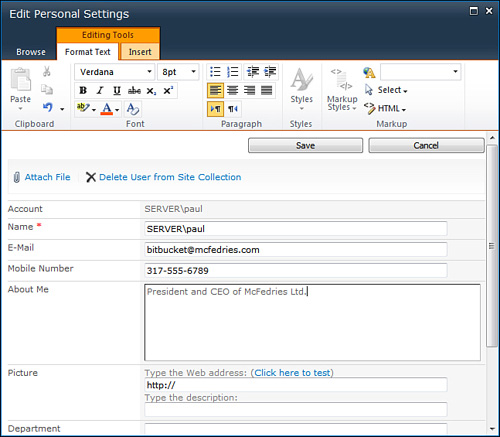
6. | Click the name of the user you want to edit.
|
7. | Click Edit Item. SharePoint displays the Edit Personal Settings page, shown in Figure 3.
|
8. | Add or edit the data in the editable fields.
|
9. | Click Save.
|
Tip
You’re not restricted to just the fields (or columns,
as SharePoint calls them) that you see in the User Information page.
You can add your own custom columns to record data such as birthdays,
MySpace or Facebook addresses, and cell phone numbers. Log on to the
top-level SharePoint as an administrator, and then select Site Actions,
Site Settings, People and Groups. In any group list, select Settings,
List Settings to open the List Settings page, and then click the Create
Column link. Type the Column Name and select a data type (such as
Single Line of Text, Number, or Date and Time). Fill in the other
settings, as necessary (these vary depending on the data type you
selected), and then click OK.
Sending an Email to Users
In the previous section, you saw that SharePoint
includes an E-Mail field in the user information. If you fill in that
field for one or more users, you can send an email message to some or
all of those users.
Note
I’m assuming here that you’re accessing the site
using a home computer that has an email client installed; this won’t
work on the Windows Home Server box because, by default, it doesn’t
come with an email client.
Here are the steps to follow:
1. | Log on to the top-level SharePoint as an administrator.
|
2. | If you want to work with a user in a subsite, navigate to that subsite.
|
3. | Select Site Actions, Site Settings.
|
4. | Click the People and Groups link.
|
5. | In the Quick Launch Groups header, click the group that contains the user.
|
6. | Activate the check box beside each user to whom you want to send the message.
|
7. | Select Actions, E-Mail Users.
|
8. | If you see the Internet Explorer Security dialog box, click Allow.
|
9. | In the message window that appears, fill in the usual message information (subject, body, and so on), and then send the message.
|
Deleting a User from a SharePoint Group
If
you’ve added a user to a SharePoint site, you may decide that you no
longer want that person to access the site. In that case, you need to
remove the user from whatever SharePoint group to which you assigned
the user originally. Similarly, if you want to move a user to another
group, you need to first remove the user from the existing group and
then add him to the other group.
In either case, here are the steps required to remove a user from a SharePoint group:
1. | Log on to the top-level SharePoint as an administrator.
|
2. | If you want to work with a user in a subsite, navigate to that subsite.
|
3. | Select Site Actions, Site Settings.
|
4. | Click the People and Groups link.
|
5. | In the Quick Launch Groups header, click the group that contains the user.
|
6. | Activate the check box beside each user you want to remove from the group.
|
7. | Select Actions, Remove Users from Group. SharePoint asks you to confirm.
|
8. | Click OK.
|