Windows SharePoint Foundation 2010 gives
you a tremendous number of settings that you can use to configure
almost any aspect of a site. Space limitations prevent me from
discussing all 30 or so settings, but the next few sections take you
through some of the most useful tweaks you can make to a site.
Customizing a Site
The look and feel of a SharePoint site is governed
by settings that control the title, the description, the visual theme,
the top link bar and Quick Launch, and more. Follow these steps to
adjust some or all of these settings:
1. | Log
on to the top-level SharePoint site as the primary or secondary site
administrator, or use an account in the site’s Owners group.
Note
Logging
on as a site administrator or owner is ideal because it gives you
access to the full range of customization settings. However, there are
also a few aspects of a site that you can customize if you log on as a
user with Design permissions (as noted in step 4, which follows).
|
2. | If you want to customize a subsite, navigate to that site.
|
3. | Click Site Actions, and then click Site Settings. Figure 1 shows the Site Settings page that appears for a top-level site administrator.

|
4. | Use the links in the Look and Feel section to customize the site.
|
The next few sections describe what you can do with each link.
Editing a Site’s Title and Description
You specified the site’s title and description when
you first set up the site, but you’re not stuck with the original
values if you’re tired of them or you feel they no longer reflect the
site’s content. Follow these steps:
1. | In the Site Settings page, click the Title, Description, and Icon link.
|
2. | Use the Title text box to edit the site title.
|
3. | Use the Description text box to edit the site description.
|
4. | Click OK to put the new settings into effect.
|
Displaying a Custom Site Icon
When you navigate to a site, you see an icon for the
site to the left of the site title. This icon is the same for all
sites, so you can inject some individuality into a site by specifying a
custom icon. The image file (smaller images are better) can reside in a
local folder, a shared network folder, or on a website. Here are the
steps to follow:
1. | In the Site Settings page, click the Title, Description, and Icon link.
|
2. | In
the Logo URL and Description section, use the URL text box to enter the
address of the image file you want to use as the site’s icon. Enter a
local pathname, a UNC (Universal Naming Convention) pathname, or a web
URL.
Tip
After you enter the image address, click the Click
Here to Test link to open the image in a browser window. If you see the
image, you know your address is accurate.
|
3. | Use
the Enter a Description text box to type text that describes the image.
This text appears when a user points at the image, displays the site
with image display turned off in his browser, or views the site using a
screen-reading device.
|
4. | Click OK to put the new settings into effect.
|
Changing a Subsite’s Folder
If the name you originally supplied for a subsite’s
folder is no longer relevant or is too long, you can change it to
something more suitable or shorter. Follow these steps:
1. | In the Site Settings page for the subsite, click the Title, Description, and Icon link.
|
2. | Use the URL Name text box to enter the new folder name you want to use.
|
3. | Click OK to put the new settings into effect.
|
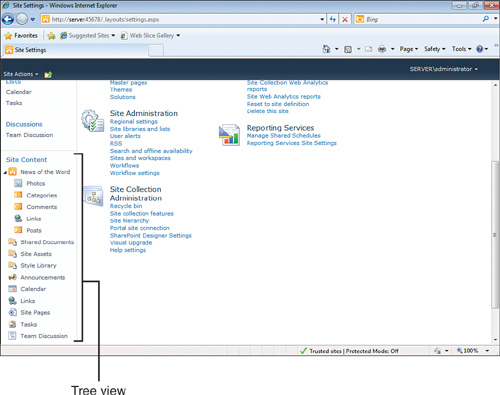
Adding a Tree View
A tree view is a
method of displaying items that have a hierarchical relationship. The
topmost item acts as the “trunk” of the tree, second-level items are
the main branches, third-level items are subbranches, and so on. For
example, the Folders list in Windows Explorer is a tree view, with a
drive’s root folder as the trunk, the root’s folders as the branches,
and so on.
Note
Some SharePoint sites (such as a blog) don’t have hierarchical content by default, so adding the tree view won’t do anything.
Here are the steps to follow to add a tree view control to your site:
1. | In the Site Settings page, click the Tree View link.
|
2. | Activate the Enable Tree View check box.
|
3. | Click OK to put the new setting into effect.
|
Click the site’s home page to see the tree view. Figure 2 shows a top-level site with a tree view added to the left side of the page.
Changing the Site Theme
The overall look of a site is determined by the site theme, which governs the following visual factors in the site’s design:
The color of the regular page text
The color of the page headings
The color of the links
The background color of the page
The background color of the top link bar
The color of the Quick Launch headings
The background color of the entire Quick Launch
SharePoint defines 20 themes to offer a variety of looks for your site. Here are the steps to follow to select a new theme:
1. | In the Site Settings page, click the Site Theme link.
Note
The Site Theme link is available to group members who have at least Design permission.
|
2. | Click the theme you want to use. (The Preview section gives you an idea what the theme looks like.)
|
3. | Click OK to apply the theme to the site.
|
Adding Links to the Top Link Bar
As you know, the top link bar displays the Home tab,
which represents the top-level SharePoint site, as well as tabs for
each subsite. However, you can also add your own links to the top link
bar. This is convenient because the top link bar is visible from any
page in any SharePoint site, so you can put your favorite sites a mere
mouse click away.
Here are the steps to follow to add a link to the top link bar:
1. | In the Site Settings page, click the Top Link Bar link to open the Top Link Bar page.
Note
The Top Link Bar link is available to group members who have at least Design permission.
|
2. | Click New Navigation Link.
|
3. | Use
the Type the Web Address text box to enter the URL of the site. If
you’d rather see text instead of the URL in the top link bar, enter a
name or short description in the Type the Description box.
|
4. | Click OK to return to the Top Link Bar page.
|
5. | Repeat steps 2 through 4 to add more links.
|
6. | If
you want to modify the order in which the links appear, click Change
Order, specify the order for each link, and then click OK.
|
7. | Click OK to put the new settings into effect.
|
Note
To
remove a link from the top link bar, open the Site Settings page and
click the Top Link Bar link. Click the Edit icon that appears beside
the link you want to remove, click Delete, and then click OK when
SharePoint asks you to confirm.
Customizing Quick Launch
Quick Launch is a useful area that gives you quick
access to the main areas of a SharePoint site. However, you can make
Quick Launch even more useful by deleting links and sections you never
use, reordering the headings and links, and adding your own headings
and links. Follow these steps:
1. | In the Site Settings page, click the Quick Launch link.
Note
The Quick Launch link is available to group members who have at least Design permission.
|
2. | Use one or more of the following techniques to customize Quick Launch:
To delete a link, click the Edit icon to the left of the link, click Delete, and then click OK. To delete a heading (and all its links), click the Edit icon to the left of the heading, click Delete, and then click OK. To
change the order of the headings, click Change Order, use the numerical
lists beside each heading to set the order, and then click OK. To
change the order in which the links appear within a particular heading,
click Change Order, use the numerical lists beside each link to set the
order, and then click OK. To create a
new heading, click New Heading, type the address that you want the
heading to link to and the heading description (this is the name that
appears in Quick Launch), and then click OK. To
add your own links to a heading, click New Navigation Link, type the
address of the link and the link description (this is the link text
that appears in Quick Launch), choose the heading under which you want
the link to appear, and then click OK.
|
3. | Click OK. |