With your SharePoint top-level site in
place, you’re ready to start using it for sharing, collaborating, and
any other tasks you can think of. Before going further, however, you
need to decide whether you want a single SharePoint site or multiple
sites. SharePoint actually gives you three options:
Single top-level site—
This option means that you add all your content to the top-level site
that you just created. Use this setup if your collaboration
requirements are fairly basic. With a single site, you can add content
such as a calendar, picture library, discussion board, lists for
contacts, announcements, links, web pages, and more. In this case, you usually access your
SharePoint site using an address of the form http://server:port/, where server is your Windows Home Server computer name and port is the TCP port associated with the SharePoint web application. An example is http://server:45678/. Multiple top-level sites—
This option means that you create two or more top-level sites, each of
which contains different content. Use multiple top-level sites if your
collaboration needs are more complex. For example, you might want to
create one site for the whole family, separate sites for each of the
kids, and another site for your home business. In this case, you access
the other top-level sites using an address of the form http://server:port/sites/folder/, where server is your Windows Home Server computer name, port is the TCP port associated with the SharePoint web application, and folder is the folder used by the top-level site. An example is http://server:45678/sites/katysblog/. Single top-level site with subsites—
This option means that you augment the top-level site that you just
created with one or more secondary SharePoint sites. Again, this is
useful for more elaborate collaboration needs, but navigating between
the sites is easier (which I’ll explain in a moment). In this case, you
access the subsites using an address of the form http://server:port/folder/, where server is your Windows Home Server computer name, port is the TCP port associated with the SharePoint web application, and folder is the folder the subsite uses. An example is http://server:45678/wedding/.
When you use a single top-level site with
subsites, SharePoint gives you the option of adding links to the
subsites in various navigation aids that are part of the top-level
site. A good example is the SharePoint Central Administration site. Examine the tabs near the top of the page.
The Home tab represents the top-level Central Administration site,
whereas the Operations and Application Management tabs represent
subsites within the top-level site. Links to these subsites also appear
in Quick Launch, which is on the left side of the home page.
Adding a Top-Level Site
Here are the steps to follow to add another top-level site to your SharePoint web application:
1. | Select Start, All Programs, Microsoft SharePoint 2010 Products, SharePoint 2010 Central Administration.
| 2. | Under Application Management, click the Create Site Collections link to display the Create Site Collection page.
| 3. | When you specify the site URL, you must use the sites folder and specify a subfolder for your site. (Again, you can also click Defined Managed Paths to create a folder other than sites.) |
Adding a Subsite
If you prefer to use a single top-level SharePoint site, follow these steps to add a subsite:
1. | Log on to the top-level SharePoint site using the primary (or secondary) site collection administration account.
| 2. | Click Site Actions and then New Site to display the New SharePoint Site page, shown in Figure 1.
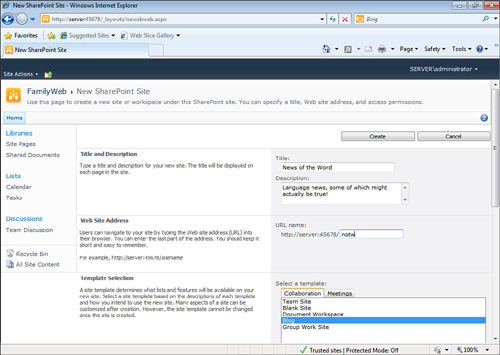
| 3. | Enter the site title and description.
| 4. | In
the Web Site Address section, use the URL Name text box to type the
name of the folder you want to use to hold the site’s contents. If the
name consists of two or more words, separate each word with an
underscore (_) instead of a space.
| 5. | Use the Template Selection section to select the template you want to use as a starting point for the site.
| 6. | In the Permissions section (see Figure 2), select a User Permissions option:
- Use Same Permissions as Parent Site— Select this option to configure the subsite with the same permissions that are configured on the top-level site.
- Use Unique Permissions— Select this option to configure the secondary site with its own permissions.
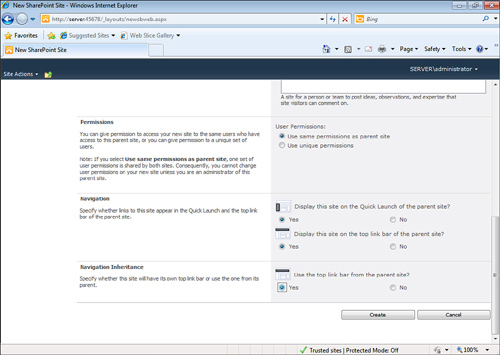
| 7. | In
the Navigation section, click Yes or No to specify whether you want a
link to the subsite to appear in the top-level site’s Quick Launch and
top link bar.
| 8. | In
the Navigation Inheritance section, click Yes or No to specify whether
you want the top-level site’s top link bar to remain onscreen when you
navigate to the subsite.
| 9. | Click Create to create the subsite.
| 10. | If you selected the Use Unique Permissions option, you see the Set Up Groups for This Site page. Click OK when you’re done.
|
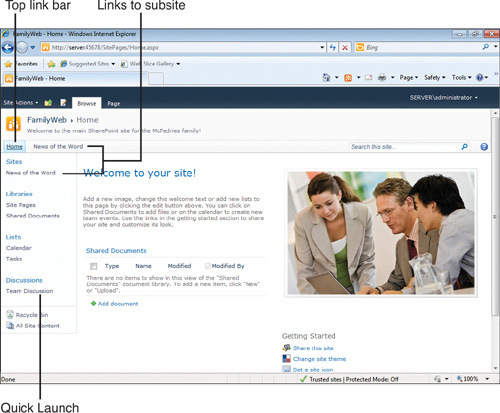
Figure 3
shows a top-level site with a subsite added. Note the extra tab in the
links bar and the link to the subsite in Quick Launch’s Sites section.
|