If you’ve installed your operating system
without first enabling AHCI (Advanced Host Controller Interface) mode, then
your HDD or SSD may not be performing as quickly as it could. In the past,
we’ve noted that SSDs will not perform as well when the SATA controller is set
to run in IDE (Integrated Drive Electronics) mode, and switching to AHCI in the
BIOS after installation won’t do the trick. In this article, we’ll show you how
to revert to AHCI mode post install. Bur first we’ll explain what makes AHCI so
effective in modern computers.
Why AHCI?
When you connect an SSD or HDD to a SATA
port on your motherboard, your BIOS determines how the SATA controller
interfaces with the drive, either in IDE or AHCI mode. IDE mode is designed for
use with legacy operating systems. If you’ve installed a newer operating system
lately, such as Windows Vista/7/8, newer mainstream Linux kernels, or FreeBSD
8.0 and newer, then AHCI is your only real choice. That’s because AHCI lets
your SATA device support hot swapping (removing auxiliary SATA-based devices
without shutting the system down first) and NCQ (Native Command Queuing).
When
you connect an SSD or HDD to a SATA port on your motherboard, your BIOS
determines how the SATA controller interfaces with the drive, either in IDE or
AHCI mode
It’s this latter feature that makes it the
obvious choice for modern systems, though NCQ means different things for HDDs
and SSDs. In mechanical hard drives,
NCQ refers to the scheme whereby the drive
can reorder the pending read/write commands to better suit how the requested
data is arranged on the platters. Because it takes longer for the platter to
make a single revolution than it does for the actuator arm to skip across the
surface of the platter, NCQ lets the hard drive execute multiple read and write
commands based on a more latency-aware sequence as opposed to just performing
them in the order in which they are received. This effectively decreases the
number of revolutions necessary to perform the commands. NCQ in SSDs, on the
other hand, lets them offset host latency by queuing commands and using
pipelines to process commands concurrently. NCQ on SSDs requires device-level
support; drives lacking this support (often older models) can’t utilize the feature
regardless of a system’s BIOS and Registry settings.
Device
Manager can give you a clue as to the status of your SATA controller.
Solving The IDE/AHCI Conundrum
Now that you understand why you need your
storage running in AHCI mode, you may be wondering why anyone would use IDE
mode given the option. Sadly, some motherboards don’t enable AHCI by default,
and as a result their users sometimes unknowingly install their operating
system on a hard drive or SSD in IDE mode. Sometimes users encounter errors
where their storage devices don’t show up as install locations when AHCI is
enabled in the
BIOS, forcing them to install using IDE
mode. Some systems, typically older, require specific drivers to install
AHCI-based storage devices, but locating those drivers can be a pain.
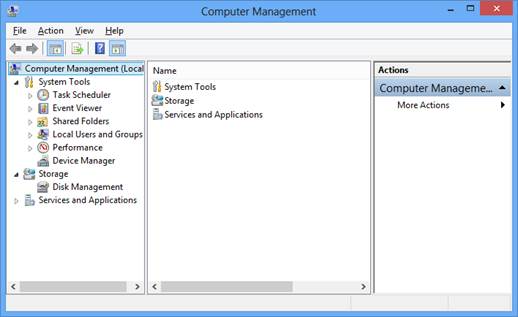
To determine if you’re currency running
your storage devices in IDE mode in Win7, right-click Computer, click Manage,
and then click Device Manager. In Win8, press
Windows Key-X and then click Computer
Management. Next, click Device Manager in the left pane and then click to
expand the IDE ATA/ATAPI Controllers item in the device tree. If AHCl is
enabled properly, you should see Standard SATA AHCI Controller, or something
else that mentions AHCI in the name. If not, then either your system doesn’t
support the feature or it does and it is just not currency enabled. If your
system is in the latter category, this tutorial is for you.
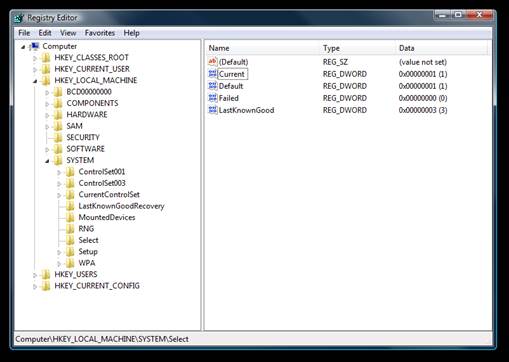
Change
the number in the Value Data field, but leave everything else alone.
Enable AHCI Mode After The Fact
Making this change involves editing the
Windows Registry. To do it properly, you’ll first want to make a backup of your
Registry file and keep it handy. To do this, go to the Win8 Start screen and
type regedit, and then press ENTER. To launch the Registry Editor in Win7,
click Start, type regedit, and then press the ENTER key. In the Windows
Registry Editor, click File, Export, and then choose a location for the backup,
name the file, and click Save. Even though you have a backup, make sure to
follow the instructions closely to avoid rendering your system unbootable.
The path varies depending on your operating
system. If you need to make the change in Windows 7, launch the Registry Editor
and navigate to HKEY_ LOCAL_MACHINE\SYSTEM\ CurrentControlSet\Services\Msahci
in the left pane. To make the changes in Win8, head to HKEY_
LOCAL_MACHINE\SYSTEM\ CurrentControlSet\Services\Storahci. The Msahci (Win7)
and Storahci (Win8) folders are where we’ll be making our Registry edits.
In Win7, double-click the Start binary
value in the Msahci folder and change the number in the Value Data field to 0.
In Win8, double-click the Start binary value in the Storahci folder and change
the number in the Value Data field to 0. If you have a StartOverride entry in
the Storahci folder, double-click it and change the Value Data to 0 (this entry
did not show up on our test system).
Win8 users may also need to make sure the
AHCI drivers for the SATA controller in question are currency installed.
Consult your motherboard manufacturer’s website to download the appropriate
drivers. The ASUS P9X79 DELUXE in our test system had three SATA drivers. We
had to download the files and cross-reference the names of the drivers against
the list of Services in the Registry, installing any that didn’t appear. Once
the drivers are installed, go to
HKEY_LOCAL_MACHINE\SYSTEM\CurrentControlSet\Services\(DriverName), where
DriverName refers to the name of the specific driver. Then double-click the
StartOverride entry and change the Value Data to 0. Repeat this for all SATA
AHCI driver entries to make sure your bases are covered. Note, if your PC
reboots during the driver installation process, you’ll need to repeat these
Registry edits.
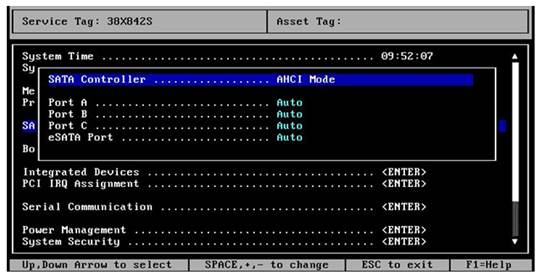
Once complete, restart your PC and enter
the BIOS, typically by pressing the DELETE or FI key during the boot sequence.
Enable AHCI in your system BIOS, typically in the IDE or SATA Configuration
submenu, then save changes and restart the PC. When your computer boots, it
will be working in AHCI mode. If the correct AHCI driver isn’t already
installed, there’s a chance it’ll install as the system boots.